

Security patch for api-gatewayLucidworks will apply a security patch to your Lucidworks Search instance to address critical Netty request smuggling vulnerabilities (CVE-2026-42581, CVE-2026-42585, CVE-2026-42587) in the
api-gateway service.
No action is required on your part.Key highlights
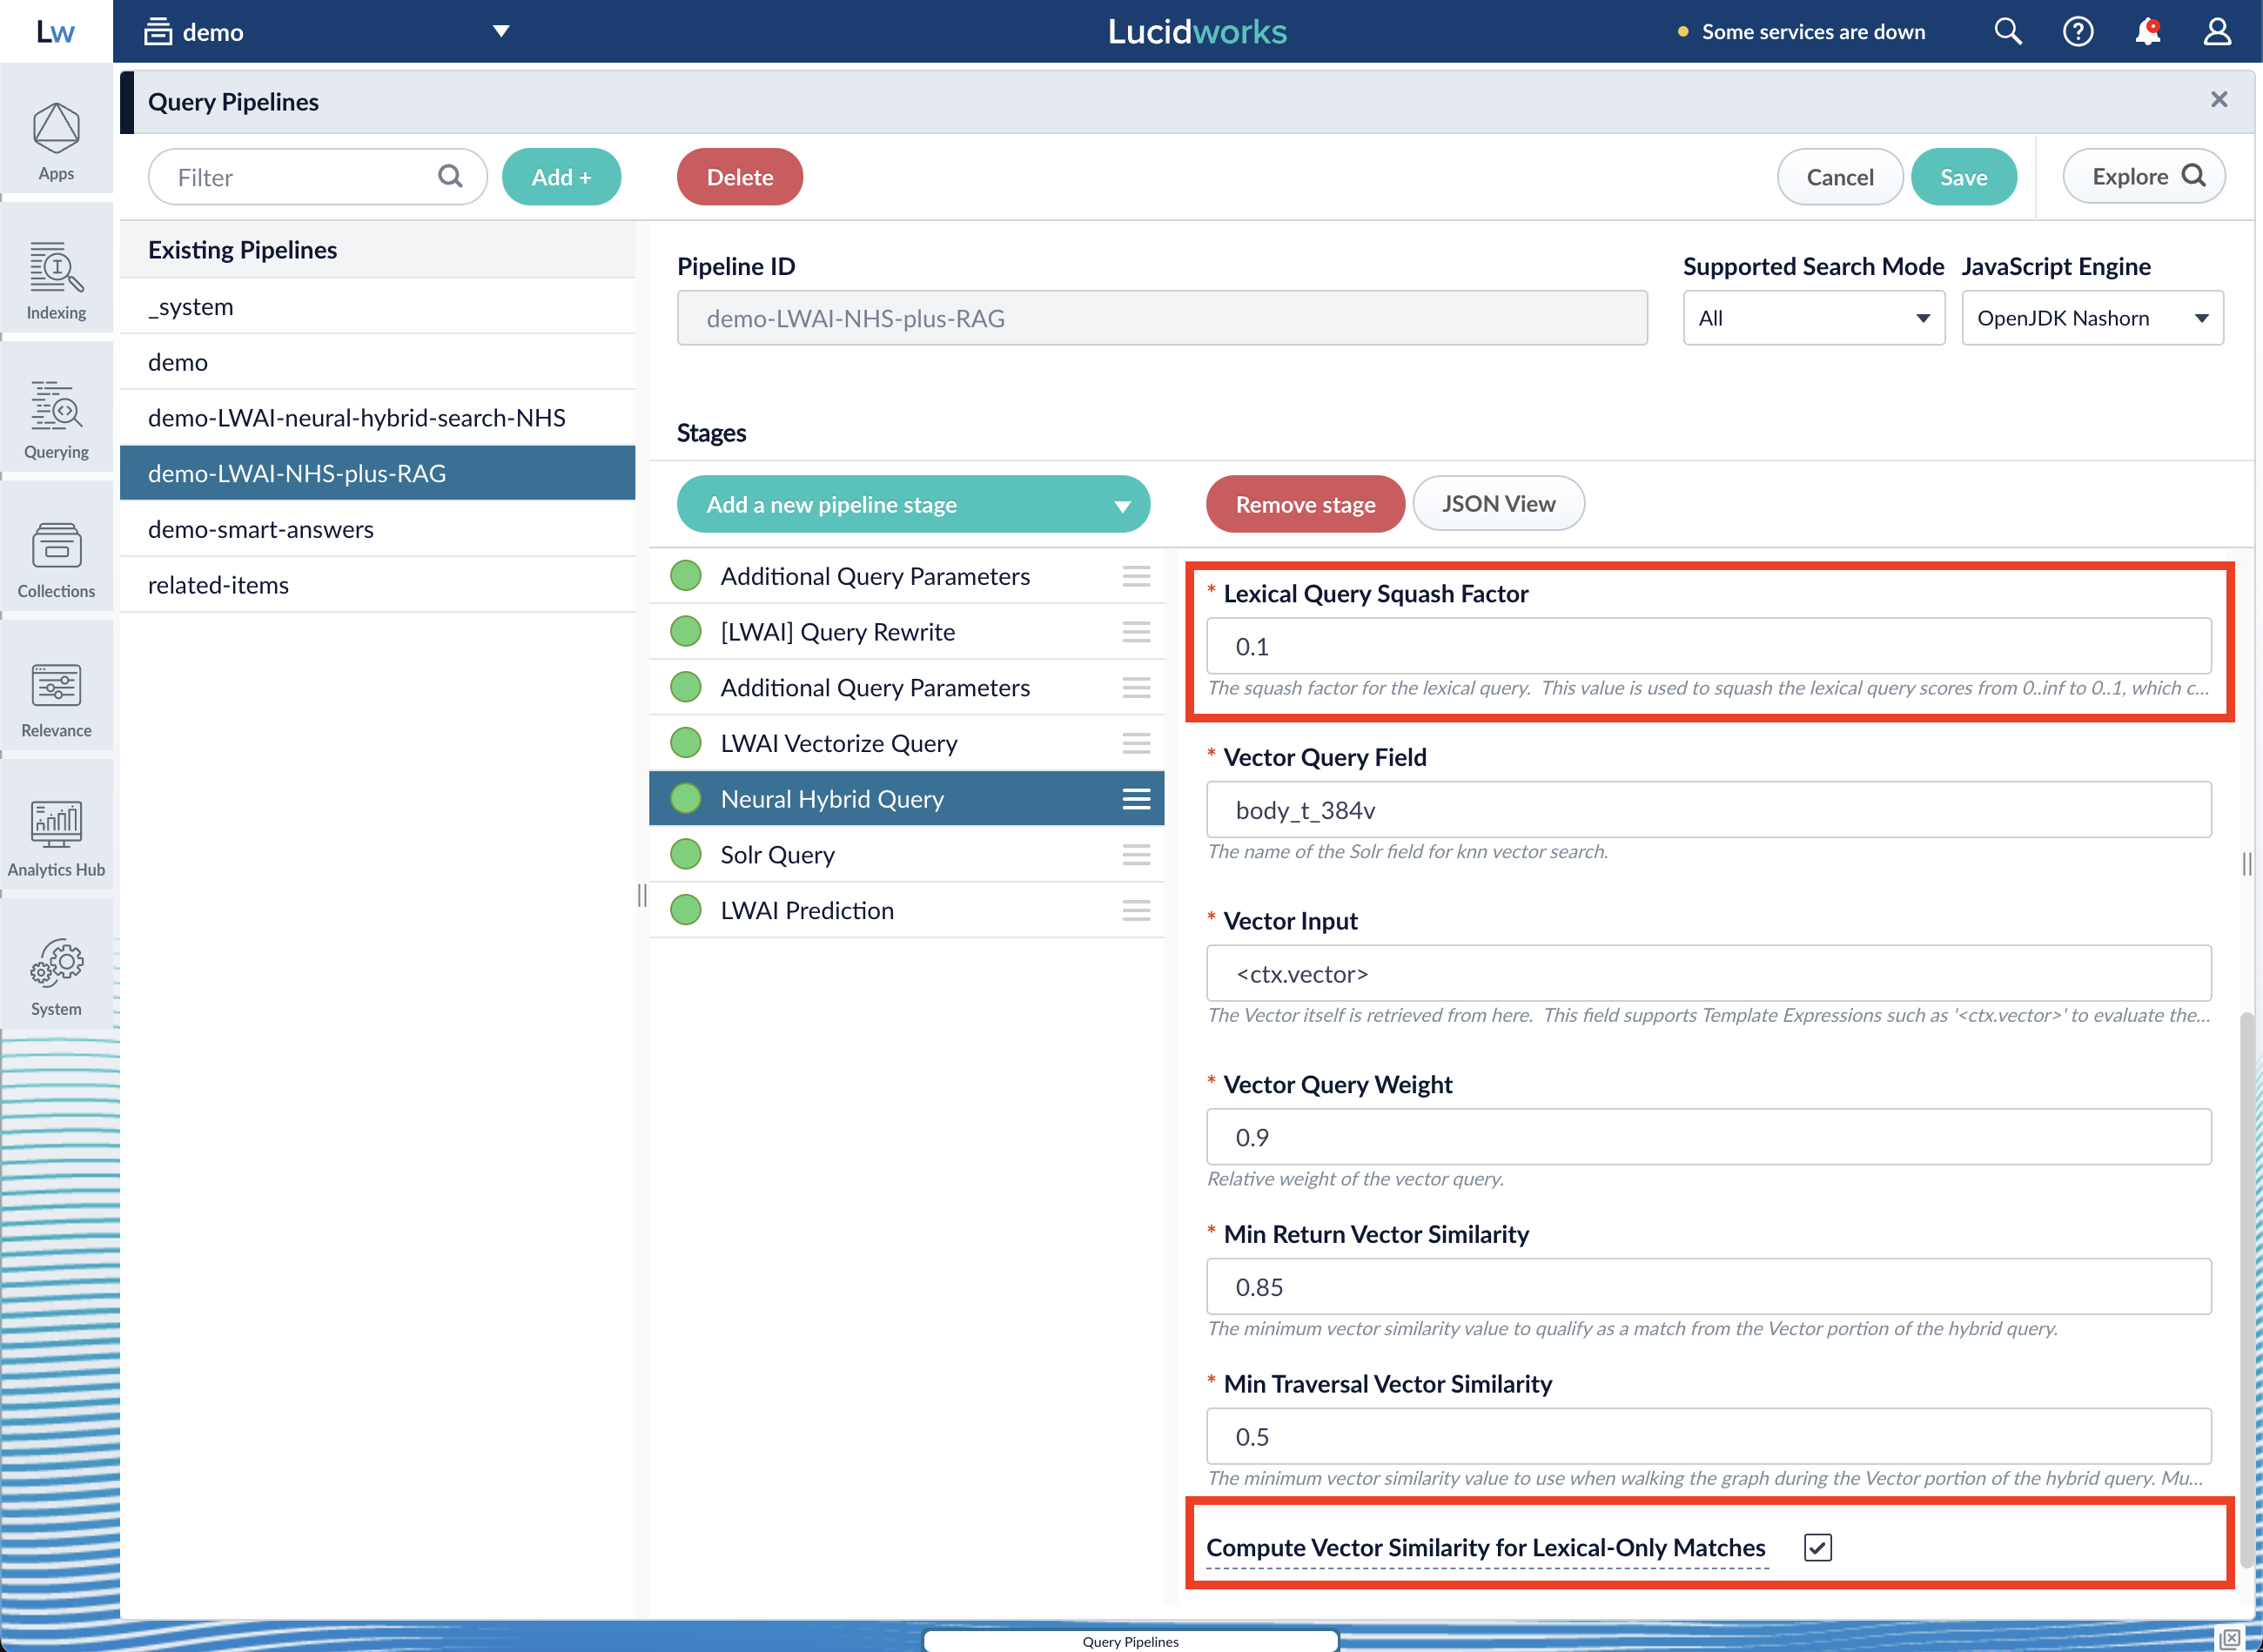
Introducing the Neural Hybrid Query stage for improved relevance
Lucidworks Search 5.9.10 introduces the Neural Hybrid Query stage, enhancing Neural Hybrid Search (NHS) by refining how semantic and lexical scores are combined in search ranking. This new stage works with Lucidworks AI to ensure that result collapsing and final ranking use a unified scoring approach, leading to more precise and consistent search results—especially in ecommerce, where selecting the most relevant SKU for a product is critical. Key benefits include:- Smarter relevance ranking: Combines semantic and lexical signals earlier for more accurate ordering.
- Optimized result collapsing: Ensures the best representative item is selected before final ranking.
- Broad applicability: Enhances search performance in ecommerce and other scenarios that use result collapsing.
- Lexical Query Squash Factor lets you input a value that squashes the lexical query scores from
0..infto0..1. This setting helps prevent the lexical query from dominating the final score. - Compute Vector Similarity for Lexical-Only Matches computes vector similarity scores for documents found in lexical search results, but not in the initial vector search results. This setting can rescue orphaned nodes by finding docs which match lexically but are not in the vector results, and compute the vector similarity score for those.
Support for Kubernetes 1.31
Lucidworks Search 5.9.10 introduces support for Kubernetes 1.31, bringing enhanced security, improved resource management, and better networking reliability. This update strengthens container security, improves how custom resources are managed and filtered, and enhances the reliability ofkubectl operations like exec and port-forward, especially in complex network environments.
By upgrading to Lucidworks Search 5.9.10, you can take full advantage of Kubernetes 1.31’s advancements for stronger security, streamlined resource handling, and improved system stability.
Expanded support for read-only file system
Lucidworks Search 5.9.11 completes support for the read-only root file system feature across all Lucidworks Search services, strengthening protection against unauthorized changes. Read-only mode is enabled by default for some Lucidworks Search services. See Read-only root file system for a list of services that support it or have it enabled by default.Faster, more efficient data processing with Spark 3.4.1
Lucidworks Search 5.9.10 upgrades Apache Spark to 3.4.1, bringing faster query execution, improved data transformation efficiency, and greater stability for distributed workloads. This enhancement optimizes indexing, refines SQL query handling, and ensures smoother analytics workflows, enabling you to process large-scale data with greater speed and precision. For more details, see the Spark 3.4.1 release notes. The Apache Spark 3.4.1 upgrade impacts jobs that use Python 3.7 behavior or compatibility, which may have automatically updated to Python 3.10.x and no longer function correctly. Update your code to ensure compatibility with Python 3.10.x and then test your Spark jobs in a staging environment before deploying to production.Enhanced security and stability
Lucidworks Search 5.9.10 introduces a new wave of security enhancements, ensuring a more resilient and up-to-date platform. This release includes critical updates across core services, including admin, frameworks, apps manager, classic connectors, and query indexing, reinforcing protection across the stack. Additionally, we’ve updated thebitnami-shell base image and upgraded key-tools to v3.0.2, further strengthening security and compliance.
These enhancements help maintain a robust and secure Lucidworks Search environment, keeping your data and infrastructure protected while optimizing performance for mission-critical workloads.
Apps Manager API
The new Apps Manager API gives information about your Fusion license, entitlements, and usage.Apps Manager API
The quick learning for Apps Manager API focuses on the purpose and functions of the Apps Manager API.
Bug fixes
-
Solr-exporterpods no longer get stuck in anImagePullBackOffstate, ensuring they pull the correct image and start reliably. -
The
job-launcherandjob-rest-serverservices now start correctly in SSL mode, resolving an issue where missing dependencies caused failures during initialization. - Lucidworks Search now returns all matching search rules and rewrites in Commerce Studio instead of just the first ten, ensuring complete rule retrieval and better compatibility between the two systems.
- Prometheus stage execution histograms and counters now include stage labels, making it easier to interpret stage metrics.
- Resolved an issue in Lucidworks Search 5.9.4 where v2 connectors failed to start in certain self-hosted EKS environments, preventing timeouts and ensuring successful job execution.
-
Increased the request buffer size in
lwai-gatewayfrom 250 KB to 5 MB, allowing large messages to be processed without failures.
Known issues
-
Saving large pipelines during high traffic may trigger service instability.
In some environments, saving large query pipelines while handling high traffic loads can cause the Query service to crash with OOM errors due to thread contention.
Lucidworks Search 5.9.14 resolves this issue. If you’re impacted and not yet on this version, contact Lucidworks Support for mitigation options.
Deprecations
For full details on deprecations, see Deprecations and Removals.-
Lucidworks Search has deprecated the Webapps service.
In previous versions of Lucidworks Search, you could use this service to deploy an App Studio WAR file into Lucidworks Search. - MLeap support has been deprecated. MLeap was used for machine learning tasks in Fusion, including SpaCy and SparkNLP deployments and certain ML models. Instead, refer to the Develop and Deploy a Machine Learning Model guide.
Develop and Deploy a Machine Learning Model
Develop and Deploy a Machine Learning Model
This tutorial walks you through deploying your own model to Fusion with Seldon Core.A real instance of this class with the Paraphrase Multilingual MiniLM L12 v2 model is as follows:In the above code, an additional function has been added in the class; this is completely fine to do.
Logging has also been added for debugging purposes.Two functions are non-negotiable:For the example, above the Python file is named
For the Paraphrase Multilingual MiniLM L12 v2 model, the requirements are as follows:In general, if an item was used in an Using the example model, the terminal commands would be as follows:This repository is public and you can visit it here: example_sbert_model
Prerequisites
- A Fusion instance with an app and indexed data
- An understanding of Python and the ability to write Python code
- Docker installed locally, plus a private or public Docker repository
- Seldon-core installed locally:
pip install seldon-core - Code editor; you can use any editor, but Visual Studio Code is used in the example
- Model: paraphrase-multilingual-MiniLM-L12-v2 from Hugging Face
- Docker image: example_sbert_model
Tips
- Always test your Python code locally before uploading to Docker and then Fusion. This simplifies troubleshooting significantly.
- Once you’ve created your Docker you can also test locally by doing
docker runwith a specified port, like 9000, which you can thencurlto confirm functionality in Fusion. See the testing example below.
Intro to Machine Learning in Fusion
The course for Intro to Machine Learning in Fusion focuses on using machine learning to infer the goals of customers and users in order to deliver a more sophisticated search experience.
Local testing example
The examples in this section use the following models:- Docker command:
- Curl to hit Docker:
- Curl model in Fusion:
- See all your deployed models:
Download the model
This tutorial uses the paraphrase-multilingual-MiniLM-L12-v2 model from Hugging Face, but any pre-trained model from https://huggingface.co will work with this tutorial.If you want to use your own model instead, you can do so, but your model must have been trained and then saved though a function similar to the PyTorch’storch.save(model, PATH) function.
See Saving and Loading Models in the PyTorch documentation.Format a Python class
The next step is to format a Python class which will be invoked by Fusion to get the results from your model. The skeleton below represents the format that you should follow. See also Packaging a Python model for Seldon Core using Docker in the Seldon Core documentation.-
init: Theinitfunction is where models, tokenizers, vectorizers, and the like should be set to self for invoking.
It is recommended that you include your model’s trained parameters directly into the Docker container rather than reaching out to external storage insideinit. -
predict: Thepredictfunction processes the field or query that Fusion passes to the model.
Thepredictfunction must be able to handle any text processing needed for the model to accept input invoked in itsmodel.evaluate(),model.predict(), or equivalent function to get the expected model result. If the output needs additional manipulation, that should be done before the result is returned.
For embedding models the return value must have the shape of (1, DIM), where DIM (dimension) is a consistent integer, to enable Fusion to handle the vector encoding into Milvus or Solr.
Use the exact name of the class when naming this file.
mini.py and the class name is mini().Create a Dockerfile
The next step is to create a Dockerfile. The Dockerfile should follow this general outline; read the comments for additional details:Create a requirements file
Therequirements.txt file is a list of installs for the Dockerfile to run to ensure the Docker container has the right resources to run the model.For the Paraphrase Multilingual MiniLM L12 v2 model, the requirements are as follows:
import statement in your Python file, it should be included in the requirements file.An easy way to populate the requirements is by using in the following command in the terminal, inside the directory that contains your code:If you use
pip freeze, you must manually add seldon-core to the requirements file because it is not invoked in the Python file but is required for containerization.Build and push the Docker image
After creating the<your_model>.py, Dockerfile, and requirements.txt files, you need to run a few Docker commands.
Run the commands below in order:Deploy the model in Fusion
Now you can go to Fusion to deploy your model.- In Fusion, navigate to Collections > Jobs.
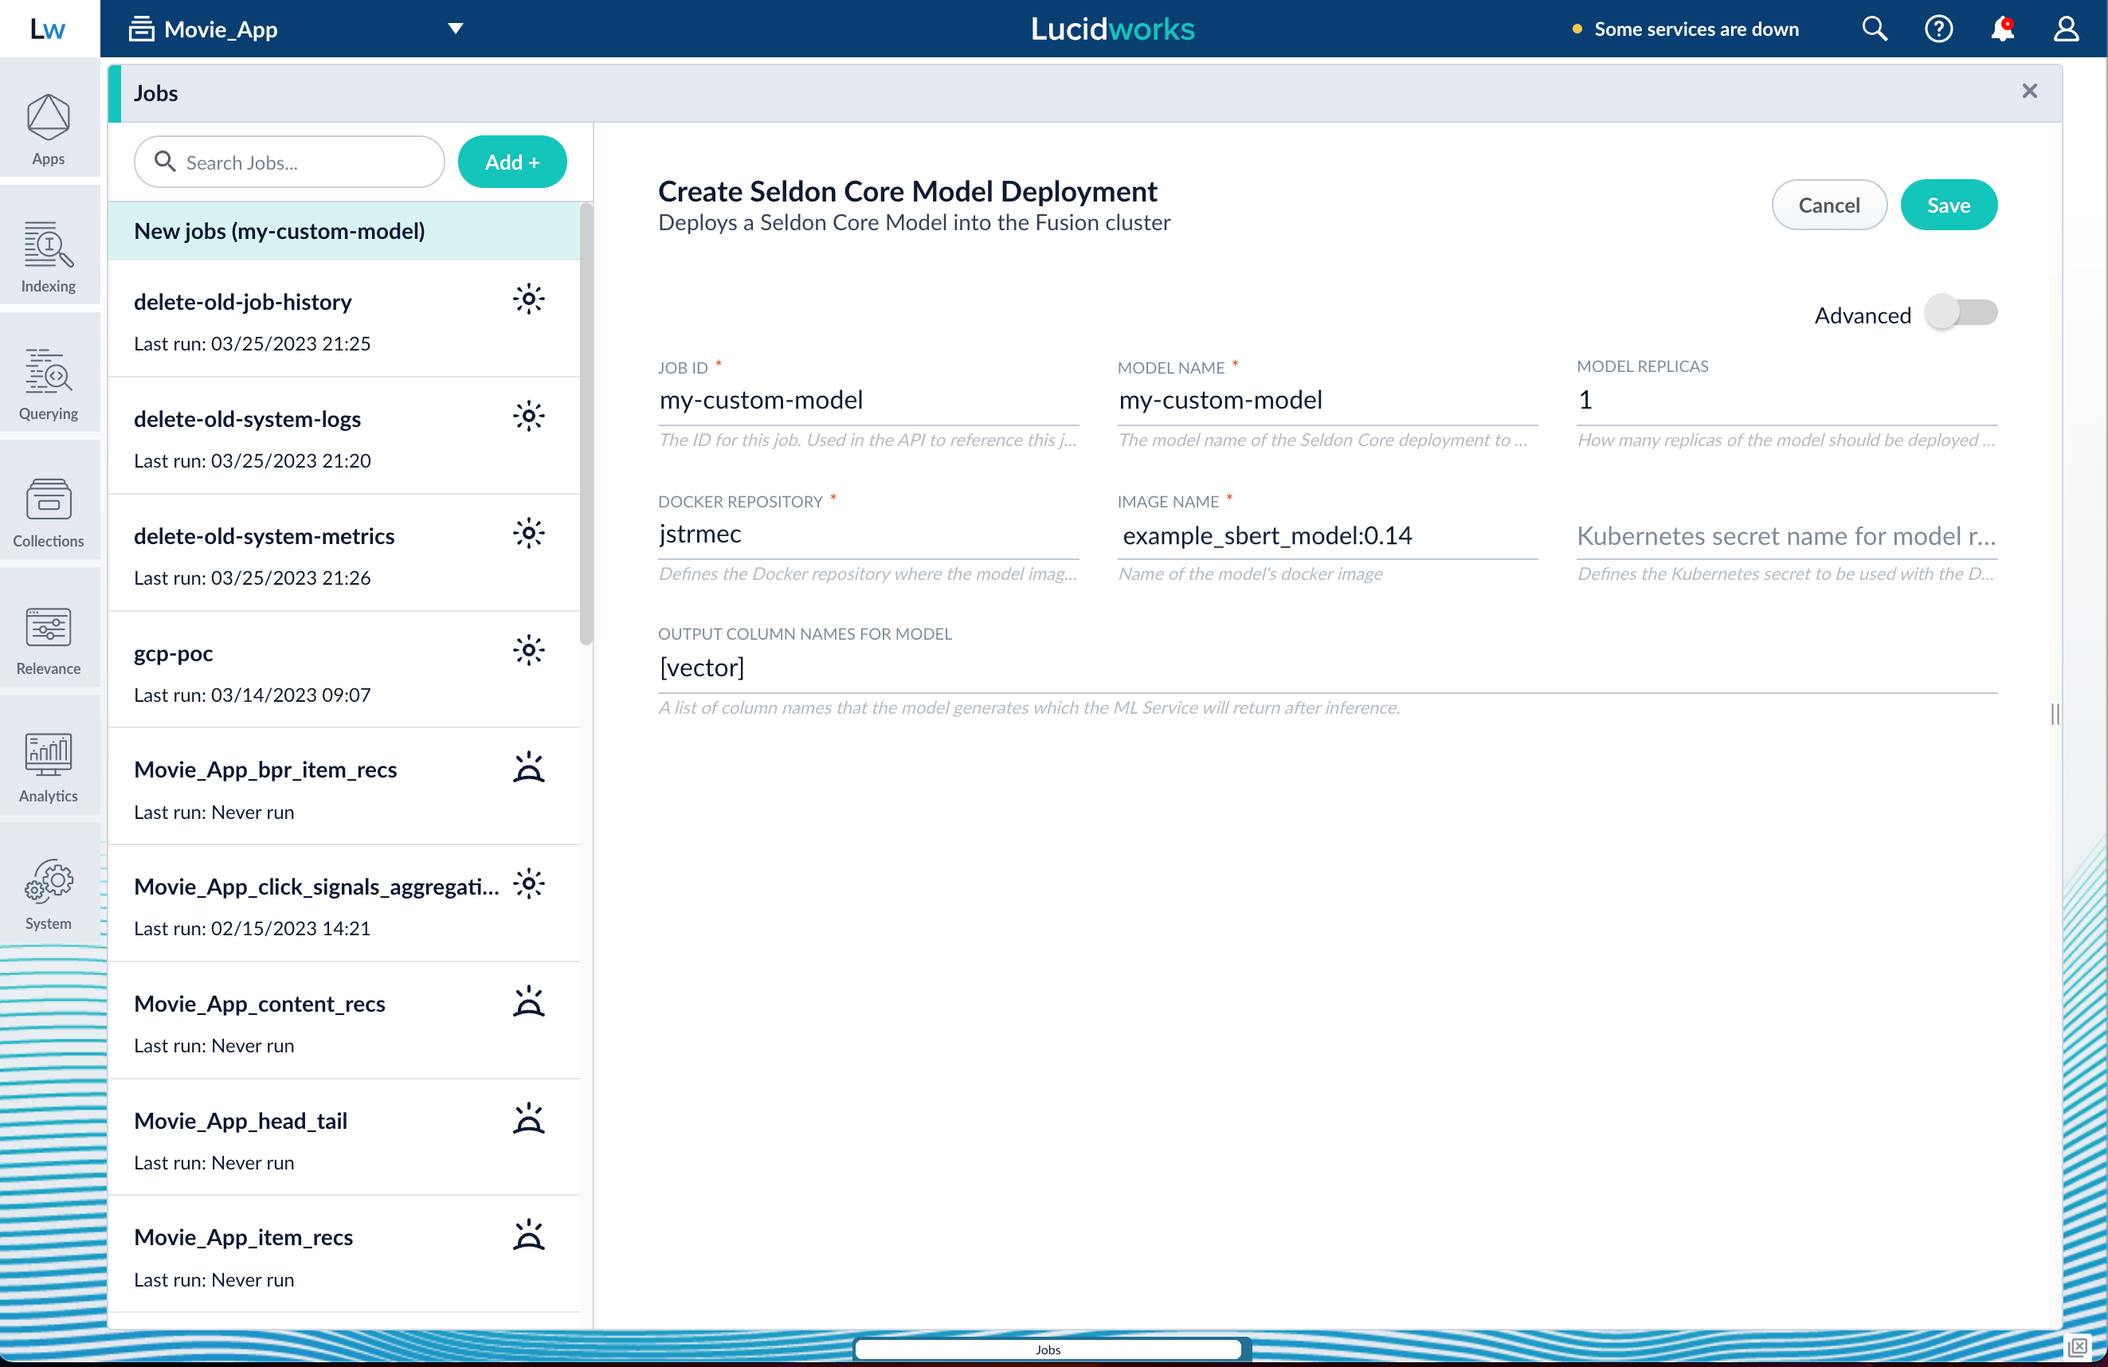
- Add a job by clicking the Add+ Button and selecting Create Seldon Core Model Deployment.
-
Fill in each of the text fields:
-
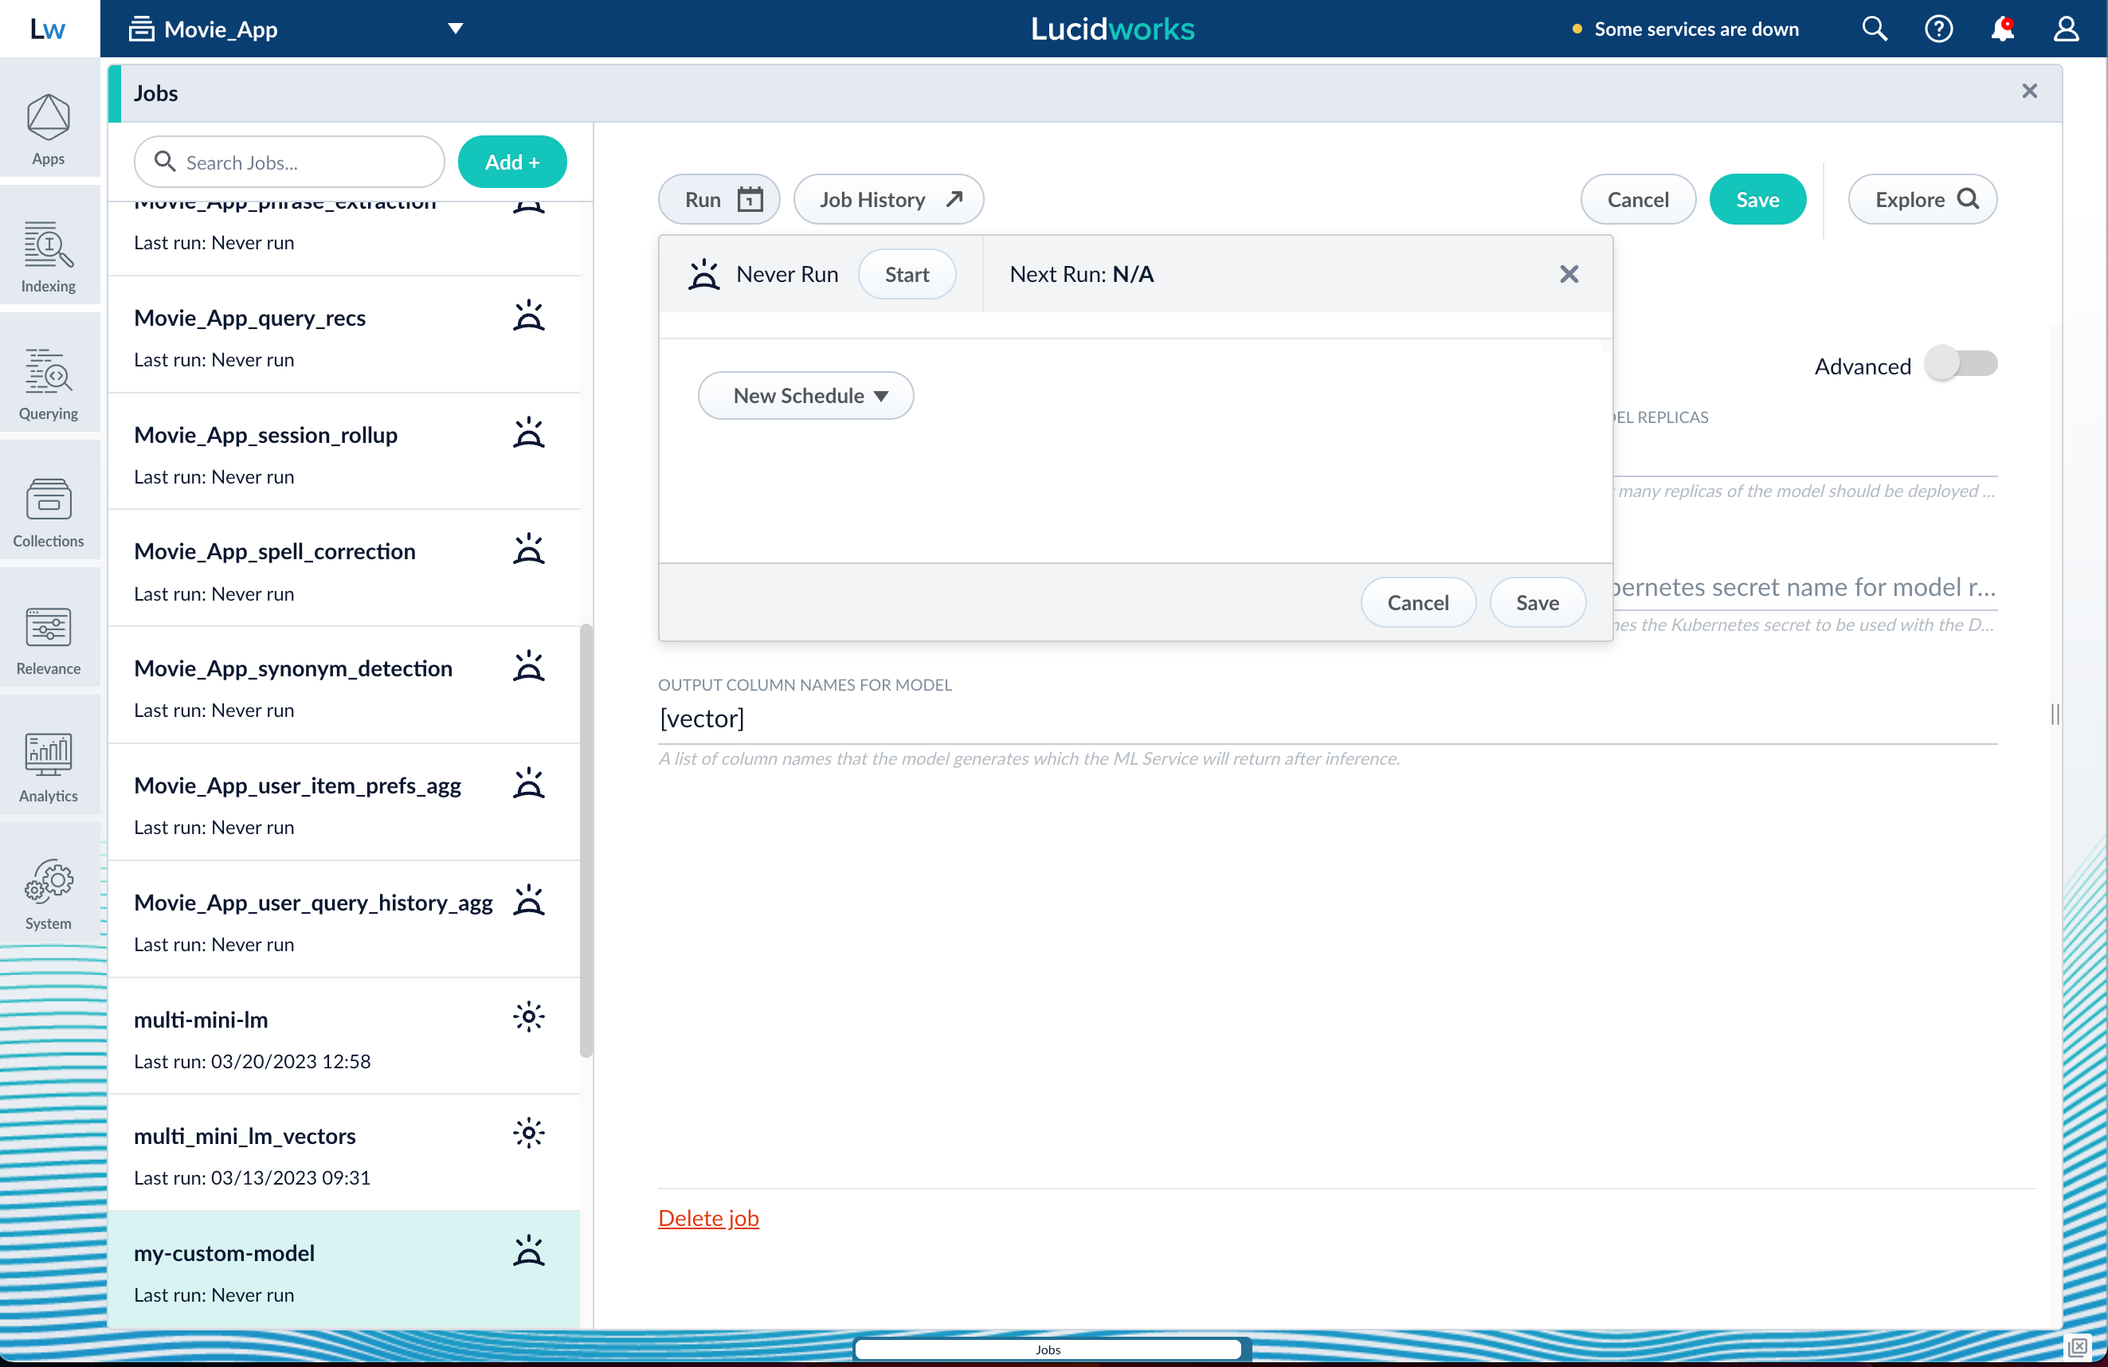
Click Save, then Run and Start.
Apply an API key to the deployment
These steps are only needed if your model utilizes any kind of secret, such as an API key. If not, skip this section and proceed to the next.- Create and modify a
<seldon_model_name>_sdep.yamlfile.
In the first line,kubectl get sdepgets the details for the currently running Seldon Deployment job and saves those details to a YAML file.kubectl apply -f open_sdep.yamladds the key to the Seldon Deployment job the next time it launches. - Delete
sdepbefore redeploying the model. The currently running Seldon Deployment job does not have the key applied to it. Delete it before redeploying and the new job will have the key. - Lastly, you can encode into Milvus.
Create a Milvus collection
- In Fusion, navigate to Collections > Jobs.
- Click the Add+ Button and select Create Collections in Milvus.
This job creates a collection in Milvus for storing the vectors sent to it. The job is needed because a collection does not automatically spawn at indexing or query time if it does not already exist. - Name the job and the collection.
- Click Add on the right side of the job panel.
The key to creating the collection is the Dimension text field; this must exactly match the shape value your output prediction has.
In our example the shape is (1,384), so 384 will be in the collections Dimension field: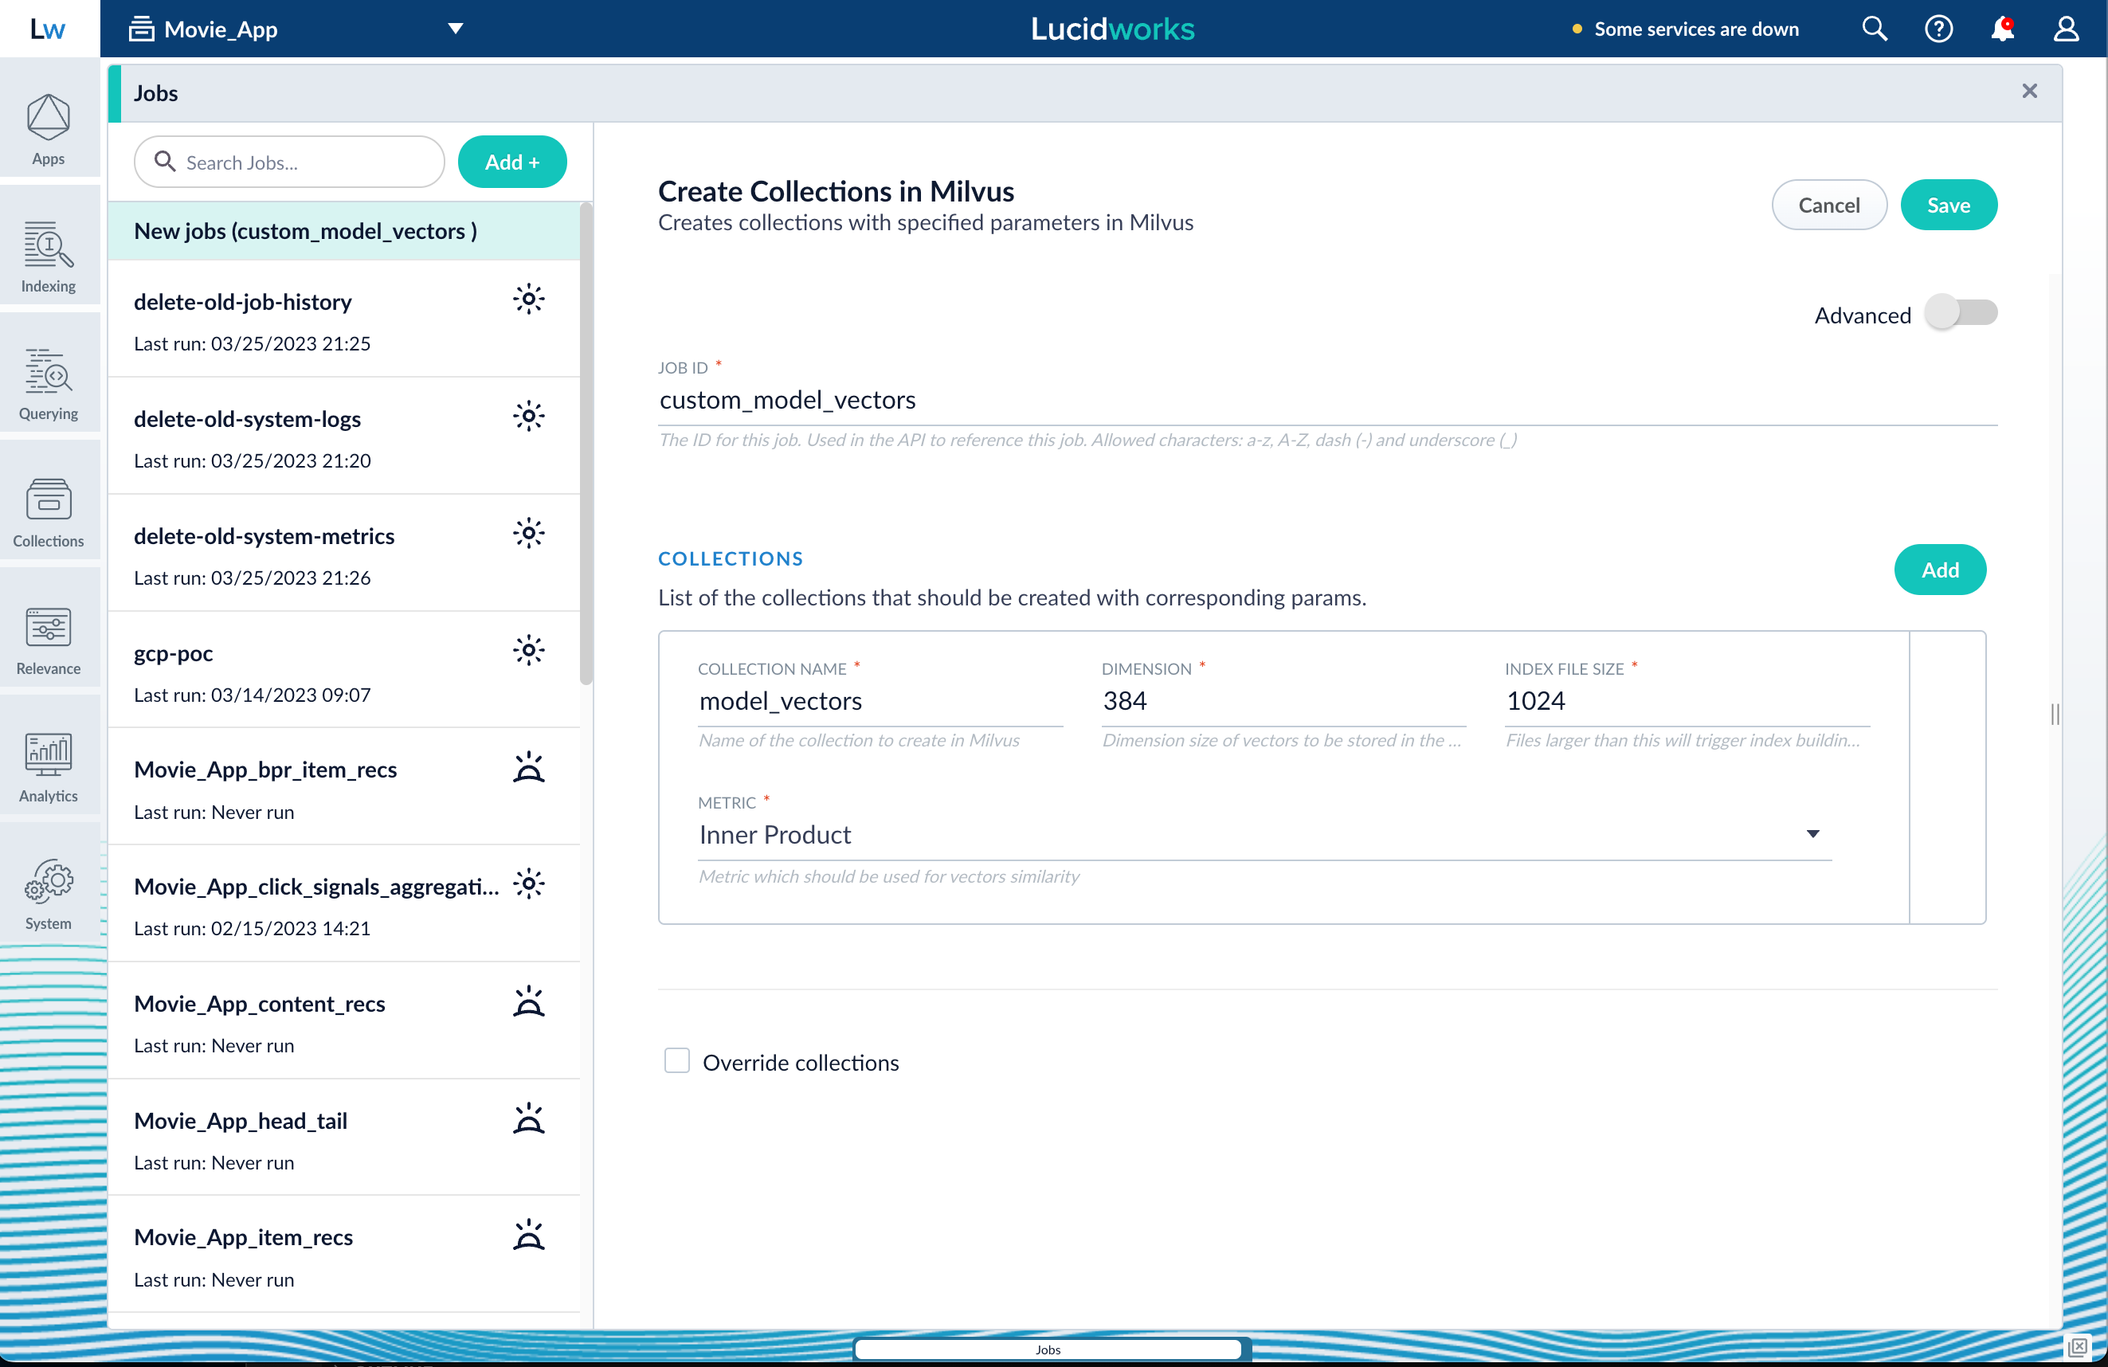
Inner Product, but this also depends on use case and model type. - Click Save, then Run and Start.
Configure the Fusion pipelines
Your real-world pipeline configuration depends on your use case and model, but for our example we will configure the index pipeline and then the query pipeline.Configure the index pipeline- Create a new index pipeline or load an existing one for editing.
- Click Add a Stage and then Encode to Milvus.
- In the new stage, fill in these fields:
- The name of your model
- The output name you have for your model job
- The field you’d like to encode
- The collection name
- Save the stage in the pipeline and index your data with it.
- Create a new query pipeline or load an existing one for editing.
- Click Add a Stage and then Milvus Query.
- Fill in the configuration fields, then save the stage.
- Add a Milvus Ensemble Query stage.
This stage is necessary to have the Milvus collection scores taken into account in ranking and to weight multiple collections. The Milvus Results Context Key from the Milvus Query Stage is used in this stage to preform math on the Milvus result scores. One (1) is a typical multiplier for the Milvus results but any number can be used. - Save the stage and then run a query by typing a search term.
- To verify the Milvus results are correct, use the Compare+ button to see another pipeline without the model implementation and compare the number of results.
Removals
For full details on removals, see Deprecations and Removals.Bitnami removal
By August 28, 2025, Fusion’s Helm chart will reference internally built open-source images instead of Bitnami images due to changes in how they host images.Forked Apache Tika Parser removal
The Forked Apache Tika parser stage has been removed. Use asynchronous Tika parsing instead.Platform Support and Component Versions
Kubernetes platform support
Lucidworks has tested and validated support for the following Kubernetes platform and versions:- Google Kubernetes Engine (GKE): 1.28, 1.29, 1.30, 1.31
Component versions
The following table details the versions of key components that may be critical to deployments and upgrades.
More information about support dates can be found at Lucidworks Fusion Product Lifecycle.