

Import with the Bulk Loader
Import with the Bulk Loader
Create and run Parallel Bulk Loader jobs
Use the Jobs manager to create and run Parallel Bulk Loader jobs. You can also use the Scheduler to schedule jobs.In the procedures, select Parallel Bulk Loader as the job type and configure the job as needed.Configuration settings for the Parallel Bulk Loader job
This section provides configuration settings for the Parallel Bulk Loader job. Also see configuration properties in the Jobs Configuration Reference.Read settings
Transformation settings
| Setting | Description |
|---|---|
transformScala | Sometimes, you can write a small script to transform input data into the correct form for indexing. But at other times, you might need the full power of the Spark API to transform data into an indexable form. The transformScala option lets you filter and/or transform the input DataFrame any way you would like. You can even define UDFs to use during your transformation. For an example of using Scala to transform the input DataFrame before indexing in Solr, see the Read from Parquet example. Another powerful use of the transformScala option is that you can pull in advanced libraries, such as Spark NLP (from John Snow Labs) to do NLP work on your content before indexing. See the Use NLP during indexing example. Your Scala script can do other things but, at a minimum, it must define the function that the Parallel Bulk Loader invokes (see below this table). |
transformSql | The transformSql option lets you write a SQL query to transform the input DataFrame. The SQL is executed after the transformScala script (if both are defined). The input DataFrame is exposed to your SQL as the _input view. See the Clean up data with SQL transformations example below for an example of using SQL to transform the input before indexing in Solr. This option also lets you leverage the UDF/UDAF functions provided by Spark SQL. |
mlModelId | If you have a Spark ML PipelineModel loaded into the blob store, you can supply the blob ID to the Parallel Bulk Loader and it will: 1. Load the model from the blob store. 2. Transform the input DataFrame (after the Scala transform but before the SQL transform). 3. Add the predicted output field (specified in the model metadata stored in the blob store) to the projected fields list.  This lets you use Spark ML models to make predictions in a more scalable, performant manner than what can be achieved with a Machine Learning index stage. This lets you use Spark ML models to make predictions in a more scalable, performant manner than what can be achieved with a Machine Learning index stage. |
transformScala:Output settings
| Setting | Description |
|---|---|
outputCollection | Name of the Fusion collection to write to. The Parallel Bulk Loader uses the Collections API to resolve the underlying Solr collection at runtime. |
outputIndexPipeline | Name of a Fusion index pipeline to which to send documents, instead of directly indexing to Solr. This option lets you perform additional ETL (extract, transform, and load) processing on the documents before they are indexed in Solr. If you need to write to time-partitioned indexes, then you must use an index pipeline, because writing directly to Solr is not partition aware. |
defineFieldsUsingInputSchema | Flag to indicate if the Parallel Bulk Loader should use the input schema to create fields in Solr, after applying the Scala and/or SQL transformations. If false, then the Parallel Bulk Loader relies on the Fusion index pipeline and/or Solr field guessing to create the fields. If true, only fields that do not exist already in Solr are created. Consequently, if there is a type mismatch between an existing field in Solr and the input schema, you will need to use a transformation to rename the field in the input schema. |
clearDatasource | If checked, the Parallel Bulk Loader deletes any existing documents in the output collection that match the query _lw_loader_id_s:<JOB>. Consequently, the Parallel Bulk Loader adds two metadata fields to each row: _lw_loader_id_s and _lw_loader_job_id_s. |
atomicUpdates | Flag to send documents directly to Solr as atomic updates instead of as new documents. This option is not supported when using an index profile. Also note that the Parallel Bulk Loader tracking fields _lw_loader_id_s and _lw_loader_job_id_s are not sent when using atomic updates, so the clear datasource option does not work with documents created using atomic updates. |
outputOptions | Options used when writing directly to Solr. See Spark-Solr: https://github.com/lucidworks/spark-solr#index-parameters For example, if your docs are relatively small, you might want to increase the batch_size (2000 default) as shown below: 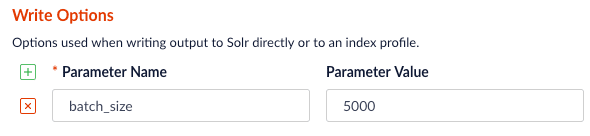 |
outputPartitions | Coalesce the DataFrame into N partitions before writing to Solr. This can help spread the indexing work out across more executors that are available in Spark, or limit the parallelism when writing to Solr. |
Tune performance
As the name of the Parallel Bulk Loader job implies, it is designed to ingest large amounts of data into Fusion by parallelizing the work across your Spark cluster. To achieve scalability, you might need to increase the amount of memory and/or CPU resources allocated to the job.By default, Fusion’s Spark configuration settings control the resources allocated to Parallel Bulk Loader jobs.You can pass these properties in the job configuration to override the default Spark shell options: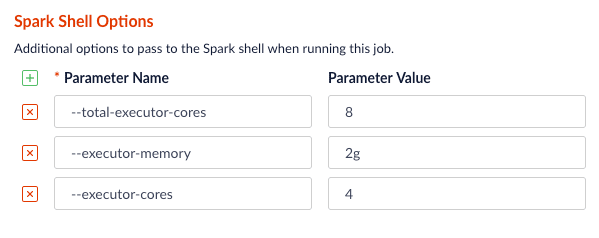
Examples
Here we provide screenshots and example JSON job definitions to illustrate key points about how to load from different data sources.Use NLP during indexing
In this example, we leverage the John Snow labs NLP library during indexing. This is just quick-and-dirty to show the concept.Also see:- https://github.com/JohnSnowLabs/spark-nlp
-
https://databricks.com/blog/2017/10/19/introducing-natural-language-processing-library-apache-spark.html
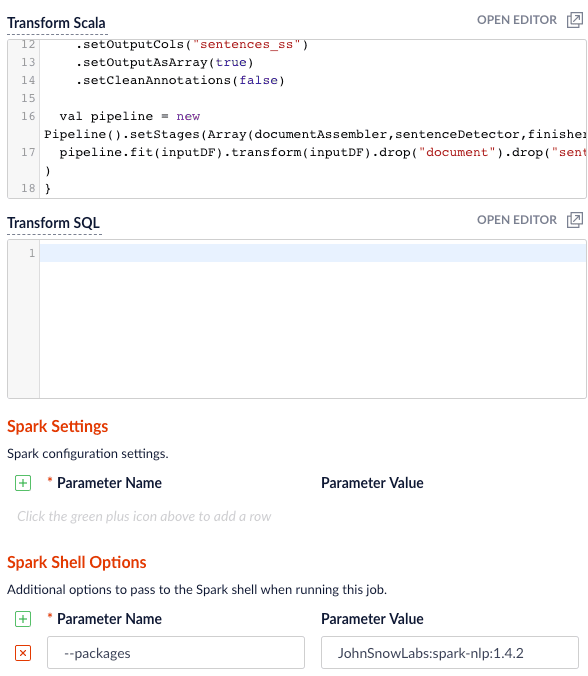
JohnSnowLabs:spark-nlp:1.4.2 package using Spark Shell Options.Clean up data with SQL transformations
Fusion has a Local Filesystem connector that can handle files such as CSV and JSON files. Using the Parallel Bulk Loader lets you leverage features that are not in the Local Filesystem connector, such as using SQL to clean up the input data.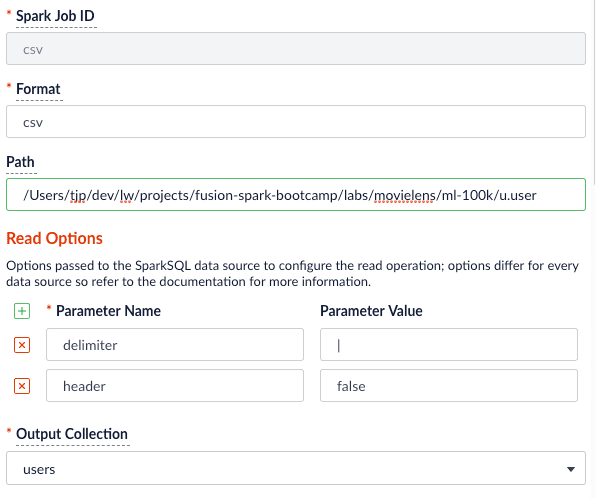
Read from S3
It is easy to read from an S3 bucket without pulling data down to your local workstation first. To avoid exposing your AWS credentials, add them to a file namedcore-site.xml in the apps/spark-dist/conf directory, such as:s3a://sstk-dev/data/u.user. If you are running a Fusion cluster then each instance of Fusion will need a core-site.xml file. S3a is the preferred protocol for reading data into Spark because it uses Amazon’s libraries to read from S3 instead of the legacy Hadoop libraries. If you need other S3 protocols (for example, s3 or s3n) you will need to add the equivalent properties to core-site.xml.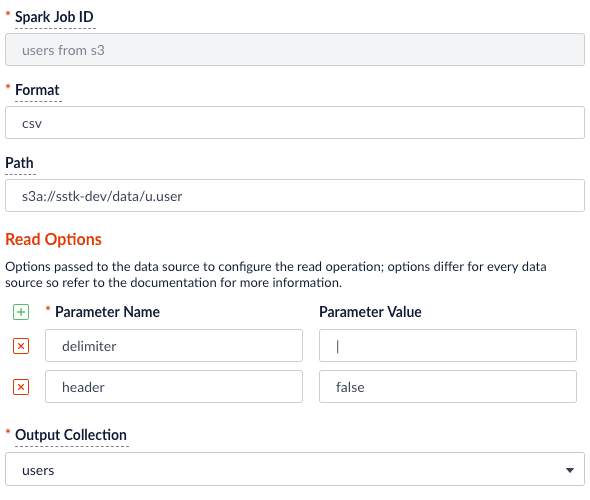
org.apache.hadoop:hadoop-aws:2.7.3 package to the job using the --packages Spark option. Also, you will need to exclude the com.fasterxml.jackson.core:jackson-core,joda-time:joda-time packages using the --exclude-packages option.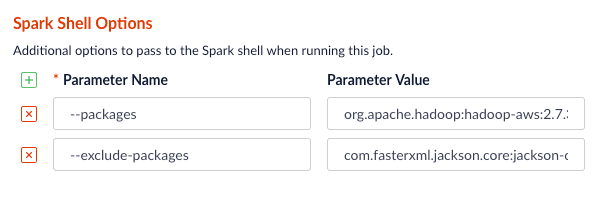
core-site.xml; see Installing the Cloud Storage connector.Read from Parquet
Reading from parquet files is built into Spark using the “parquet” format. For additional read options, see Configuration of Parquet.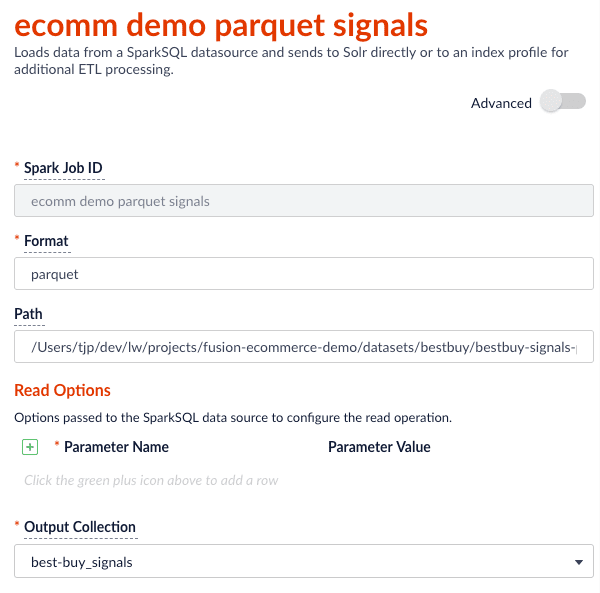
transformScala option to filter and transform the input DataFrame into a better form for indexing using the following Scala script:Read from JDBC tables
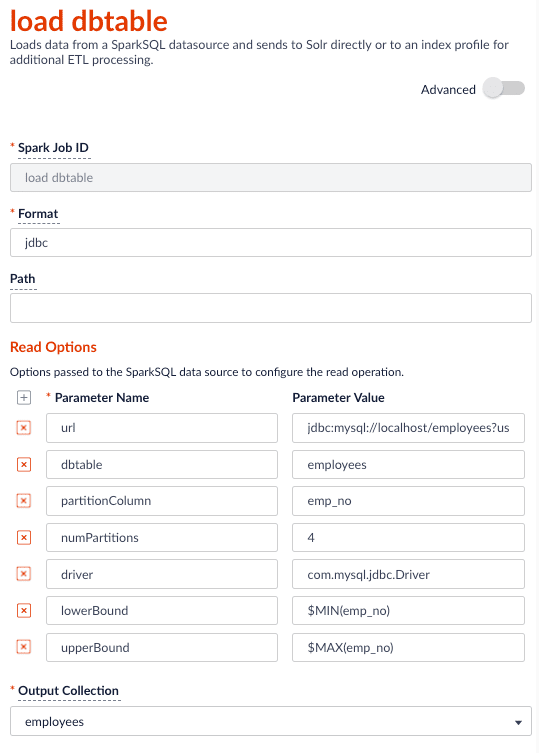
You can use the Parallel Bulk Loader to parallelize reads from JDBC tables, if the tables have numeric columns that can be partitioned into relatively equal partition sizes. In the example below, we partition the employees table into 4 partitions using theemp_no column (int). Behind the scenes, Spark sends four separate queries to the database and processes the result sets in parallel.Load the JDBC driver JAR file into the Blob store
Before you ingest from a JDBC data source, you need to use the Fusion Admin UI to upload the JDBC driver JAR file into the blob store.Alternatively, you can add the JAR file to the Fusion blob store withresourceType=spark:jar; for example:resourceType=spark:jar from the blob store to the appropriate classpaths before running a Parallel Bulk Loader job.Read from a table
- http://spark.apache.org/docs/latest/sql-programming-guide.html#jdbc-to-other-databases
- https://medium.com/@radek.strnad/tips-for-using-jdbc-in-apache-spark-sql-396ea7b2e3d3
$MIN(emp_no) and $MAX(emp_no) macros in the read options. These are macros offered by the Parallel Bulk Loader to help configure parallel reads of JDBC tables. Behind the scenes, the macros are translated into SQL queries to get the MAX and MIN values of the specified field, which Spark uses to compute splits for partitioned queries. As mentioned above, the field must be numeric and must have a relatively balanced distribution of values between MAX and MIN; otherwise, you are unlikely to see much performance benefit to partitioning.Index HBase tables
To index an HBase table, use the Hortonworks connector.The Parallel Bulk Loader lets us replace the HBase Indexer.
hbase-site.xml (and possibly core-site.xml) to apps/spark-dist/conf in Fusion, for example:- Launch the HBase shell and create a table named
fusion_numswith a single column family namedlw: - Do a list command to see your table:
- Fill the table with some data:
- Scan the fusion_nums table to see your data:
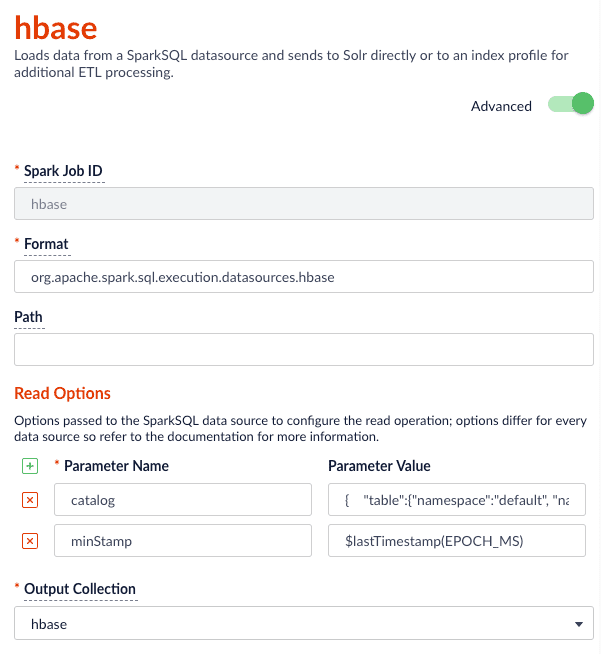
$lastTimestamp macro in the read options. This lets us filter rows read from HBase using the timestamp of the last document the Parallel Bulk Loader wrote to Solr, that is, to get the newest updates from HBase only (incremental updates). Most Spark data sources provide a way to filter results based on timestamp.Job JSON:Index Elastic data
With Elasticsearch 6.2.2 using theorg.elasticsearch:elasticsearch-spark-20_2.11:6.2.1 package, here is a Scala script to run in bin/spark-shell to index some test data: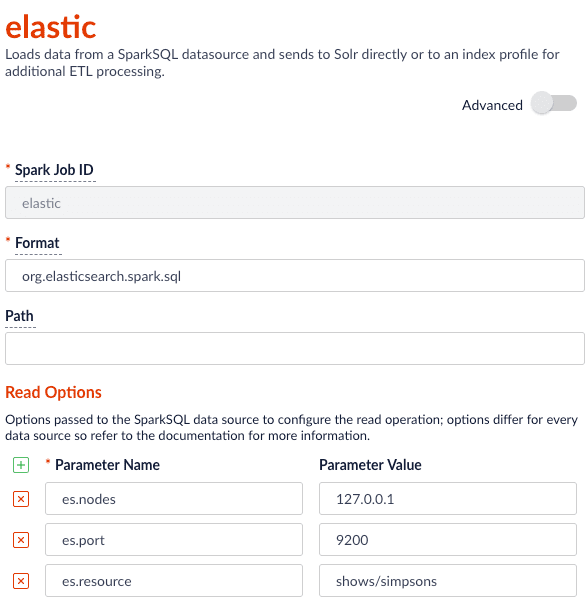
Read from Couchbase
To index a Couchbase bucket, use the official Couchbase Spark connector found here.For example, we will create a test bucket in Couchbase. If you already have a bucket in Couchbase, feel free to use that and skip to the test data setup section. This test was performed using Couchbase Server 6.0.0.- Create a bucket test in the Couchbase admin UI. Give access to a system account user to use in the Parallel Bulk Loader job config.
- Connect to Couchbase using the command line client cbq. For example,
cbq -e=http://<host>:8091 -u <user> -p <password>. Ensure the provided user is an authorized user of the test bucket. - Create a primary index on the test bucket:
CREATE PRIMARY INDEX 'test-primary-index' ON 'test' USING GSI;. - Insert some data:
INSERT INTO 'test' ( KEY, VALUE ) VALUES ( "1", { "id": "01", "field1": "a value", "field2": "another value"} ) RETURNING META().id as docid, *;. - Verify you can query the document just inserted:
select * from 'test';.
com.couchbase.spark.sql.DefaultSource. Then specify the com.couchbase.client:spark-connector_2.11:2.2.0 package as the spark shell --packages option, as well as a few spark settings that direct the connector to a particular Couchbase server and bucket to connect to using the provided credentials. See here for all of the available Spark configuration settings for the Couchbase Spark connector.Putting it all together: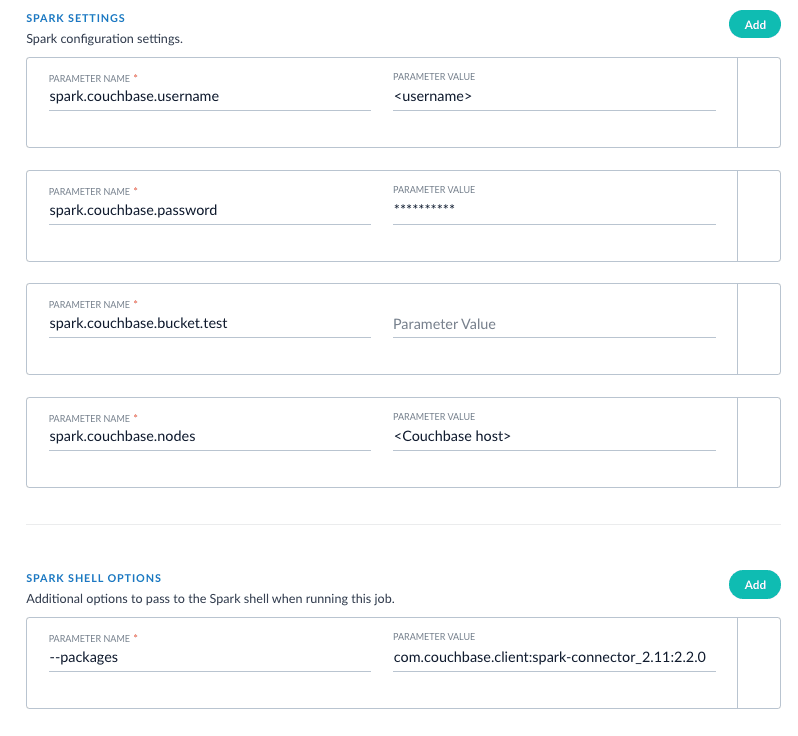
XML setup
XML is a supported format that requires settings forformat and --packages. In addition, you must specify the filepath in the readOptions section. For example: