> ## Documentation Index
> Fetch the complete documentation index at: https://doc.lucidworks.com/llms.txt
> Use this file to discover all available pages before exploring further.
# Remote V2 Connectors
export const LwTemplate = ({title = "Key questions to get you started", icon = "sparkles", cta = "Powered by Agent Studio", linkHref = "https://lucidworks.com/demo/?utm_source=docs&utm_medium=referral&utm_campaign=docs_cta_ai"}) => {
const [isLoaded, setIsLoaded] = useState(false);
useEffect(() => {
const timer = setTimeout(() => {
setIsLoaded(true);
}, 500);
return () => clearTimeout(timer);
}, []);
return
{isLoaded && `
}} />}
Powered by Lucidworks Agent Studio
;
};
[localhost link]: http://localhost:3000/docs/fusion-connectors/developers/remote-v2-connectors
[mintlify link]: https://doc.lucidworks.com/docs/fusion-connectors/developers/remote-v2-connectors
[old doc.lw link]: https://doc.lucidworks.com/fusion-connectors/8xhsoc
Remote V2 connectors enable you to index data sources that reside behind corporate firewalls or on-premises infrastructure without exposing them directly to the cloud. Unlike standard connectors that run within the Fusion cloud environment, remote connectors run on your own infrastructure and communicate securely with Fusion using gRPC over HTTP/2. Remote connector capability is available for all V2 connectors unless otherwise stated in the specific connector documentation.
Use remote connectors for data sources behind firewalls, security policies restricting cloud access, or compliance requirements mandating on-premises data processing.
Use standard connectors for publicly accessible or cloud-based data sources where Fusion can manage all infrastructure, scaling, and maintenance.
## Connector compatibility
Only V2 connectors are able to run remotely on-premises.
You also need the remote connector client JAR file that matches your Fusion version.
You can download the latest files at [V2 Connectors Downloads](/docs/fusion-connectors/connectors-downloads).
Whenever you upgrade Fusion, you must also update your remote connectors to match the new version of Fusion.
## Firewall configuration best practices
You can use a forward proxy server to allow HTTP/2 communication into the Fusion cloud. A forward proxy server acts as an intermediary between the firewalled connector and Fusion and will only allow specified communication traffic and block unauthorized traffic.
## Asynchronous parsing
Asynchronous parsing separates document crawling from document parsing, improving indexing performance and resource utilization. Unlike synchronous parsing where crawling waits for each document to be parsed, asynchronous parsing allows the connector to continue crawling while documents are parsed independently. This is particularly beneficial for remote V2 connectors processing large volumes of documents or complex file formats.
This feature is available in Fusion 5.9 and later.
For more information on asynchronous parsing with remote V2 connectors, see [Use Tika Asynchronous Parsing](#use-tika-asynchronous-parsing).
## Learn more
If you need to index data from behind a firewall, you can configure a V2 connector to run remotely on-premises using TLS-enabled gRPC.
## Prerequisites
Before you can set up an on-prem V2 connector, you must configure the egress from your network to allow HTTP/2 communication into the Fusion cloud. You can use a [forward proxy server](#egress-and-proxy-server-configuration) to act as an intermediary between the connector and Fusion.
The following is required to run V2 connectors remotely:
* The [plugin zip file and the connector-plugin-standalone JAR](https://plugins.lucidworks.com/).
* A configured connector backend gRPC endpoint.
* Username and password of a user with a `remote-connectors` or `admin` role.
* If the host where the remote connector is running is not configured to trust the server’s TLS certificate, you must configure the file path of the trust certificate collection.
If your version of Fusion doesn’t have the `remote-connectors` role by default, you can create one. No API or UI permissions are required for the role.
## Connector compatibility
Only V2 connectors are able to run remotely on-premises.
You also need the remote connector client JAR file that matches your Fusion version.
You can download the latest files at [V2 Connectors Downloads](/docs/fusion-connectors/downloads/v2-connectors-downloads).
When you upgrade Fusion, you must also update your remote connectors to match the new version of Fusion.
The gRPC connector backend is not supported in Fusion environments deployed on AWS.
## System requirements
The following is required for the on-prem host of the remote connector:
* (Fusion 5.9.0-5.9.10) JVM version 11
* (Fusion 5.9.11 and later) JVM version 17
* Minimum of 2 CPUs
* 4GB Memory
Note that memory requirements depend on the number and size of ingested documents.
## Enable backend ingress
In your `values.yaml` file, configure this section as needed:
```yaml theme={"dark"}
ingress:
enabled: false
pathtype: "Prefix"
path: "/"
#host: "ingress.example.com"
ingressClassName: "nginx" # Fusion 5.9.6 only
tls:
enabled: false
certificateArn: ""
# Enable the annotations field to override the default annotations
#annotations: ""
```
* Set `enabled` to `true` to enable the backend ingress.
* Set `pathtype` to `Prefix` or `Exact`.
* Set `path` to the path where the backend will be available.
* Set `host` to the host where the backend will be available.
* In Fusion 5.9.6 *only*, you can set `ingressClassName` to one of the following:
* `nginx` for Nginx Ingress Controller
* `alb` for AWS Application Load Balancer (ALB)
* Configure TLS and certificates according to your CA’s procedures and policies.
TLS must be enabled in order to use AWS ALB for ingress.
## Connector configuration example
```yaml theme={"dark"}
kafka-bridge:
target: mynamespace-connectors-backend.lucidworkstest.com:443 # mandatory
plain-text: false # optional, false by default.
proxy-server: # optional - needed when a forward proxy server is used to provide outbound access to the standalone connector
host: host
port: some-port
user: user # optional
password: password # optional
trust: # optional - needed when the client's system doesn't trust the server's certificate
cert-collection-filepath: path1
proxy: # mandatory fusion-proxy
user: admin
password: password123
url: https://fusiontest.com/ # needed only when the connector plugin requires blob store access
plugin: # mandatory
path: ./fs.zip
type: #optional - the suffix is added to the connector id
suffix: remote
```
### Minimal example
```yaml theme={"dark"}
kafka-bridge:
target: mynamespace-connectors-backend.lucidworkstest.com:443
proxy:
user: admin
password: "password123"
plugin:
path: ./testplugin.zip
```
### Logback XML configuration file example
```xml theme={"dark"}
%d - %-5p [%t:%C{3.}@%L] - %m{nolookups}%nutf8${LOGDIR:-.}/connector.log${LOGDIR:-.}/connector-%d{yyyy-MM-dd}.%i.log.gz50MB10GB%d - %-5p [%t:%C{3.}@%L] - %m{nolookups}%nutf8
```
## Run the remote connector
```java theme={"dark"}
java [-Dlogging.config=[LOGBACK_XML_FILE]] \
-jar connector-plugin-client-standalone.jar [YAML_CONFIG_FILE]
```
The `logging.config` property is optional. If not set, logging messages are sent to the console.
## Test communication
You can run the connector in communication testing mode. This mode tests the communication with the backend without running the plugin, reports the result, and exits.
```java theme={"dark"}
java -Dstandalone.connector.connectivity.test=true -jar connector-plugin-client-standalone.jar [YAML_CONFIG_FILE]
```
## Encryption
In a deployment, communication to the connector’s backend server is encrypted using TLS. You should only run this configuration without TLS in a testing scenario. To disable TLS, set `plain-text` to `true`.
## Egress and proxy server configuration
One of the methods you can use to allow outbound communication from behind a firewall is a proxy server. You can configure a proxy server to allow certain communication traffic while blocking unauthorized communication. If you use a proxy server at the site where the connector is running, you must configure the following properties:
* **Host.** The hosts where the proxy server is running.
* **Port.** The port the proxy server is listening to for communication requests.
* **Credentials.** Optional proxy server user and password.
When you configure egress, it is important to disable any connection or activity timeouts because the connector uses long running gRPC calls.
## Password encryption
If you use a login name and password in your configuration, run the following utility to encrypt the password:
1. Enter a user name and password in the connector configuration YAML.
2. Run the standalone JAR with this property:
```java theme={"dark"}
-Dstandalone.connector.encrypt.password=true
```
3. Retrieve the encrypted passwords from the log that is created.
4. Replace the clear password in the configuration YAML with the encrypted password.
## Connector restart (5.7 and earlier)
The connector will shut down automatically whenever the connection to the server is disrupted, to prevent it from getting into a bad state. Communication disruption can happen, for example, when the server running in the `connectors-backend` pod shuts down and is replaced by a new pod. Once the connector shuts down, connector configuration and job execution are disabled. To prevent that from happening, you should restart the connector as soon as possible.
You can use Linux scripts and utilities to restart the connector automatically, such as [Monit](https://mmonit.com/monit/).
## Recoverable bridge (5.8 and later)
If communication to the remote connector is disrupted, the connector will try to recover communication and gRPC calls. By default, six attempts will be made to recover each gRPC call. The number of attempts can be configured with the `max-grpc-retries` bridge parameters.
## Job expiration duration (5.9.5 only)
The timeout value for irresponsive backend jobs can be configured with the `job-expiration-duration-seconds` parameter. The default value is `120` seconds.
## Use the remote connector
Once the connector is running, it is available in the Datasources dropdown. If the standalone connector terminates, it disappears from the list of available connectors. Once it is re-run, it is available again and configured connector instances will not get lost.
## Enable asynchronous parsing (5.9 and later)
To separate document crawling from document parsing, enable Tika Asynchronous Parsing on remote V2 connectors.
This document describes how to set up your application to use Tika asynchronous parsing.
Unlike synchronous Tika parsing, which uses a parser stage, asynchronous Tika parsing is configured in the datasource and index pipeline. For more information, see [Asynchronous Tika Parsing](/docs/5/fusion/getting-data-in/indexing/asynchronous-tika-parsing).
**Field names change with asynchronous Tika parsing.**
{/* // The code sample `\_lw_*` uses a backslash to escape the underscore character to prevent italics. */}
In contrast to synchronous parsing, asynchronous Tika parsing prepends `parser_` to fields added to a document. System fields, which start with `\_lw_`, are not prepended with `parser_`. If you are migrating to asynchronous Tika parsing, and your search application configuration relies on specific field names, update your search application to use the new fields.
## Configure the connectors datasource
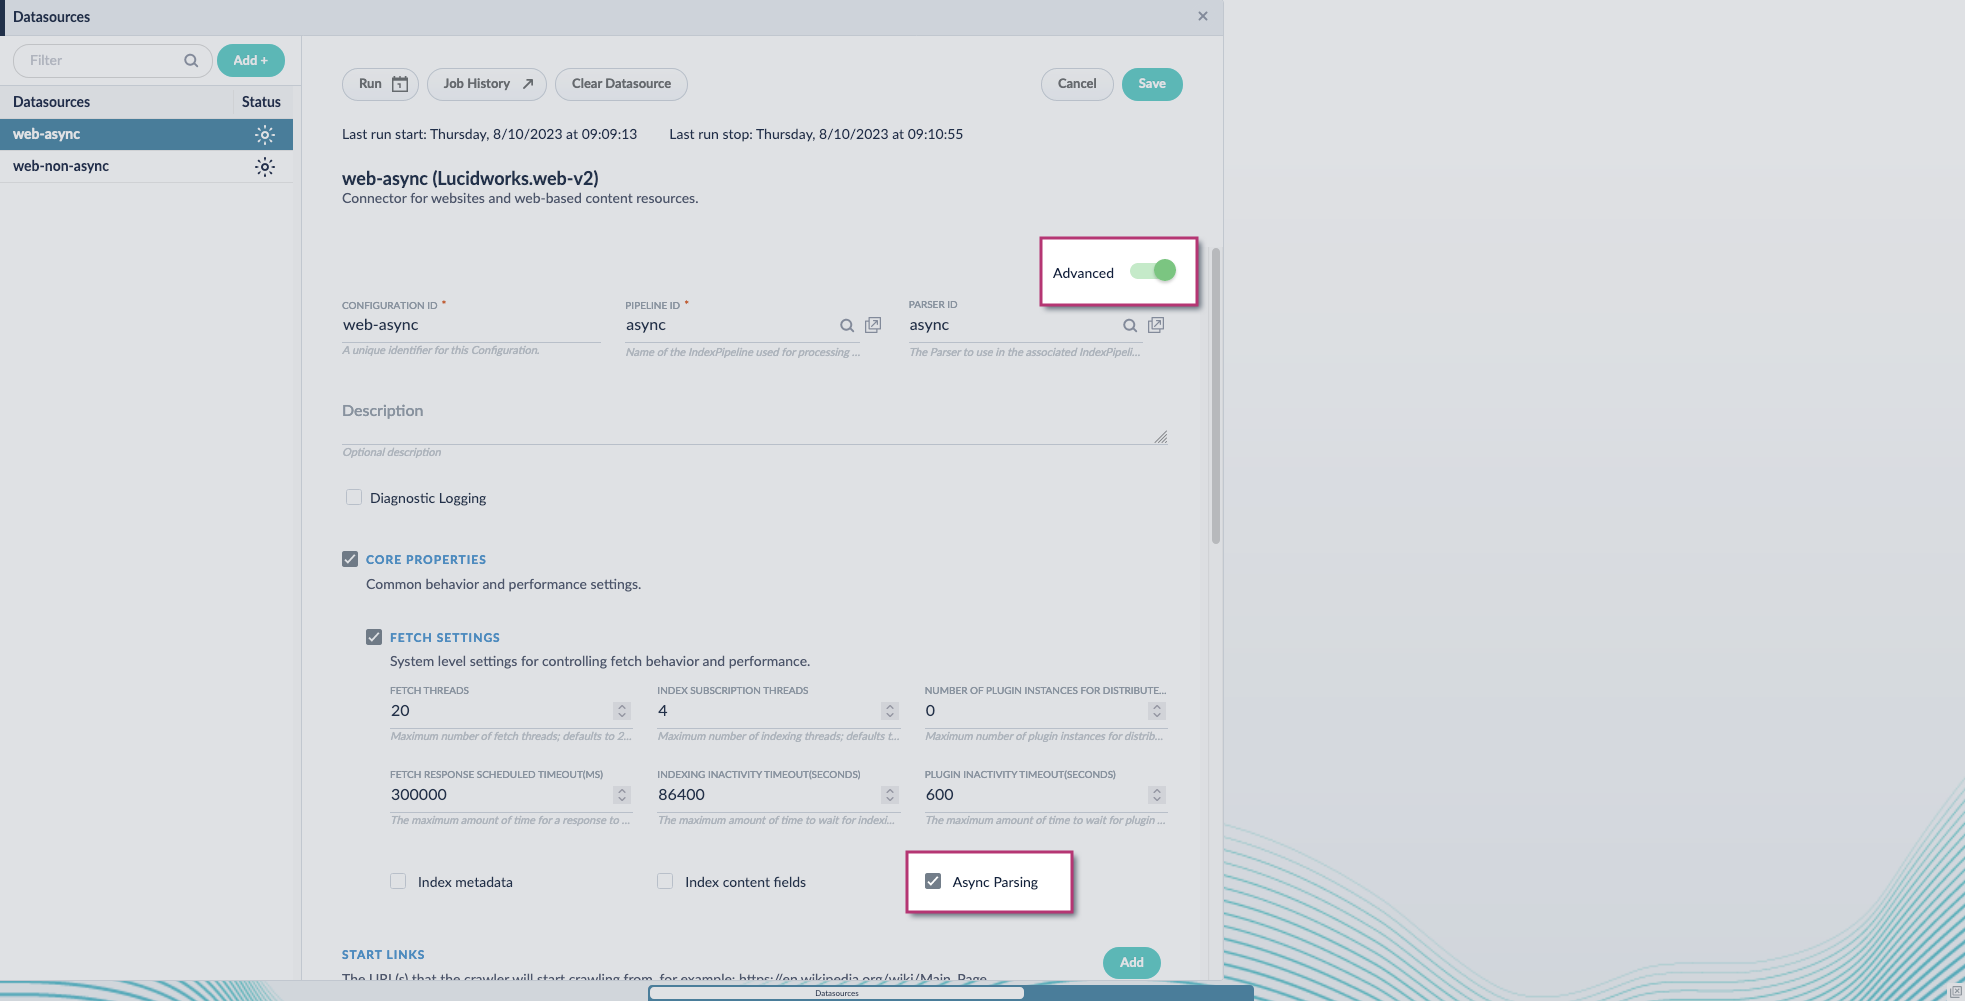
1. Navigate to your datasource.
2. Enable the **Advanced** view.
3. Enable the **Async Parsing** option.
**Fusion 5.9.11 and later uses your parser configuration when using asynchronous parsing.**
The asynchronous parsing service performs Tika parsing using Apache Tika Server. In Fusion 5.8 through 5.9.10, other parsers, such as HTML and JSON, are not supported by the asynchronous parsing service. By enabling asynchronous parsing, the parser configuration linked to your datasource is ignored. In Fusion 5.9.11 and later, other parsers, such as HTML and JSON, are supported by the asynchronous parsing service. By enabling asynchronous parsing, the parser configuration linked to your datasource is used.
4. Save the datasource configuration.
## Configure the parser stage
You must do this step in Fusion 5.9.11 and later.
1. Navigate to **Parsers**.
2. Select the parser, or create a new parser.
3. From the **Add a parser stage** menu, select **Apache Tika Container Parser**.
4. (Optional) Enter a label for this stage. This label changes the names from Apache Tika Container Parser to the value you enter in this field.
5. If the Apache Tika Container Parser stage is not already the first stage, drag and drop the stage to the top of the stage list so it is the first stage that runs.
## Configure the index pipeline
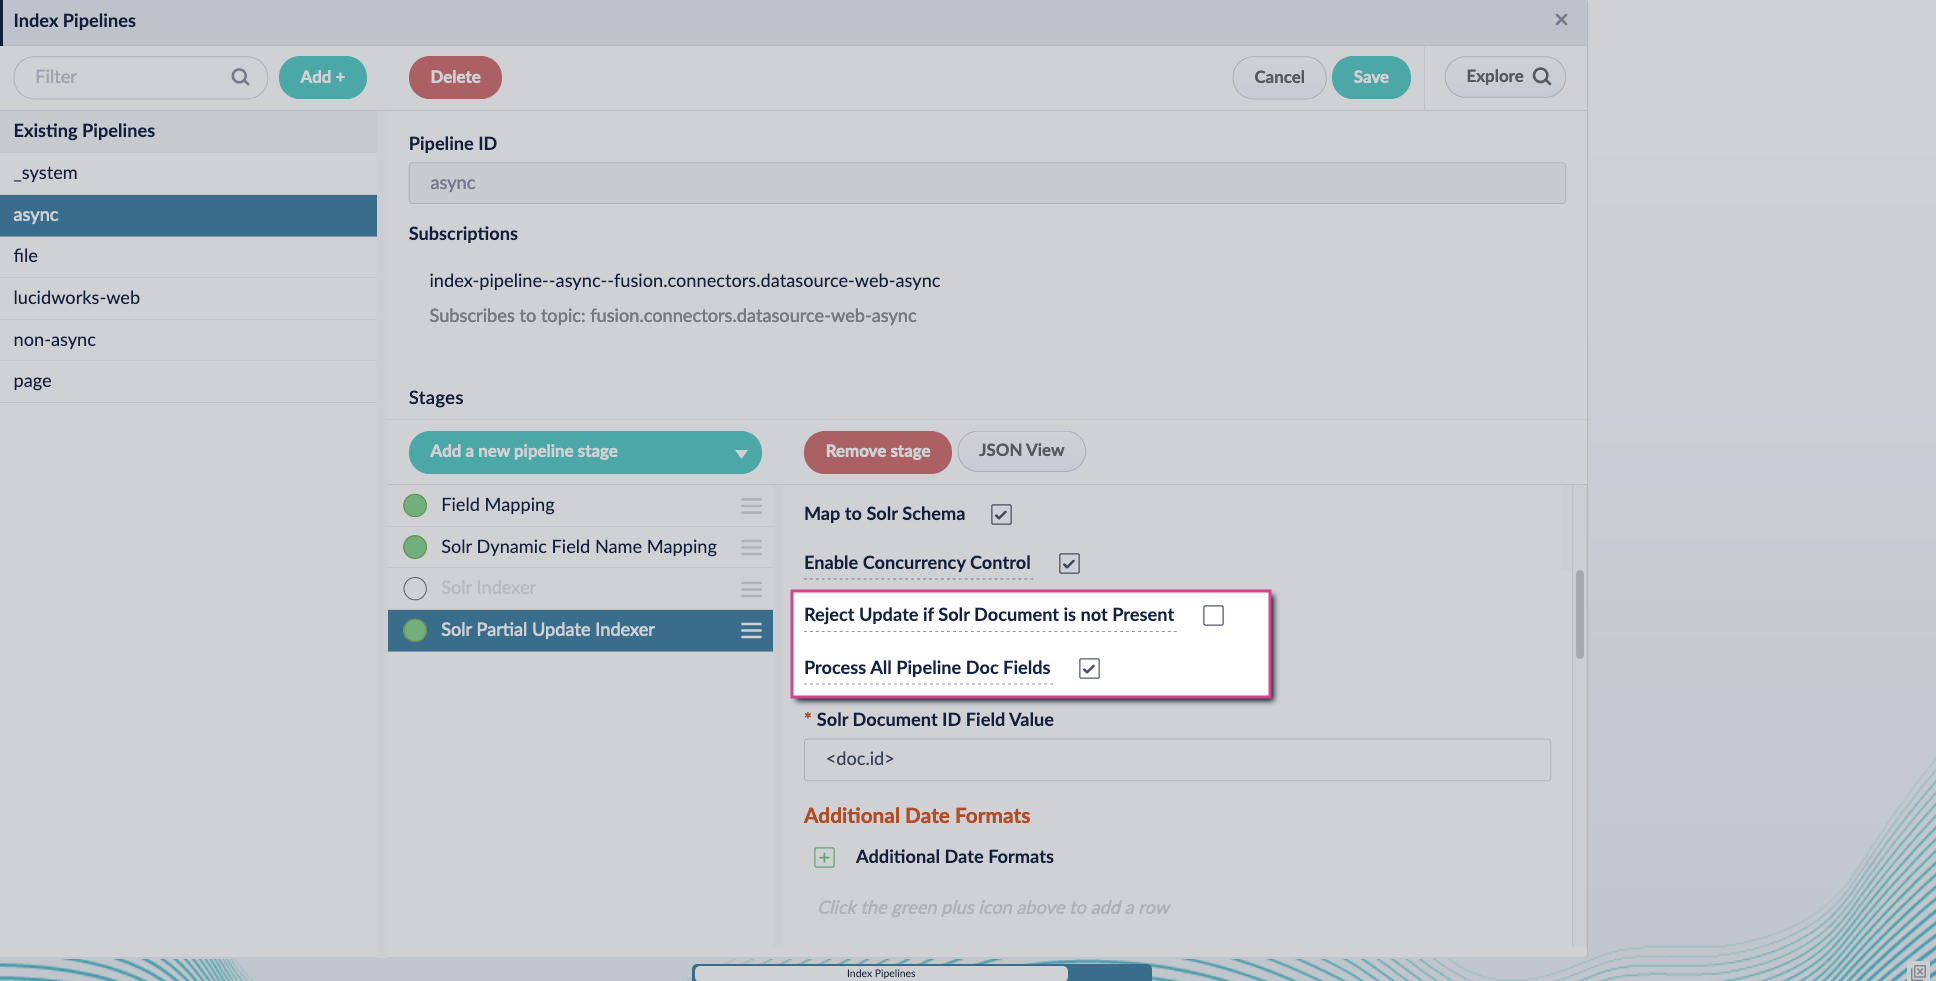
1. Go to the **Index Pipeline** screen.
2. Add the **Solr Partial Update Indexer** stage.
3. Turn off the **Reject Update if Solr Document is not Present** option and turn on the **Process All Pipeline Doc Fields** option:
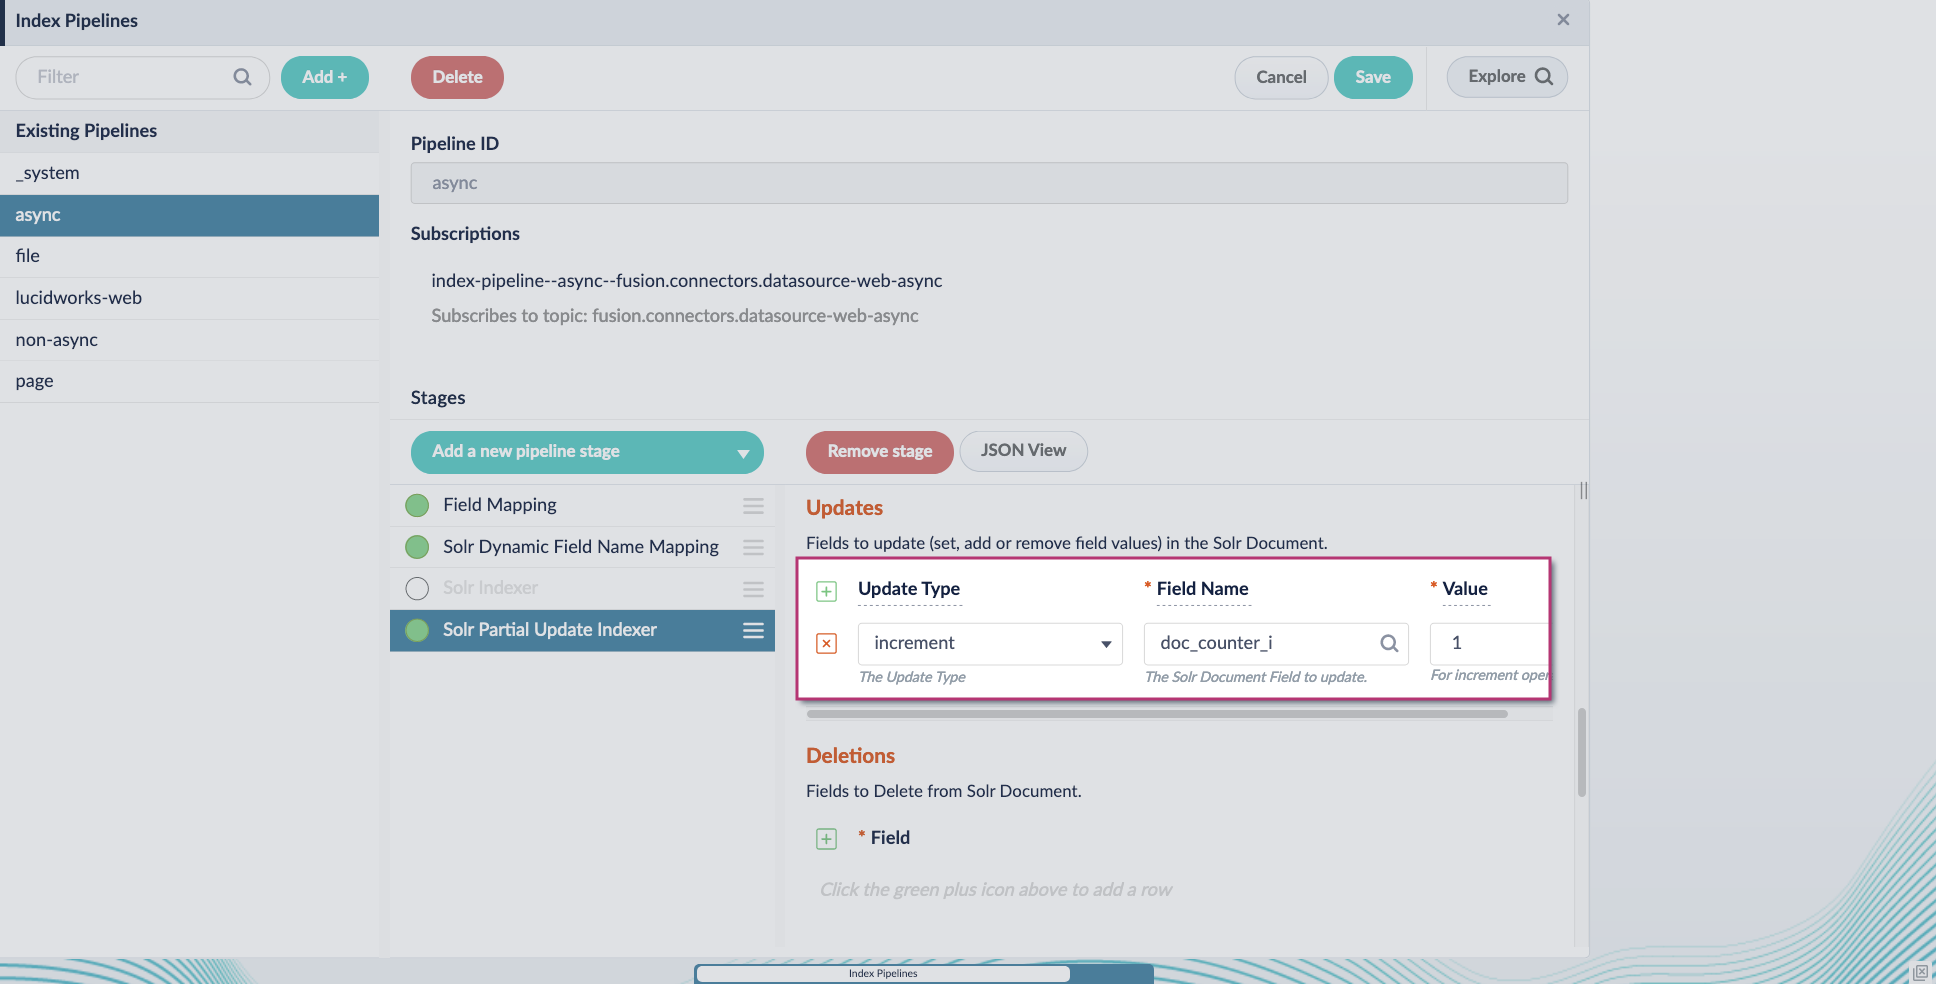
4. Include an extra update field in the stage configuration using any update type and field name. In this example, an incremental field `docs_counter_i` with an increment value of `1` is added:
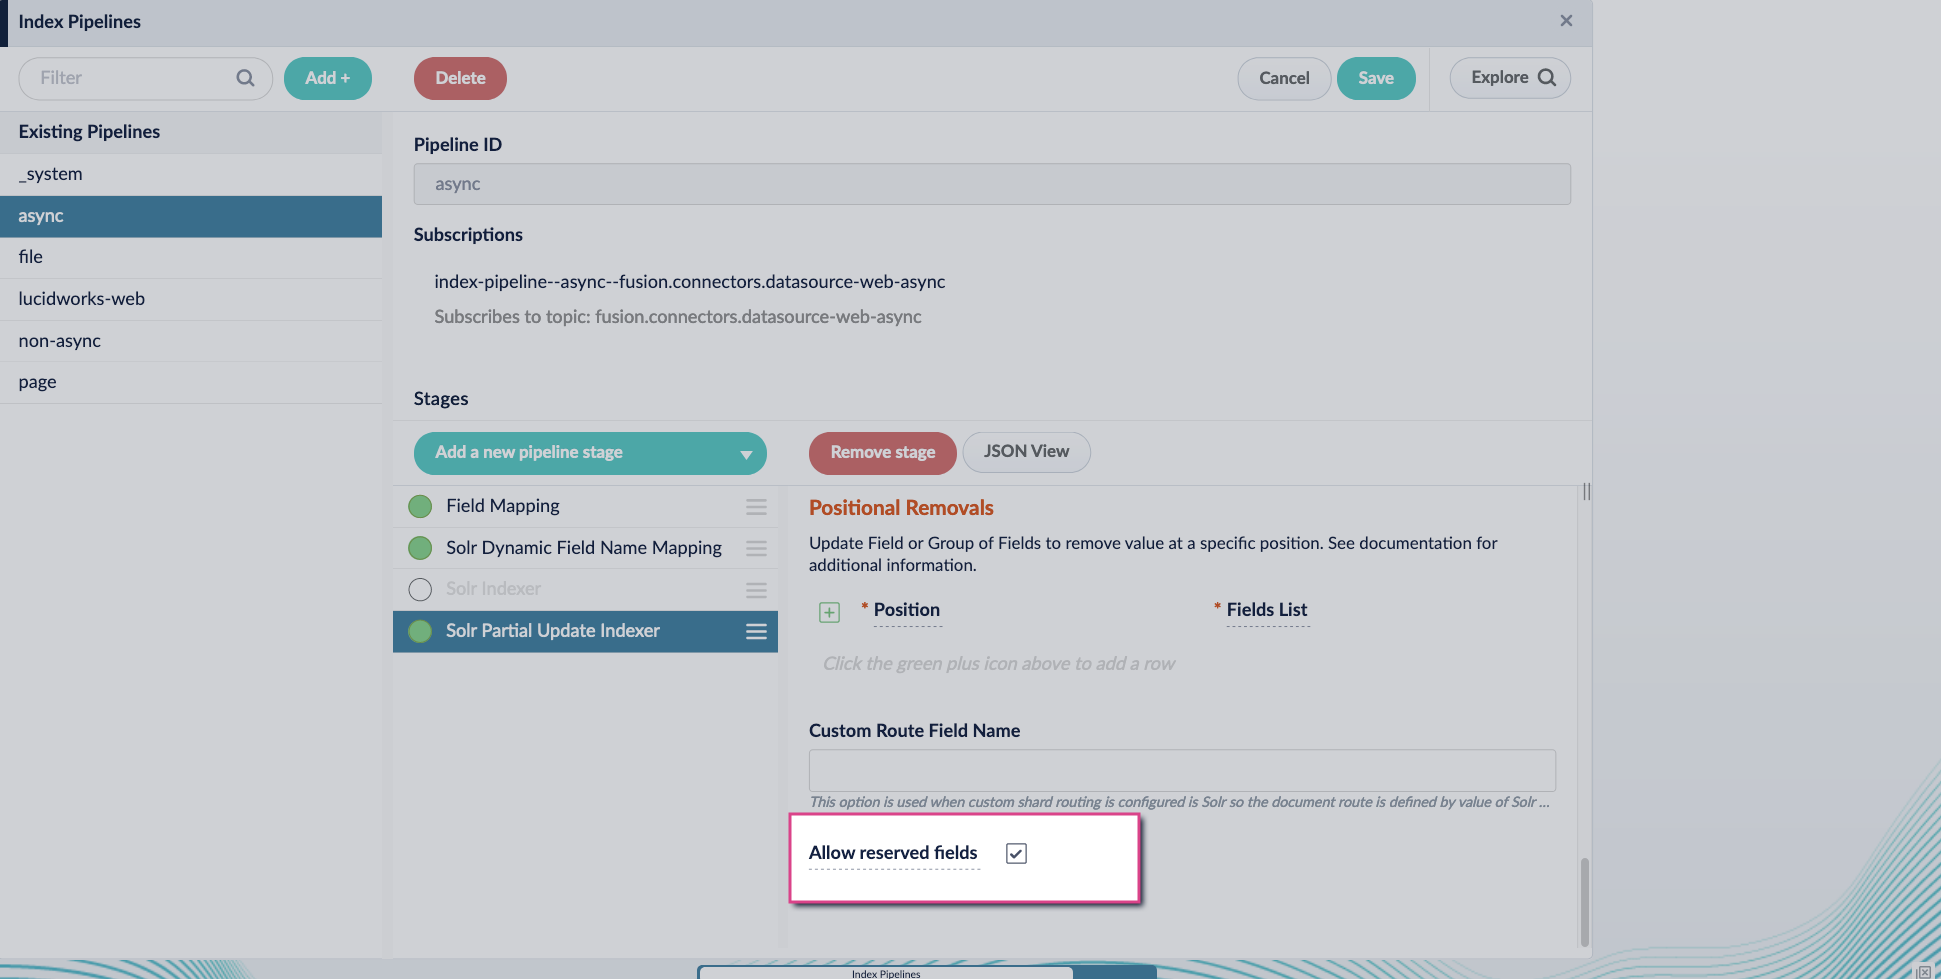
5. Enable the **Allow reserved fields** option:
6. Click **Save**.
7. Turn off or remove the **Solr Indexer stage**, and move the **Solr Partial Update Indexer stage** to be the last stage in the pipeline.
Asynchronous Tika parsing setup is now complete. Run the datasource indexing job and monitor the results.
 4. Include an extra update field in the stage configuration using any update type and field name. In this example, an incremental field `docs_counter_i` with an increment value of `1` is added:
 5. Enable the **Allow reserved fields** option:
 6. Click **Save**.
7. Turn off or remove the **Solr Indexer stage**, and move the **Solr Partial Update Indexer stage** to be the last stage in the pipeline.
6. Click **Save**.
7. Turn off or remove the **Solr Indexer stage**, and move the **Solr Partial Update Indexer stage** to be the last stage in the pipeline.
 Asynchronous Tika parsing setup is now complete. Run the datasource indexing job and monitor the results.