> ## Documentation Index
> Fetch the complete documentation index at: https://doc.lucidworks.com/llms.txt
> Use this file to discover all available pages before exploring further.
# Fusion 5.5.0
export const InlineImage = ({src, alt = '', height = '2em'}) => {
return  ;
};
[localhost link]: http://localhost:3000/docs/5/fusion/release-notes/5.5.0-release-notes
[mintlify link]: https://doc.lucidworks.com/docs/5/fusion/release-notes/5.5.0-release-notes
[old doc.lw link]: https://doc.lucidworks.com/fusion/5.9/301ya6
**Release date:** March 18, 2022
**Component versions:**
| Component | Version |
| ----------------------- | ------------------------------------------------------------------------------------------------------------------------------------------------------------------------------------------------------------------------------------------------------------------------------------- |
| **Solr** | 8.11.1 |
| **ZooKeeper** | 3.6.2 |
| **Spark** | 2.4.5 |
| **Kubernetes** | GKE, AKS, EKS 1.22 Rancher (RKE) and OpenShift 4 compatible with Kubernetes 1.22 OpenStack and customized Kubernetes installs not supported. See [Kubernetes support](/docs/policies/lifecycle-policies/lw-version-support-lifecycle#kubernetes-support) for end of support dates. |
| **Ingress Controllers** | Nginx, Ambassador (Envoy), GKE Ingress Controller Istio not supported. |
More information about support dates can be found at [Lucidworks Fusion Product Lifecycle](/docs/policies/lifecycle-policies/lw-version-support-lifecycle).
**Looking to upgrade?**
See [Fusion 5 Upgrades](/docs/5/fusion/operations/fusion-5-upgrades) for detailed instructions.
## Improvements
* Fusion 5.5 adds support for Rancher. See **Deploy Fusion 5 on Other Kubernetes Platforms** for more information.
The [`setup_f5_k8s.sh` script](https://github.com/lucidworks/fusion-cloud-native/blob/master/setup_f5_k8s.sh) in the [`fusion-cloud-native`](https://github.com/lucidworks/fusion-cloud-native) repository provides deployment support for any Kubernetes platform, including on-premise, private cloud, public cloud, and hybrid platforms.
This script is used by the [`setup_f5_gke.sh`](https://github.com/lucidworks/fusion-cloud-native/blob/master/setup_f5_gke.sh), [`setup_f5_eks.sh`](https://github.com/lucidworks/fusion-cloud-native/blob/master/setup_f5_eks.sh), and [`setup_f5_aks.sh`](https://github.com/lucidworks/fusion-cloud-native/blob/master/setup_f5_aks.sh) scripts, which provide additional platform-specific support for Google Kubernetes Engine (GKE), Amazon Elastic Kubernetes Service (EKS), and Azure Kubernetes Service (AKS).
This topic explains how to deploy a Fusion cluster in Kubernetes using the [`setup_f5_k8s.sh` script](https://github.com/lucidworks/fusion-cloud-native/blob/master/setup_f5_k8s.sh) in the [`fusion-cloud-native`](https://github.com/lucidworks/fusion-cloud-native) repository.
If you’re deploying on-premises or using a localized repository, you’ll need to use a private repository for Docker images.
## Prerequisites
This section covers prerequisites and background knowledge needed to help you understand the structure of this document and how the Fusion installation process works with Kubernetes.
### Release Name and Namespace
Before installing Fusion, you need to choose a [https://kubernetes.io/docs/concepts/overview/working-with-objects/namespaces/](https://kubernetes.io/docs/concepts/overview/working-with-objects/namespaces/) Kubernetes namespace to install Fusion into.
Think of a K8s namespace as a virtual cluster within a physical cluster. You can install multiple instances of Fusion in the same cluster *in separate namespaces*.
However, please *do not* install more than one Fusion release in the same namespace.
All Fusion services must run in the same namespace, i.e. you should not try to split a Fusion cluster across multiple namespaces.\_\_
Use a short name for the namespace, containing only letters, digits, or dashes (no dots or underscores). The setup scripts in this repo use the namespace for the Helm release name by default.
### Install Helm
Helm is a package manager for Kubernetes that helps you install and manage applications on your Kubernetes cluster.
Regardless of which Kubernetes platform you're using, you need to install *`helm`* as it is required to install Fusion for any K8s platform.
On MacOS, you can do:
```bash theme={"dark"}
brew install kubernetes-helm
```
If you already have helm installed, make sure you're using the latest version:
```bash theme={"dark"}
brew upgrade kubernetes-helm
```
For other OS, please refer to the Helm installation docs: [https://helm.sh/docs/using\_helm/](https://helm.sh/docs/using_helm/)
The Fusion helm chart requires that helm is greater than version `3.0.0`; check your Helm version by running `helm version --short`.
#### Helm User Permissions
If you require that fusion is installed by a user with minimal permissions, instead of an admin user, then the role and cluster role that will have to be assigned to the user within the namespace that you wish to install fusion in are documented in the `install-roles` directory.
When working with Kubernetes on the command-line, it's useful to create a shell alias for `kubectl`, e.g.:
```bash theme={"dark"}
alias k=kubectl
```
To use these role in a cluster, as an admin user first create the namespace that you wish to install fusion into:
```bash theme={"dark"}
k create namespace fusion-namespace
```
Apply the `role.yaml` and `cluster-role.yaml` files to that namespace
```bash theme={"dark"}
k apply -f cluster-role.yaml
k config set-context --current --namespace=$NAMESPACE
k apply -f role.yaml
```
Then bind the rolebinding and clusterolebinding to the install user:
```bash wrap theme={"dark"}
k create --namespace fusion-namespace rolebinding fusion-install-rolebinding --role fusion-installer --user
k create clusterrolebinding fusion-install-rolebinding --clusterrole fusion-installer --user
```
You will then be able to run the `helm install` command as the ``
### Clone fusion-cloud-native from GitHub
You should clone this repo from github as you'll need to run the scripts on your local workstation:
```bash theme={"dark"}
git clone https://github.com/lucidworks/fusion-cloud-native.git
```
You should get into the habit of pulling this repo for the latest changes before performing any maintenance operations on your Fusion cluster to ensure you have the latest updates to the scripts.
```bash theme={"dark"}
cd fusion-cloud-native
git pull
```
Cloning the github repo is preferred so that you can pull in updates to the scripts, but if you are not a git user, then you can download the project: [https://github.com/lucidworks/fusion-cloud-native/archive/master.zip](https://github.com/lucidworks/fusion-cloud-native/archive/master.zip).
Once downloaded, extract the zip and cd into the `fusion-cloud-native-master` directory.
## Deployment
If you're not running on a managed K8s platform like GKE, AKS, or EKS, you can use Helm to install the Fusion chart to an existing Kubernetes cluster.
Fusion version 5.5 now includes support for the Rancher Kubernetes Engine (RKE) platform. Before deploying Fusion to RKE, you must download and install the [latest RKE software](https://rancher.com/docs/rke/latest/en/). After configuring your cluster, you can proceed with the Helm v3 installation.
You must have a working cluster configured before performing the Helm v3 installation.
### Use Helm v3 to Install Fusion
You should upgrade to the latest version of Helm v3 for working with Fusion. If you need to keep Helm V2 for other clusters,
ensure Helm V3 is ahead of Helm V2 in your working shell's PATH before proceeding.
#### Customize Fusion Chart Settings
Fusion aims to be well-configured out-of-the-box, but you can customize any of the built-in settings using a custom values `YAML` file. If you use one of our setup scripts, such as `setup_f5_gke.sh`, then it will create a custom values YAML file for you the first time you run it using [https://github.com/lucidworks/fusion-cloud-native/blob/master/customize\_fusion\_values.yaml.example](https://github.com/lucidworks/fusion-cloud-native/blob/master/customize_fusion_values.yaml.example) as a template.
If you're working with Helm directly and not using one of our setup scripts, then run the [https://github.com/lucidworks/fusion-cloud-native/blob/master/customize\_fusion\_values.sh](https://github.com/lucidworks/fusion-cloud-native/blob/master/customize_fusion_values.sh) script to create a custom values YAML file from our [https://github.com/lucidworks/fusion-cloud-native/blob/master/customize\_fusion\_values.yaml.example](https://github.com/lucidworks/fusion-cloud-native/blob/master/customize_fusion_values.yaml.example) template as a starting point:
```bash theme={"dark"}
./customize_fusion_values.sh -c -n \
--provider --num-solr 1 --node-pool ""
```
Pass `--help` for usage details.
In this example:
* `` is the K8s platform you're running on, such as `gke`
* `` is the name of your cluster
* `` is the K8s namespace where you plan to install Fusion
The `--node-pool` option specifies the node selector label for determining which nodes to run Fusion pods. You can pass `"{}"` to let Kubernetes decide which nodes to schedule pods on.
This file is referred to as `${MY_VALUES}` in the commands belo. Replace the filename with the correct filename for your environment. Keep this file handy, as you'll need it to customize Fusion settings and upgrade to a newer version.
Review the settings in the custom values YAML file to ensure the defaults are appropriate for your environment, including the number of Solr and Zookeeper replicas.
Add the Lucidworks Helm repo:
```bash theme={"dark"}
helm repo add lucidworks https://charts.lucidworks.com
```
The `customize_fusion_values.sh` script creates an upgrade script to install/upgrade Fusion into Kubernetes using Helm. Look in the directory where you ran `customize_fusion_values.sh` for a script named like:
`___upgrade_fusion.sh`. Run this script to install Fusion.
## Verifying the Fusion Installation
In this section, we provide some tips on how to verify the Fusion installation.
Check if the Fusion Admin UI is available at `\https://:6764/admin/`.
Let's review some useful kubectl commands.
### Enhance the K8s Command-line Experience
Here is a list of tools we found useful for improving your command-line experience with Kubernetes:
* krew (kubectl plugin mgr): [https://github.com/kubernetes-sigs/krew/](https://github.com/kubernetes-sigs/krew/)
* kube-ps1 (show current context on command line prompt): [https://github.com/jonmosco/kube-ps1](https://github.com/jonmosco/kube-ps1)
* kubectx / kubens (switch between clusters / namespaces): [https://github.com/ahmetb/kubectx](https://github.com/ahmetb/kubectx)
### Useful kubectl commands
kubectl reference: [https://kubernetes.io/docs/reference/generated/kubectl/kubectl-commands](https://kubernetes.io/docs/reference/generated/kubectl/kubectl-commands)
Set the namespace for `kubectl` if not using the default:
```bash theme={"dark"}
kubectl config set-context --current --namespace=
```
**This saves you from having to pass `-n` with every command.**
Get a list of running pods: `k get pods`
Get logs for a pod using a label: `k logs –l app.kubernetes.io/component=query-pipeline`
Get pod deployment spec and details: `k get pods -o yaml`
Get details about a pod events: `k describe po `
Port forward to a specific pod: `k port-forward 8983:8983`
SSH into a pod: `k exec -it -- /bin/bash`
CPU/Memory usage report for pods: `k top pods`
Forcefully kill a pod: `k delete po --force --grace-period 0`
Scale up (or down) a deployment: `k scale deployment.v1.apps/ --replicas=N`
Get a list of pod versions: `k get po -o jsonpath='{..image}' | tr -s '[[:space:]]' '\n' | sort | uniq`
### Check Fusion Pods and Services
Once the install script completes, you can check that all pods and services are available using:
```bash theme={"dark"}
kubectl get pods
```
If all goes well, you should see a list of pods similar to:
```bash wrap theme={"dark"}
NAME READY STATUS RESTARTS AGE
seldon-controller-manager-6675874894-qxwrv 1/1 Running 0 8m45s
f5-admin-ui-74d794f4f8-m5jms 1/1 Running 0 8m45s
f5-ambassador-fd6b9b5dc-7ghf6 1/1 Running 0 8m43s
f5-api-gateway-6b9998b9c-tmchk 1/1 Running 0 8m45s
f5-auth-ui-7565564b4c-rdc74 1/1 Running 0 8m42s
f5-classic-rest-service-0 1/1 Running 3 8m44s
f5-devops-ui-77bb867ffb-fbzxd 1/1 Running 0 8m42s
f5-fusion-admin-78b8f8fc7f-4d7l8 1/1 Running 0 8m42s
f5-fusion-indexing-599c8d448-xzsvm 1/1 Running 0 8m44s
f5-insights-665fd9f6fc-g5psw 1/1 Running 0 8m43s
f5-job-launcher-84dd4c5c96-p8528 1/1 Running 0 8m44s
f5-job-rest-server-6d44d964b8-xtnxw 1/1 Running 0 8m45s
f5-logstash-0 1/1 Running 0 8m45s
f5-ml-model-service-6987dc94c9-9ppp8 2/2 Running 1 8m45s
f5-monitoring-grafana-5d499dbb58-pzw72 1/1 Running 0 10m
f5-monitoring-prometheus-kube-state-metrics-54d6678dv9h7h 1/1 Running 0 10m
f5-monitoring-prometheus-pushgateway-7d65c65b85-vwrwf 1/1 Running 0 10m
f5-monitoring-prometheus-server-0 2/2 Running 0 10m
f5-pm-ui-86cbc5bb65-nd2n8 1/1 Running 0 8m44s
f5-pulsar-bookkeeper-0 1/1 Running 0 8m45s
f5-pulsar-broker-b56cc776f-56msx 1/1 Running 0 8m45s
f5-query-pipeline-5d75d7d5f4-l2mdf 1/1 Running 0 8m43s
f5-connectors-7bb6cfc65f-7wfs2 1/1 Running 0 8m42s
f5-connectors-backend-987fdc648-dldwv 1/1 Running 0 8m45s
f5-rules-ui-6b9d55b78f-9hzzj 1/1 Running 0 8m43s
f5-solr-0 1/1 Running 0 8m44s
f5-solr-exporter-c4687c785-jsm7x 1/1 Running 0 8m45s
f5-ui-6cdbcc68c6-rj9cq 1/1 Running 0 8m45s
f5-webapps-6d6bb9bfd-hm4qx 1/1 Running 0 8m45s
f5-workflow-controller-7b66679fb7-sjbvp 1/1 Running 0 8m44s
f5-zookeeper-0 1/1 Running 0 8m45s
```
The number of pods per deployment / statefulset will vary based on your cluster size and replicaCount settings in your custom values YAML file.
Also, don't worry if you see some pods having been restarted as that just means they were too slow to come up and Kubernetes killed and restarted them.
You do want to see at least one pod running for every service. If a pod is not running after waiting a sufficient amount of time,
use `kubectl logs ` to see the logs for that pod; to see the logs for previous versions of a pod, use: `kubectl logs -p`.
You can also look at the actions Kubernetes performed on the pod using `kubectl describe po `.
To see a list of Fusion services, do:
```bash theme={"dark"}
kubectl get svc
```
For an overview of the various Fusion 5 microservices, see: [Fusion microservices](/docs/5/fusion/reference/microservices).
Once you're ready to build a Fusion cluster for production, please see see more information at [Fusion 5 Survival Guide](/docs/5/fusion/operations/survival-guide/overview).
### Upgrading with Zero Downtime
One of the most powerful features provided by Kubernetes and a cloud-native microservices architecture is the ability to do a rolling update on a live cluster. Fusion 5 allows customers to upgrade from Fusion 5.x.y to a later 5.x.z version on a live cluster with zero downtime or disruption of service.
When Kubernetes performs a rolling update to an individual microservice, there will be a mix of old and new services in the cluster concurrently (only briefly in most cases) and requests from other services will be routed to both versions. Consequently, Lucidworks ensures all changes we make to our service do not break the API interface exposed to other services in the same 5.x line of releases. We also ensure stored configuration remains compatible in the same 5.x release line.
Lucidworks releases minor updates to individual services frequently, so our customers can pull in those upgrades using Helm at their discretion.
To upgrade your cluster at any time, use the `--upgrade` option with our setup scripts in this repo.
The scripts in this repo automatically pull in the latest chart updates from our Helm repository and deploy any updates needed by doing a diff of your current installation and the latest release from Lucidworks.
To see what would be upgraded, you can pass the `--dry-run` option to the script.
### Grafana Dashboards
Get the initial Grafana password from a K8s secret by doing:
```bash wrap theme={"dark"}
kubectl get secret --namespace "${NAMESPACE}" ${RELEASE}-monitoring-grafana \
-o jsonpath="{.data.admin-password}" | base64 --decode ; echo
```
With Grafana, you can either setup a temporary port-forward to a Grafana pod or expose Grafana on an external IP using a K8s LoadBalancer.
To define a LoadBalancer, do (replace \${RELEASE} with your Helm release label):
```bash wrap theme={"dark"}
kubectl expose deployment ${RELEASE}-monitoring-grafana --type=LoadBalancer --name=grafana --port=3000 --target-port=3000
```
You can use `kubectl get services --namespace ` to determine when the load balancer is setup and its IP address. Direct your browser to `http://:3000` and enter the username `admin@localhost` and the password that was returned in the previous step.
This will log you into the application. It is recommended that you create another administrative user with a more desirable password.
The dashboards and datasoure will be setup for you in grafana, simply navigate to `Dashboards` -> `Manage` to view the available dashboards
## More deployment options
* How to deploy Fusion 5 in Google Kubernetes Engine
* How to deploy Fusion 5 in Amazon Elastic Kubernetes Service
* How to deploy Fusion 5 in Azure Kubernetes Service
## Learn more
The course for **Deploying Fusion 5** focuses on the prerequisite software needed to deploy Fusion, the necessary setup steps, and the physical act of deployment.
## Security
* Fusion services have been updated with the following versions:
* Log4J service version 2.17.1
* Tika 1.28
* nginix 1.21.5-alpine
## Bug Fixes
### Fusion
* Fixed an issue that caused problems with access and configuration of kubelet options.
* Fixed an issue that potentially allowed Read roles to create/delete Solr operations.
* Fixed an issue that prevented the logout option from being displayed if the "logout" button was clicked while creating or modifying an OIDC/SAML [security realm](/docs/5/fusion/operations/security/access-control/security-realms).
* Fixed an issue that caused the cursor to bypass the password field when using the tab button at login.
* Fixed an issue that prevented [App Insights](/docs/5/fusion/getting-data-out/data-analytics/app-insights/overview) from creating custom reports.
* Fixed an issue that caused invalid language codes to be displayed in the [**Detect Language**](/docs/5/fusion/reference/config-ref/pipeline-stages/index-stages/language-detection-index-stage) index pipeline stage.
* Fixed an issue that caused the **Schedule a Job** to disappear after saving the job settings.
**How to schedule a job**
1. In the Fusion workspace, navigate to **Collections > Scheduler**.
2. Select the job from the job list.
3. Click **Run**.
4. Click **New Schedule**.
5. Select a job trigger:
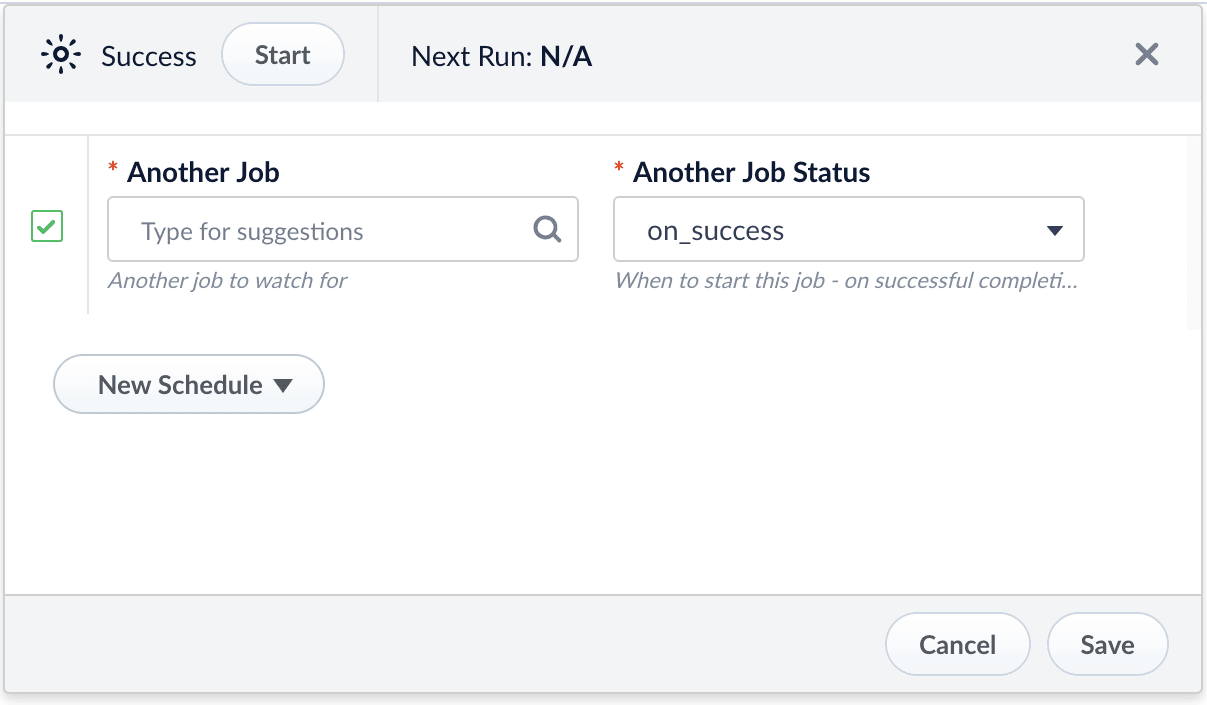
* **After Another Job Completes**
Enter the job ID and job result that trigger this one.
;
};
[localhost link]: http://localhost:3000/docs/5/fusion/release-notes/5.5.0-release-notes
[mintlify link]: https://doc.lucidworks.com/docs/5/fusion/release-notes/5.5.0-release-notes
[old doc.lw link]: https://doc.lucidworks.com/fusion/5.9/301ya6
**Release date:** March 18, 2022
**Component versions:**
| Component | Version |
| ----------------------- | ------------------------------------------------------------------------------------------------------------------------------------------------------------------------------------------------------------------------------------------------------------------------------------- |
| **Solr** | 8.11.1 |
| **ZooKeeper** | 3.6.2 |
| **Spark** | 2.4.5 |
| **Kubernetes** | GKE, AKS, EKS 1.22 Rancher (RKE) and OpenShift 4 compatible with Kubernetes 1.22 OpenStack and customized Kubernetes installs not supported. See [Kubernetes support](/docs/policies/lifecycle-policies/lw-version-support-lifecycle#kubernetes-support) for end of support dates. |
| **Ingress Controllers** | Nginx, Ambassador (Envoy), GKE Ingress Controller Istio not supported. |
More information about support dates can be found at [Lucidworks Fusion Product Lifecycle](/docs/policies/lifecycle-policies/lw-version-support-lifecycle).
**Looking to upgrade?**
See [Fusion 5 Upgrades](/docs/5/fusion/operations/fusion-5-upgrades) for detailed instructions.
## Improvements
* Fusion 5.5 adds support for Rancher. See **Deploy Fusion 5 on Other Kubernetes Platforms** for more information.
The [`setup_f5_k8s.sh` script](https://github.com/lucidworks/fusion-cloud-native/blob/master/setup_f5_k8s.sh) in the [`fusion-cloud-native`](https://github.com/lucidworks/fusion-cloud-native) repository provides deployment support for any Kubernetes platform, including on-premise, private cloud, public cloud, and hybrid platforms.
This script is used by the [`setup_f5_gke.sh`](https://github.com/lucidworks/fusion-cloud-native/blob/master/setup_f5_gke.sh), [`setup_f5_eks.sh`](https://github.com/lucidworks/fusion-cloud-native/blob/master/setup_f5_eks.sh), and [`setup_f5_aks.sh`](https://github.com/lucidworks/fusion-cloud-native/blob/master/setup_f5_aks.sh) scripts, which provide additional platform-specific support for Google Kubernetes Engine (GKE), Amazon Elastic Kubernetes Service (EKS), and Azure Kubernetes Service (AKS).
This topic explains how to deploy a Fusion cluster in Kubernetes using the [`setup_f5_k8s.sh` script](https://github.com/lucidworks/fusion-cloud-native/blob/master/setup_f5_k8s.sh) in the [`fusion-cloud-native`](https://github.com/lucidworks/fusion-cloud-native) repository.
If you’re deploying on-premises or using a localized repository, you’ll need to use a private repository for Docker images.
## Prerequisites
This section covers prerequisites and background knowledge needed to help you understand the structure of this document and how the Fusion installation process works with Kubernetes.
### Release Name and Namespace
Before installing Fusion, you need to choose a [https://kubernetes.io/docs/concepts/overview/working-with-objects/namespaces/](https://kubernetes.io/docs/concepts/overview/working-with-objects/namespaces/) Kubernetes namespace to install Fusion into.
Think of a K8s namespace as a virtual cluster within a physical cluster. You can install multiple instances of Fusion in the same cluster *in separate namespaces*.
However, please *do not* install more than one Fusion release in the same namespace.
All Fusion services must run in the same namespace, i.e. you should not try to split a Fusion cluster across multiple namespaces.\_\_
Use a short name for the namespace, containing only letters, digits, or dashes (no dots or underscores). The setup scripts in this repo use the namespace for the Helm release name by default.
### Install Helm
Helm is a package manager for Kubernetes that helps you install and manage applications on your Kubernetes cluster.
Regardless of which Kubernetes platform you're using, you need to install *`helm`* as it is required to install Fusion for any K8s platform.
On MacOS, you can do:
```bash theme={"dark"}
brew install kubernetes-helm
```
If you already have helm installed, make sure you're using the latest version:
```bash theme={"dark"}
brew upgrade kubernetes-helm
```
For other OS, please refer to the Helm installation docs: [https://helm.sh/docs/using\_helm/](https://helm.sh/docs/using_helm/)
The Fusion helm chart requires that helm is greater than version `3.0.0`; check your Helm version by running `helm version --short`.
#### Helm User Permissions
If you require that fusion is installed by a user with minimal permissions, instead of an admin user, then the role and cluster role that will have to be assigned to the user within the namespace that you wish to install fusion in are documented in the `install-roles` directory.
When working with Kubernetes on the command-line, it's useful to create a shell alias for `kubectl`, e.g.:
```bash theme={"dark"}
alias k=kubectl
```
To use these role in a cluster, as an admin user first create the namespace that you wish to install fusion into:
```bash theme={"dark"}
k create namespace fusion-namespace
```
Apply the `role.yaml` and `cluster-role.yaml` files to that namespace
```bash theme={"dark"}
k apply -f cluster-role.yaml
k config set-context --current --namespace=$NAMESPACE
k apply -f role.yaml
```
Then bind the rolebinding and clusterolebinding to the install user:
```bash wrap theme={"dark"}
k create --namespace fusion-namespace rolebinding fusion-install-rolebinding --role fusion-installer --user
k create clusterrolebinding fusion-install-rolebinding --clusterrole fusion-installer --user
```
You will then be able to run the `helm install` command as the ``
### Clone fusion-cloud-native from GitHub
You should clone this repo from github as you'll need to run the scripts on your local workstation:
```bash theme={"dark"}
git clone https://github.com/lucidworks/fusion-cloud-native.git
```
You should get into the habit of pulling this repo for the latest changes before performing any maintenance operations on your Fusion cluster to ensure you have the latest updates to the scripts.
```bash theme={"dark"}
cd fusion-cloud-native
git pull
```
Cloning the github repo is preferred so that you can pull in updates to the scripts, but if you are not a git user, then you can download the project: [https://github.com/lucidworks/fusion-cloud-native/archive/master.zip](https://github.com/lucidworks/fusion-cloud-native/archive/master.zip).
Once downloaded, extract the zip and cd into the `fusion-cloud-native-master` directory.
## Deployment
If you're not running on a managed K8s platform like GKE, AKS, or EKS, you can use Helm to install the Fusion chart to an existing Kubernetes cluster.
Fusion version 5.5 now includes support for the Rancher Kubernetes Engine (RKE) platform. Before deploying Fusion to RKE, you must download and install the [latest RKE software](https://rancher.com/docs/rke/latest/en/). After configuring your cluster, you can proceed with the Helm v3 installation.
You must have a working cluster configured before performing the Helm v3 installation.
### Use Helm v3 to Install Fusion
You should upgrade to the latest version of Helm v3 for working with Fusion. If you need to keep Helm V2 for other clusters,
ensure Helm V3 is ahead of Helm V2 in your working shell's PATH before proceeding.
#### Customize Fusion Chart Settings
Fusion aims to be well-configured out-of-the-box, but you can customize any of the built-in settings using a custom values `YAML` file. If you use one of our setup scripts, such as `setup_f5_gke.sh`, then it will create a custom values YAML file for you the first time you run it using [https://github.com/lucidworks/fusion-cloud-native/blob/master/customize\_fusion\_values.yaml.example](https://github.com/lucidworks/fusion-cloud-native/blob/master/customize_fusion_values.yaml.example) as a template.
If you're working with Helm directly and not using one of our setup scripts, then run the [https://github.com/lucidworks/fusion-cloud-native/blob/master/customize\_fusion\_values.sh](https://github.com/lucidworks/fusion-cloud-native/blob/master/customize_fusion_values.sh) script to create a custom values YAML file from our [https://github.com/lucidworks/fusion-cloud-native/blob/master/customize\_fusion\_values.yaml.example](https://github.com/lucidworks/fusion-cloud-native/blob/master/customize_fusion_values.yaml.example) template as a starting point:
```bash theme={"dark"}
./customize_fusion_values.sh -c -n \
--provider --num-solr 1 --node-pool ""
```
Pass `--help` for usage details.
In this example:
* `` is the K8s platform you're running on, such as `gke`
* `` is the name of your cluster
* `` is the K8s namespace where you plan to install Fusion
The `--node-pool` option specifies the node selector label for determining which nodes to run Fusion pods. You can pass `"{}"` to let Kubernetes decide which nodes to schedule pods on.
This file is referred to as `${MY_VALUES}` in the commands belo. Replace the filename with the correct filename for your environment. Keep this file handy, as you'll need it to customize Fusion settings and upgrade to a newer version.
Review the settings in the custom values YAML file to ensure the defaults are appropriate for your environment, including the number of Solr and Zookeeper replicas.
Add the Lucidworks Helm repo:
```bash theme={"dark"}
helm repo add lucidworks https://charts.lucidworks.com
```
The `customize_fusion_values.sh` script creates an upgrade script to install/upgrade Fusion into Kubernetes using Helm. Look in the directory where you ran `customize_fusion_values.sh` for a script named like:
`___upgrade_fusion.sh`. Run this script to install Fusion.
## Verifying the Fusion Installation
In this section, we provide some tips on how to verify the Fusion installation.
Check if the Fusion Admin UI is available at `\https://:6764/admin/`.
Let's review some useful kubectl commands.
### Enhance the K8s Command-line Experience
Here is a list of tools we found useful for improving your command-line experience with Kubernetes:
* krew (kubectl plugin mgr): [https://github.com/kubernetes-sigs/krew/](https://github.com/kubernetes-sigs/krew/)
* kube-ps1 (show current context on command line prompt): [https://github.com/jonmosco/kube-ps1](https://github.com/jonmosco/kube-ps1)
* kubectx / kubens (switch between clusters / namespaces): [https://github.com/ahmetb/kubectx](https://github.com/ahmetb/kubectx)
### Useful kubectl commands
kubectl reference: [https://kubernetes.io/docs/reference/generated/kubectl/kubectl-commands](https://kubernetes.io/docs/reference/generated/kubectl/kubectl-commands)
Set the namespace for `kubectl` if not using the default:
```bash theme={"dark"}
kubectl config set-context --current --namespace=
```
**This saves you from having to pass `-n` with every command.**
Get a list of running pods: `k get pods`
Get logs for a pod using a label: `k logs –l app.kubernetes.io/component=query-pipeline`
Get pod deployment spec and details: `k get pods -o yaml`
Get details about a pod events: `k describe po `
Port forward to a specific pod: `k port-forward 8983:8983`
SSH into a pod: `k exec -it -- /bin/bash`
CPU/Memory usage report for pods: `k top pods`
Forcefully kill a pod: `k delete po --force --grace-period 0`
Scale up (or down) a deployment: `k scale deployment.v1.apps/ --replicas=N`
Get a list of pod versions: `k get po -o jsonpath='{..image}' | tr -s '[[:space:]]' '\n' | sort | uniq`
### Check Fusion Pods and Services
Once the install script completes, you can check that all pods and services are available using:
```bash theme={"dark"}
kubectl get pods
```
If all goes well, you should see a list of pods similar to:
```bash wrap theme={"dark"}
NAME READY STATUS RESTARTS AGE
seldon-controller-manager-6675874894-qxwrv 1/1 Running 0 8m45s
f5-admin-ui-74d794f4f8-m5jms 1/1 Running 0 8m45s
f5-ambassador-fd6b9b5dc-7ghf6 1/1 Running 0 8m43s
f5-api-gateway-6b9998b9c-tmchk 1/1 Running 0 8m45s
f5-auth-ui-7565564b4c-rdc74 1/1 Running 0 8m42s
f5-classic-rest-service-0 1/1 Running 3 8m44s
f5-devops-ui-77bb867ffb-fbzxd 1/1 Running 0 8m42s
f5-fusion-admin-78b8f8fc7f-4d7l8 1/1 Running 0 8m42s
f5-fusion-indexing-599c8d448-xzsvm 1/1 Running 0 8m44s
f5-insights-665fd9f6fc-g5psw 1/1 Running 0 8m43s
f5-job-launcher-84dd4c5c96-p8528 1/1 Running 0 8m44s
f5-job-rest-server-6d44d964b8-xtnxw 1/1 Running 0 8m45s
f5-logstash-0 1/1 Running 0 8m45s
f5-ml-model-service-6987dc94c9-9ppp8 2/2 Running 1 8m45s
f5-monitoring-grafana-5d499dbb58-pzw72 1/1 Running 0 10m
f5-monitoring-prometheus-kube-state-metrics-54d6678dv9h7h 1/1 Running 0 10m
f5-monitoring-prometheus-pushgateway-7d65c65b85-vwrwf 1/1 Running 0 10m
f5-monitoring-prometheus-server-0 2/2 Running 0 10m
f5-pm-ui-86cbc5bb65-nd2n8 1/1 Running 0 8m44s
f5-pulsar-bookkeeper-0 1/1 Running 0 8m45s
f5-pulsar-broker-b56cc776f-56msx 1/1 Running 0 8m45s
f5-query-pipeline-5d75d7d5f4-l2mdf 1/1 Running 0 8m43s
f5-connectors-7bb6cfc65f-7wfs2 1/1 Running 0 8m42s
f5-connectors-backend-987fdc648-dldwv 1/1 Running 0 8m45s
f5-rules-ui-6b9d55b78f-9hzzj 1/1 Running 0 8m43s
f5-solr-0 1/1 Running 0 8m44s
f5-solr-exporter-c4687c785-jsm7x 1/1 Running 0 8m45s
f5-ui-6cdbcc68c6-rj9cq 1/1 Running 0 8m45s
f5-webapps-6d6bb9bfd-hm4qx 1/1 Running 0 8m45s
f5-workflow-controller-7b66679fb7-sjbvp 1/1 Running 0 8m44s
f5-zookeeper-0 1/1 Running 0 8m45s
```
The number of pods per deployment / statefulset will vary based on your cluster size and replicaCount settings in your custom values YAML file.
Also, don't worry if you see some pods having been restarted as that just means they were too slow to come up and Kubernetes killed and restarted them.
You do want to see at least one pod running for every service. If a pod is not running after waiting a sufficient amount of time,
use `kubectl logs ` to see the logs for that pod; to see the logs for previous versions of a pod, use: `kubectl logs -p`.
You can also look at the actions Kubernetes performed on the pod using `kubectl describe po `.
To see a list of Fusion services, do:
```bash theme={"dark"}
kubectl get svc
```
For an overview of the various Fusion 5 microservices, see: [Fusion microservices](/docs/5/fusion/reference/microservices).
Once you're ready to build a Fusion cluster for production, please see see more information at [Fusion 5 Survival Guide](/docs/5/fusion/operations/survival-guide/overview).
### Upgrading with Zero Downtime
One of the most powerful features provided by Kubernetes and a cloud-native microservices architecture is the ability to do a rolling update on a live cluster. Fusion 5 allows customers to upgrade from Fusion 5.x.y to a later 5.x.z version on a live cluster with zero downtime or disruption of service.
When Kubernetes performs a rolling update to an individual microservice, there will be a mix of old and new services in the cluster concurrently (only briefly in most cases) and requests from other services will be routed to both versions. Consequently, Lucidworks ensures all changes we make to our service do not break the API interface exposed to other services in the same 5.x line of releases. We also ensure stored configuration remains compatible in the same 5.x release line.
Lucidworks releases minor updates to individual services frequently, so our customers can pull in those upgrades using Helm at their discretion.
To upgrade your cluster at any time, use the `--upgrade` option with our setup scripts in this repo.
The scripts in this repo automatically pull in the latest chart updates from our Helm repository and deploy any updates needed by doing a diff of your current installation and the latest release from Lucidworks.
To see what would be upgraded, you can pass the `--dry-run` option to the script.
### Grafana Dashboards
Get the initial Grafana password from a K8s secret by doing:
```bash wrap theme={"dark"}
kubectl get secret --namespace "${NAMESPACE}" ${RELEASE}-monitoring-grafana \
-o jsonpath="{.data.admin-password}" | base64 --decode ; echo
```
With Grafana, you can either setup a temporary port-forward to a Grafana pod or expose Grafana on an external IP using a K8s LoadBalancer.
To define a LoadBalancer, do (replace \${RELEASE} with your Helm release label):
```bash wrap theme={"dark"}
kubectl expose deployment ${RELEASE}-monitoring-grafana --type=LoadBalancer --name=grafana --port=3000 --target-port=3000
```
You can use `kubectl get services --namespace ` to determine when the load balancer is setup and its IP address. Direct your browser to `http://:3000` and enter the username `admin@localhost` and the password that was returned in the previous step.
This will log you into the application. It is recommended that you create another administrative user with a more desirable password.
The dashboards and datasoure will be setup for you in grafana, simply navigate to `Dashboards` -> `Manage` to view the available dashboards
## More deployment options
* How to deploy Fusion 5 in Google Kubernetes Engine
* How to deploy Fusion 5 in Amazon Elastic Kubernetes Service
* How to deploy Fusion 5 in Azure Kubernetes Service
## Learn more
The course for **Deploying Fusion 5** focuses on the prerequisite software needed to deploy Fusion, the necessary setup steps, and the physical act of deployment.
## Security
* Fusion services have been updated with the following versions:
* Log4J service version 2.17.1
* Tika 1.28
* nginix 1.21.5-alpine
## Bug Fixes
### Fusion
* Fixed an issue that caused problems with access and configuration of kubelet options.
* Fixed an issue that potentially allowed Read roles to create/delete Solr operations.
* Fixed an issue that prevented the logout option from being displayed if the "logout" button was clicked while creating or modifying an OIDC/SAML [security realm](/docs/5/fusion/operations/security/access-control/security-realms).
* Fixed an issue that caused the cursor to bypass the password field when using the tab button at login.
* Fixed an issue that prevented [App Insights](/docs/5/fusion/getting-data-out/data-analytics/app-insights/overview) from creating custom reports.
* Fixed an issue that caused invalid language codes to be displayed in the [**Detect Language**](/docs/5/fusion/reference/config-ref/pipeline-stages/index-stages/language-detection-index-stage) index pipeline stage.
* Fixed an issue that caused the **Schedule a Job** to disappear after saving the job settings.
**How to schedule a job**
1. In the Fusion workspace, navigate to **Collections > Scheduler**.
2. Select the job from the job list.
3. Click **Run**.
4. Click **New Schedule**.
5. Select a job trigger:
* **After Another Job Completes**
Enter the job ID and job result that trigger this one.
 * **Cron String**
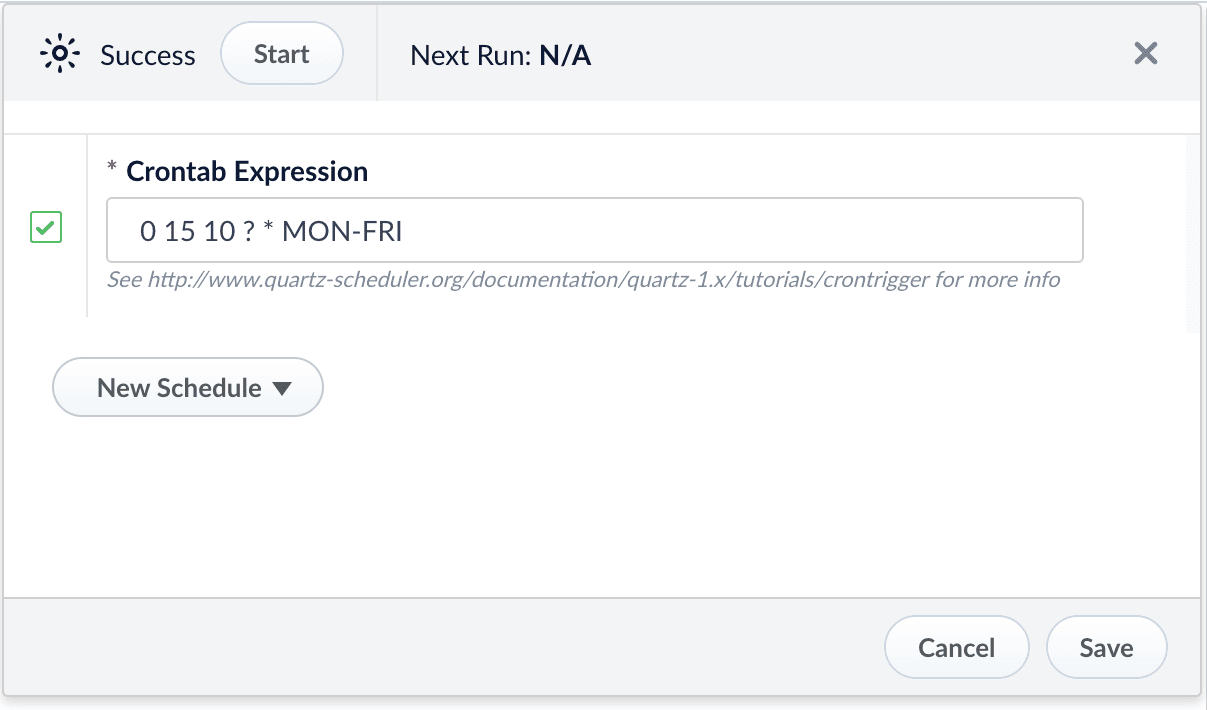
Enter a Quartz cron expression, using UTC time unless `default.timezone` is set to another time zone in `fusion.cors` (`fusion.properties` in Fusion 4.x). See [the Quartz documentation](http://www.quartz-scheduler.org/api/2.3.0/org/quartz/CronExpression.html) for additional details.
* **Cron String**
Enter a Quartz cron expression, using UTC time unless `default.timezone` is set to another time zone in `fusion.cors` (`fusion.properties` in Fusion 4.x). See [the Quartz documentation](http://www.quartz-scheduler.org/api/2.3.0/org/quartz/CronExpression.html) for additional details.
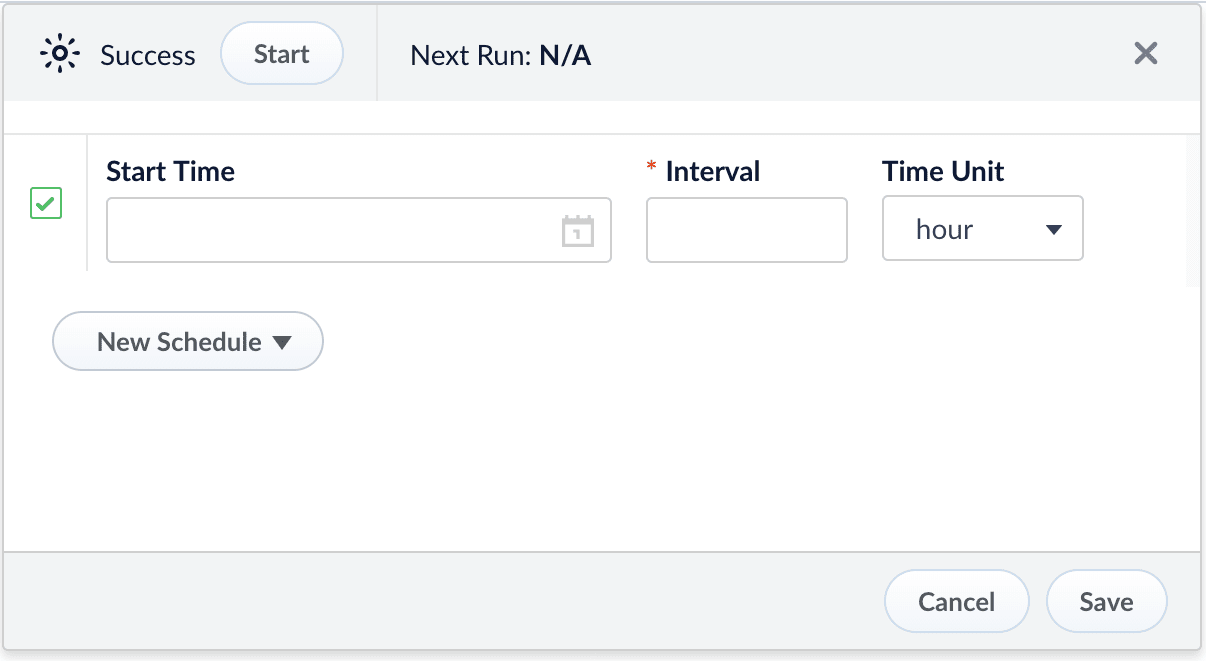
 * **Start + Interval**
Enter a start date/time, an interval, and the interval units. Include seconds in the start time.
* **Start + Interval**
Enter a start date/time, an interval, and the interval units. Include seconds in the start time.
 ### Predictive Merchandiser
* Fixed an issue that caused console and facet elements to stretch too far across the screen.
* Fixed an issue that made the **+ Add** button unavailable to associate products with **Merchandising Zero Results**.
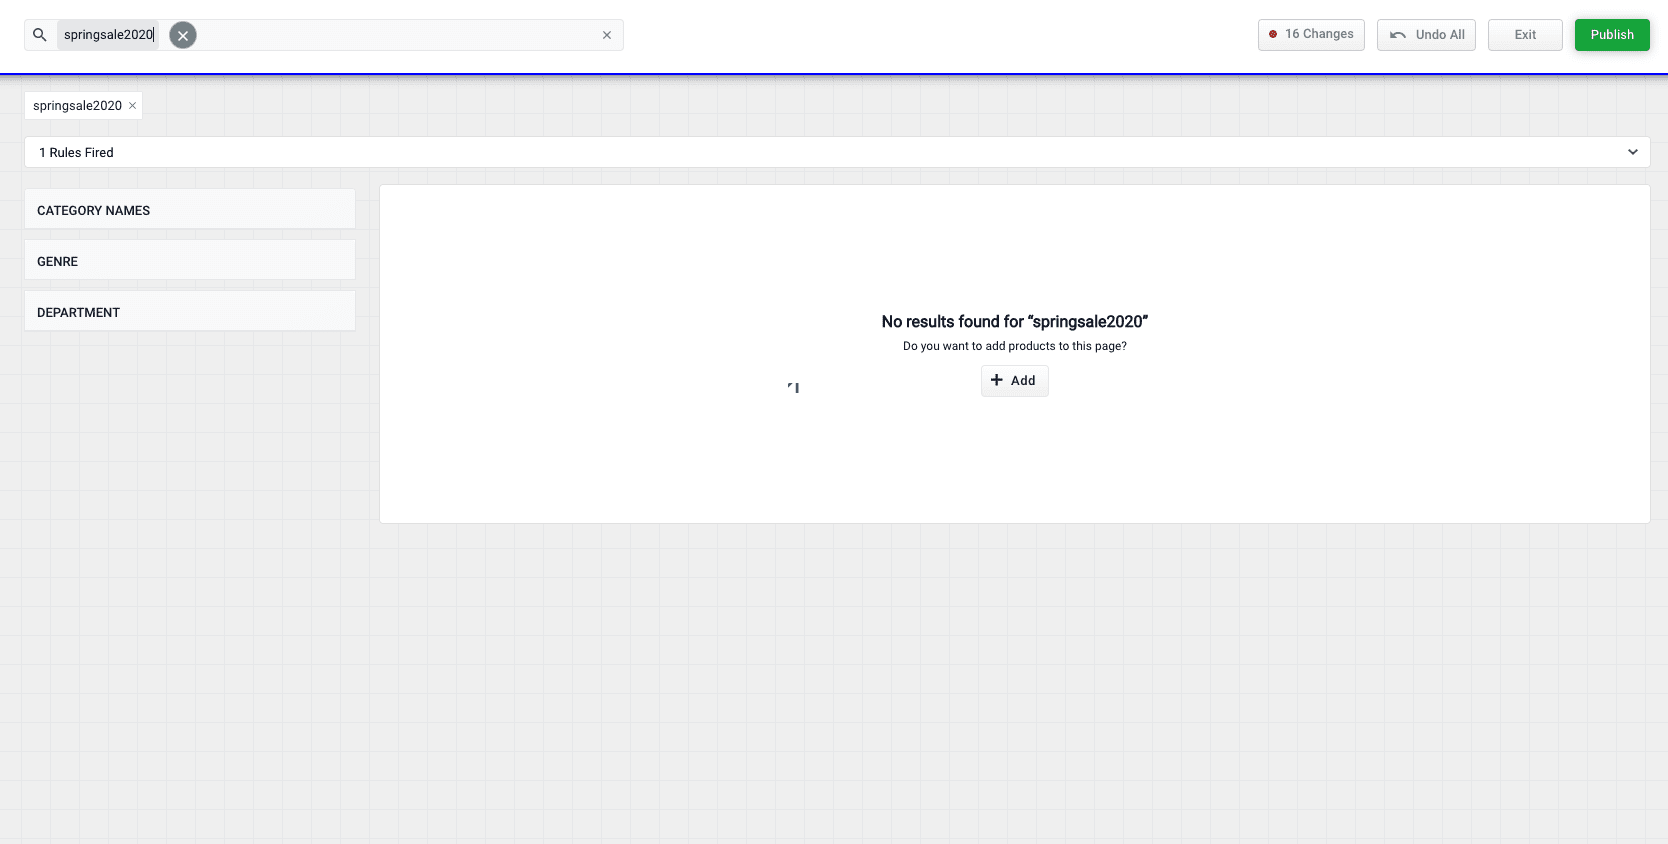
1. Enter a search query the generates 0 results:
### Predictive Merchandiser
* Fixed an issue that caused console and facet elements to stretch too far across the screen.
* Fixed an issue that made the **+ Add** button unavailable to associate products with **Merchandising Zero Results**.
1. Enter a search query the generates 0 results:
 2. Click the **Add** button:
  3. Select products or [product groups](/docs/5/fusion/getting-data-out/curating-your-search-experience/predictive-merchandiser/product-grouping) that you want to associate with the 0 results query:
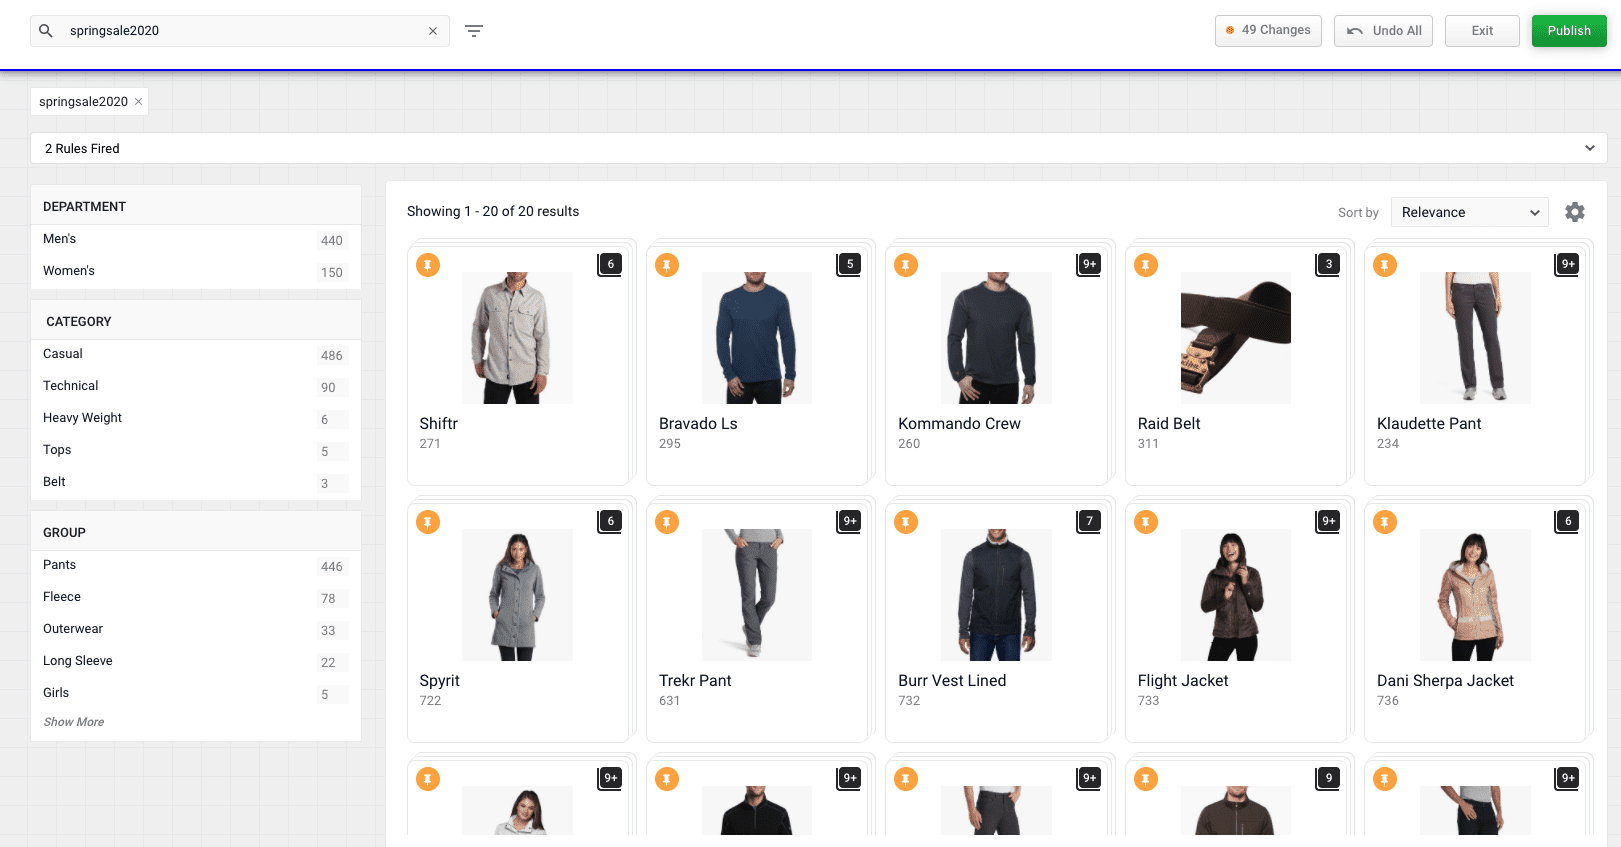
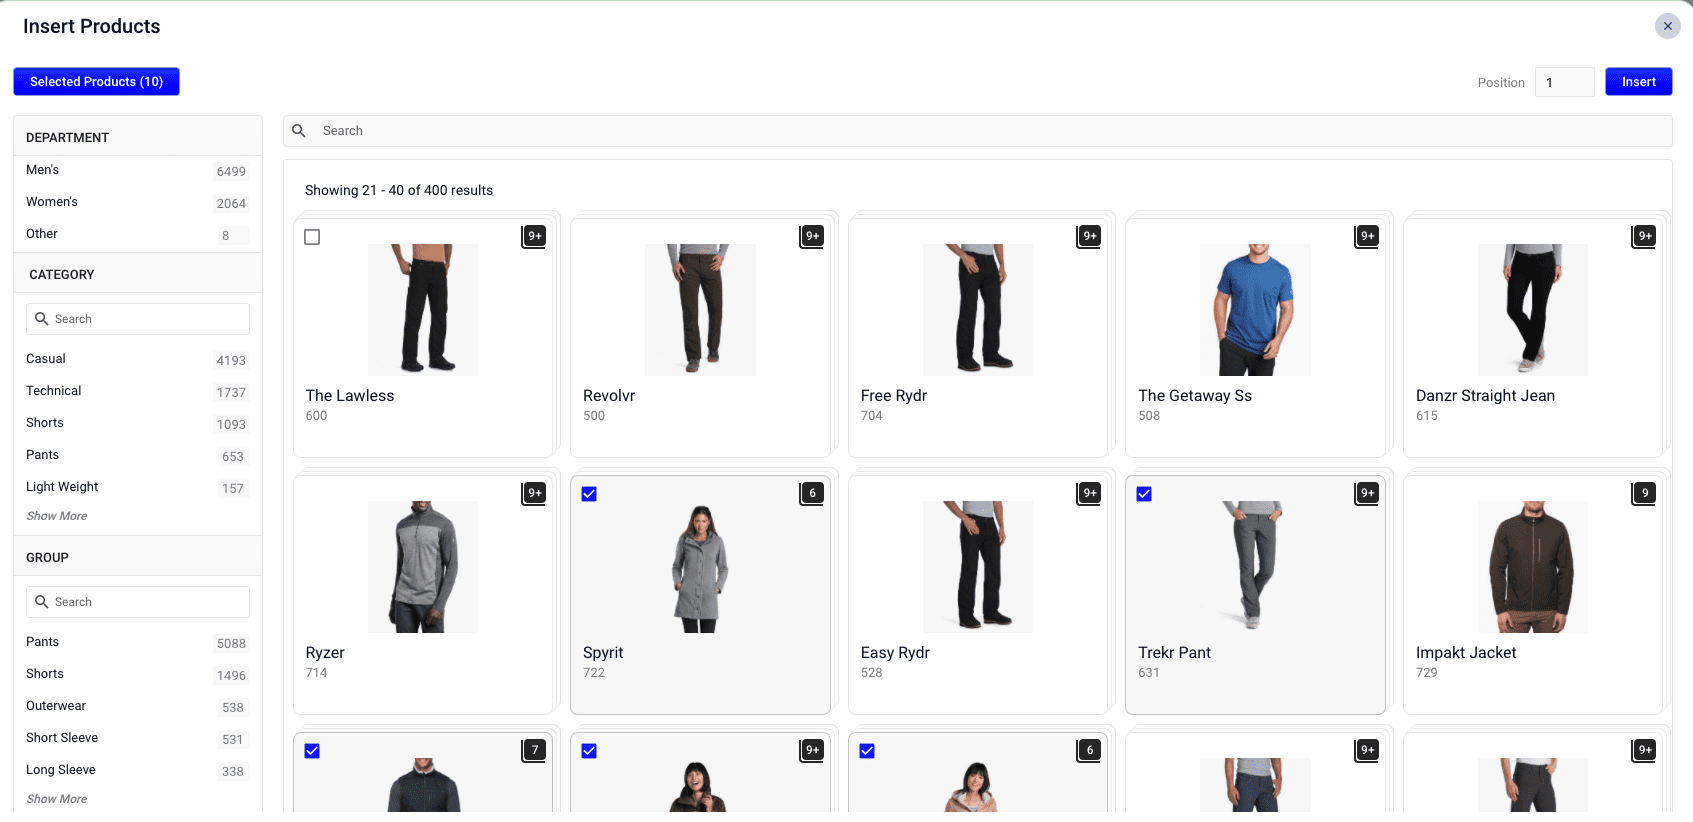 4. Click the **Insert** button. The selected products are now displayed when the search query is used, resolving the 0 results query:
 * Fixed an issue that caused results to disregard sorting attempts.
* Fixed an issue that caused **Use Hierarchical Facets** values with child facets to not expand when clicked.
## Fusion
To configure hierarchical fields settings:
1. Access the application and click **Relevance > Rules > Templates**.
2. Click the three vertical dots to the right of the application name to display the Hierarchical fields settings section.
* Fixed an issue that caused results to disregard sorting attempts.
* Fixed an issue that caused **Use Hierarchical Facets** values with child facets to not expand when clicked.
## Fusion
To configure hierarchical fields settings:
1. Access the application and click **Relevance > Rules > Templates**.
2. Click the three vertical dots to the right of the application name to display the Hierarchical fields settings section.
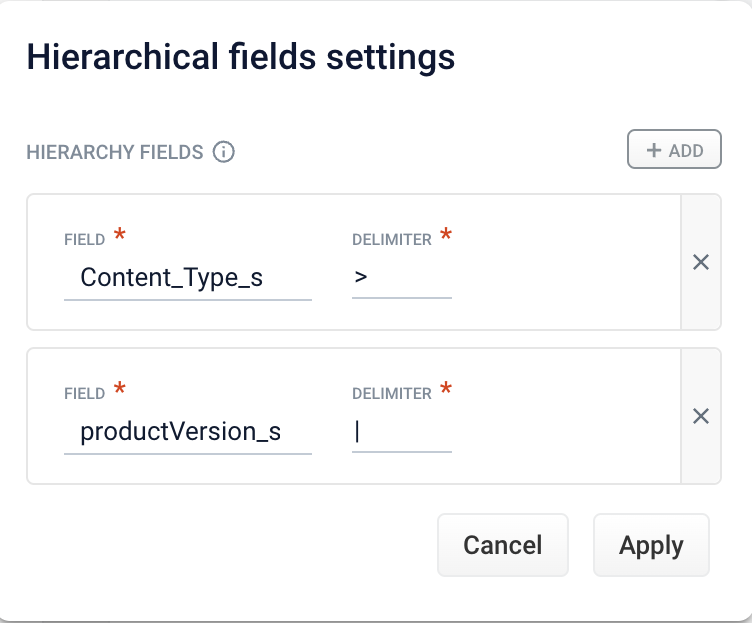 3. Complete one of the following:
* To add a new field, click **+ Add**. Enter values in the **Field** and **Delimiter** fields and click **Apply**.
Any symbol can be used as a delimiter.
* To edit an existing field, click **Field** and select the value to edit. Enter the appropriate value in the **Delimiter** field and click **Apply**.
* To delete a field setting, select the value in **Field**, click **X**, and then click **Apply**.
* To cancel any changes before you apply them, click **Cancel**.
* Fixed an issue that prevented facet ordering from working as expected.
* Fixed an issue that caused analytics chart cards to remain blank.
* Fixed an issue that caused facets with no values to produce an error in query logs.
### Connectors
* Various Connector improvements and bug fixes.
## Removals
The following features and functionalities are removed in Fusion 5.5.0:
* The SharePoint V1 connector.
* Usage of the `with` keyword syntax in the [JavaScript Query Stage](/docs/5/fusion/reference/config-ref/pipeline-stages/query-stages/javascript-query-stage) has been removed, as usage can result in random errors. See [MDN Web Docs](https://developer.mozilla.org/en-US/docs/Web/JavaScript/Reference/Statements/with) for more information.
* Child facet values have been removed from [Hierarchical Facet](/docs/5/fusion/getting-data-out/curating-your-search-experience/predictive-merchandiser/hierarchical-faceting) breadcrumbs in favor of displaying facet values, to avoid confusion.
## Known Issues
**Important**
Users may experience one of the following issues with Predictive Merchandiser within the Fusion 5.5 release:
* The [**Rules**](/docs/5/fusion/getting-data-out/query-enhancement/rules-editor) screen no longer loads in Predictive Merchandiser when importing an app after building from Fusion 5.5.
* After importing an app running an earlier version of Solr, newly-created facets do not appear in the **Use Predictive Merchandiser Facets**.
## Add a Facet
You can create rules that add facets by interacting directly with the Facet List in Interactive Mode. You can add facets that are set unconditionally, or facets that are only set when your customers run a particular query. For example, you might want to set a music genre facet when a customer navigates to the music section of your catalog.
Adding a facet automatically creates a new rule if a default facet rule does not already exist. If a default facet rule does exist, adding a facet updates that rule with the new facet.
### Enable the Facet Zone (Fusion 5.4 and later)
In Fusion 5.4 and later, facets appear in the zone on the left panel of the Predictive Merchandiser, once enabled. Follow the steps below to turn on the facets zone:
1. Click **Start Task**. The button appears.
2. In the left panel, click **+Add** and enter the desired parameters.
3. Click **Done** when you’ve finished.
You can also add facets that are not dependent on rules being triggered. To do this, edit the Facet Zone widget.
### Edit the Facet Zone widget (5.4 and later)
1. In the facet zone, click **+Add**. The **Edit Rule** dialog box appears.
3. Complete one of the following:
* To add a new field, click **+ Add**. Enter values in the **Field** and **Delimiter** fields and click **Apply**.
Any symbol can be used as a delimiter.
* To edit an existing field, click **Field** and select the value to edit. Enter the appropriate value in the **Delimiter** field and click **Apply**.
* To delete a field setting, select the value in **Field**, click **X**, and then click **Apply**.
* To cancel any changes before you apply them, click **Cancel**.
* Fixed an issue that prevented facet ordering from working as expected.
* Fixed an issue that caused analytics chart cards to remain blank.
* Fixed an issue that caused facets with no values to produce an error in query logs.
### Connectors
* Various Connector improvements and bug fixes.
## Removals
The following features and functionalities are removed in Fusion 5.5.0:
* The SharePoint V1 connector.
* Usage of the `with` keyword syntax in the [JavaScript Query Stage](/docs/5/fusion/reference/config-ref/pipeline-stages/query-stages/javascript-query-stage) has been removed, as usage can result in random errors. See [MDN Web Docs](https://developer.mozilla.org/en-US/docs/Web/JavaScript/Reference/Statements/with) for more information.
* Child facet values have been removed from [Hierarchical Facet](/docs/5/fusion/getting-data-out/curating-your-search-experience/predictive-merchandiser/hierarchical-faceting) breadcrumbs in favor of displaying facet values, to avoid confusion.
## Known Issues
**Important**
Users may experience one of the following issues with Predictive Merchandiser within the Fusion 5.5 release:
* The [**Rules**](/docs/5/fusion/getting-data-out/query-enhancement/rules-editor) screen no longer loads in Predictive Merchandiser when importing an app after building from Fusion 5.5.
* After importing an app running an earlier version of Solr, newly-created facets do not appear in the **Use Predictive Merchandiser Facets**.
## Add a Facet
You can create rules that add facets by interacting directly with the Facet List in Interactive Mode. You can add facets that are set unconditionally, or facets that are only set when your customers run a particular query. For example, you might want to set a music genre facet when a customer navigates to the music section of your catalog.
Adding a facet automatically creates a new rule if a default facet rule does not already exist. If a default facet rule does exist, adding a facet updates that rule with the new facet.
### Enable the Facet Zone (Fusion 5.4 and later)
In Fusion 5.4 and later, facets appear in the zone on the left panel of the Predictive Merchandiser, once enabled. Follow the steps below to turn on the facets zone:
1. Click **Start Task**. The button appears.
2. In the left panel, click **+Add** and enter the desired parameters.
3. Click **Done** when you’ve finished.
You can also add facets that are not dependent on rules being triggered. To do this, edit the Facet Zone widget.
### Edit the Facet Zone widget (5.4 and later)
1. In the facet zone, click **+Add**. The **Edit Rule** dialog box appears.
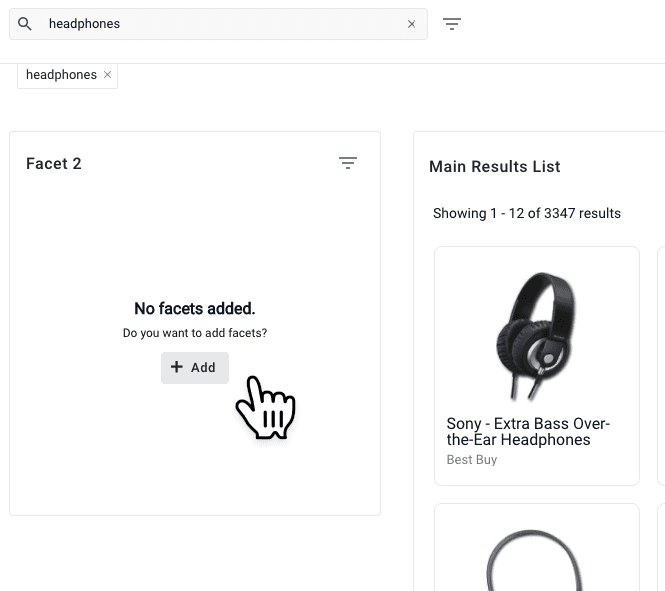 2. Click the **Facet Field** field, and enter the desired facet parameter.
You can add multiple facet parameters by clicking the **+ Add** button:
3. Click the **Save** button to add your facet:
### Add Additional Facets
1. Hover your cursor above or below an existing facet. A **+** button appears:
2. Click the **Facet Field** field, and enter the desired facet parameter.
You can add multiple facet parameters by clicking the **+ Add** button:
3. Click the **Save** button to add your facet:
### Add Additional Facets
1. Hover your cursor above or below an existing facet. A **+** button appears:
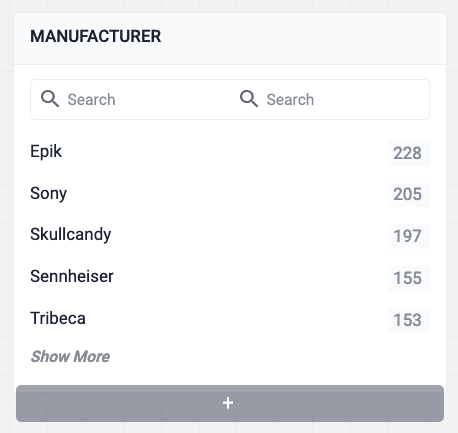 2. Click the **+** button.
## Move a Facet
1. Hover your cursor over a facet. A menu overlay appears at the top.
2. Click-and-hold the drag bar:
3. Move the facet to the desired location.
4. Release the click.
## Remove a Facet
1. Hover your cursor over a facet. A menu overlay appears at the top.
2. Click the **Remove** button:
{/* // Included as of PM 1.2.0. For versioning the site later. */}
## Block a Facet Item
1. Hover your cursor over a facet item. A menu overlay appears.
2. Click the **Block** button:
## Bury a Facet Item
1. Hover your cursor over a facet item. A menu overlay appears.
2. Click the **Bury** button:
## Boost a Facet Item
1. Hover your cursor over a facet item. A menu overlay appears.
2. Click the **Boost** button:
{/* // Included as of PM 1.2.0. For versioning the site later. */}
### Reorder Boosted Facet Items
1. Hover over a boosted facet item. A drag bar appears.
2. Click and hold the drag bar:
3. Move the facet item to the desired location.
4. Release the click.
Workaround Steps:
In the `solrconfig.xml`, all cache classes that use `solr.LRUCache` must be changed to `solr.search.CaffeineCache`. See [Cache Implementations](https://solr.apache.org/guide/8_7/query-settings-in-solrconfig.html#cache-implementations) for more information.
* Changing the **Sort by** order of results is not reflected in the results list.
## Known issues
* New Kerberos security realms cannot be configured successfully in this version of Fusion.
2. Click the **+** button.
## Move a Facet
1. Hover your cursor over a facet. A menu overlay appears at the top.
2. Click-and-hold the drag bar:
3. Move the facet to the desired location.
4. Release the click.
## Remove a Facet
1. Hover your cursor over a facet. A menu overlay appears at the top.
2. Click the **Remove** button:
{/* // Included as of PM 1.2.0. For versioning the site later. */}
## Block a Facet Item
1. Hover your cursor over a facet item. A menu overlay appears.
2. Click the **Block** button:
## Bury a Facet Item
1. Hover your cursor over a facet item. A menu overlay appears.
2. Click the **Bury** button:
## Boost a Facet Item
1. Hover your cursor over a facet item. A menu overlay appears.
2. Click the **Boost** button:
{/* // Included as of PM 1.2.0. For versioning the site later. */}
### Reorder Boosted Facet Items
1. Hover over a boosted facet item. A drag bar appears.
2. Click and hold the drag bar:
3. Move the facet item to the desired location.
4. Release the click.
Workaround Steps:
In the `solrconfig.xml`, all cache classes that use `solr.LRUCache` must be changed to `solr.search.CaffeineCache`. See [Cache Implementations](https://solr.apache.org/guide/8_7/query-settings-in-solrconfig.html#cache-implementations) for more information.
* Changing the **Sort by** order of results is not reflected in the results list.
## Known issues
* New Kerberos security realms cannot be configured successfully in this version of Fusion.