> ## Documentation Index
> Fetch the complete documentation index at: https://doc.lucidworks.com/llms.txt
> Use this file to discover all available pages before exploring further.
# Fusion AI 4.0.2 Release Notes
export const InlineImage = ({src, alt = '', height = '2em'}) => {
return  ;
};
[localhost link]: http://localhost:3000/docs/4/fusion-ai/release-notes/4.0.2-release-notes
[mintlify link]: https://doc.lucidworks.com/docs/4/fusion-ai/release-notes/4.0.2-release-notes
[old doc.lw link]: https://doc.lucidworks.com/fusion-ai/4.2/435
**Release date:** 22 May 2018
## New features
None.
## Improvements
* The `weightExpression` parameter for the [Boost with Signals](/docs/4/fusion-ai/reference/query-pipeline-stages/recommendation-boosting-query-stage) query pipeline stage now supports math expressions in [JEXL syntax](http://commons.apache.org/proper/commons-jexl/reference/syntax.html).\
Examples:
**`weight_d * 1000`** `weight_d * score`
\*\* `weight_d + math:max(score, 1)`
## Other changes
* The [SQL-Based Experiment Metric](/docs/4/fusion-ai/reference/jobs/sql-based-experiment-metric) job is no longer available in the Jobs panel of the UI.\
The [Custom SQL experiment metric](/docs/4/fusion-ai/reference/metrics) performs an equivalent function. You can configure this metric when you **Set Up an Experiment using a Query Profile**.
Perform the tasks needed to set up an experiment. This topic describes how to set up an experiment using a query profile that references the experiment.
{/* // tag::before-you-begin[] */}
## Before you begin
Before you set up an experiment, you must already have:
* **A search app.** The key aspect of the search app for experiments is that the search app identifies users in some way. A user ID might be associated with users persistently (this is best) or only for the current session. Searches and subsequent actions by anonymous users are not sent through an experiment.
{/* // + */}
{/* // TIP: You can use [Fusion App Studio](/app-studio/4.1/963/fusion-app-studio) to build your search app. */}
* **A Fusion app.** The Fusion app provides the search functionality you want to provide. Below, you will modify the app to include an experiment.
* **Data for users to search.** The app should have data that users can search and search results that users can interact with. Typically, users will search a single dataset in the sense that different users are not given search results from different datasets. But in an experiment, different experiment variants *can* use data in different collections.
* **Results for users to interact with.** Experiment metrics depend on users interacting with search results, for example, clicking on them. A search app uses signals to report the interactions to Fusion.
* **A plan for the experiment.** This plan includes which control and variants to compare, the projected traffic, sample sizes, experiment duration, metrics, and decision criteria.
Basically, you need a working system in some environment on which you want to perform experiments, and a plan for experiment variants and for deciding which results are best.
{/* // end::before-you-begin[] */}
## Create query pipelines
The primary approach for experiment variants is to have multiple query pipelines. You must create additional query pipelines as needed *before* creating the experiment.
You can also vary the collection that is searched and query parameters, which you do when creating the experiment. In fact, if that is all you are varying, you can define an experiment that uses a single query pipeline. (And you can skip this section.)
You will need the following pipelines:
* **Pipeline for the control variant.** The first variant in an experiment is the control. The A/B/n experiment metrics compare the control variant pairwise with the other variants. The control variant should probably use the default query pipeline. Here, we assume that is the case.
You could modify the configuration of the default query pipeline (which the control variant will use) before the experiment. However, doing so has two disadvantages. First, pairwise comparisons in the experiment will not be against the status quo. Second, Fusion AI will not have a baseline of historical signal data to compare against (that comparison lets an experiment reach higher confidence numbers more quickly).
* **Pipelines for other variants.** Other variants in an experiment can use other query pipelines, each with different stages and/or that are configured differently. These are "how you might do things differently."
**How to create query pipelines for non-control variants**
Create and configure the additional query pipelines you need for non-control variants. Repeat these steps for each pipeline.
{/* // tag::create-pipelines[] */}
1. Navigate to Querying > **Query Pipelines**.
2. Click **Add**.
3. Enter a **Pipeline ID** (arbitrary name) for the pipeline, and then click **Save**.
;
};
[localhost link]: http://localhost:3000/docs/4/fusion-ai/release-notes/4.0.2-release-notes
[mintlify link]: https://doc.lucidworks.com/docs/4/fusion-ai/release-notes/4.0.2-release-notes
[old doc.lw link]: https://doc.lucidworks.com/fusion-ai/4.2/435
**Release date:** 22 May 2018
## New features
None.
## Improvements
* The `weightExpression` parameter for the [Boost with Signals](/docs/4/fusion-ai/reference/query-pipeline-stages/recommendation-boosting-query-stage) query pipeline stage now supports math expressions in [JEXL syntax](http://commons.apache.org/proper/commons-jexl/reference/syntax.html).\
Examples:
**`weight_d * 1000`** `weight_d * score`
\*\* `weight_d + math:max(score, 1)`
## Other changes
* The [SQL-Based Experiment Metric](/docs/4/fusion-ai/reference/jobs/sql-based-experiment-metric) job is no longer available in the Jobs panel of the UI.\
The [Custom SQL experiment metric](/docs/4/fusion-ai/reference/metrics) performs an equivalent function. You can configure this metric when you **Set Up an Experiment using a Query Profile**.
Perform the tasks needed to set up an experiment. This topic describes how to set up an experiment using a query profile that references the experiment.
{/* // tag::before-you-begin[] */}
## Before you begin
Before you set up an experiment, you must already have:
* **A search app.** The key aspect of the search app for experiments is that the search app identifies users in some way. A user ID might be associated with users persistently (this is best) or only for the current session. Searches and subsequent actions by anonymous users are not sent through an experiment.
{/* // + */}
{/* // TIP: You can use [Fusion App Studio](/app-studio/4.1/963/fusion-app-studio) to build your search app. */}
* **A Fusion app.** The Fusion app provides the search functionality you want to provide. Below, you will modify the app to include an experiment.
* **Data for users to search.** The app should have data that users can search and search results that users can interact with. Typically, users will search a single dataset in the sense that different users are not given search results from different datasets. But in an experiment, different experiment variants *can* use data in different collections.
* **Results for users to interact with.** Experiment metrics depend on users interacting with search results, for example, clicking on them. A search app uses signals to report the interactions to Fusion.
* **A plan for the experiment.** This plan includes which control and variants to compare, the projected traffic, sample sizes, experiment duration, metrics, and decision criteria.
Basically, you need a working system in some environment on which you want to perform experiments, and a plan for experiment variants and for deciding which results are best.
{/* // end::before-you-begin[] */}
## Create query pipelines
The primary approach for experiment variants is to have multiple query pipelines. You must create additional query pipelines as needed *before* creating the experiment.
You can also vary the collection that is searched and query parameters, which you do when creating the experiment. In fact, if that is all you are varying, you can define an experiment that uses a single query pipeline. (And you can skip this section.)
You will need the following pipelines:
* **Pipeline for the control variant.** The first variant in an experiment is the control. The A/B/n experiment metrics compare the control variant pairwise with the other variants. The control variant should probably use the default query pipeline. Here, we assume that is the case.
You could modify the configuration of the default query pipeline (which the control variant will use) before the experiment. However, doing so has two disadvantages. First, pairwise comparisons in the experiment will not be against the status quo. Second, Fusion AI will not have a baseline of historical signal data to compare against (that comparison lets an experiment reach higher confidence numbers more quickly).
* **Pipelines for other variants.** Other variants in an experiment can use other query pipelines, each with different stages and/or that are configured differently. These are "how you might do things differently."
**How to create query pipelines for non-control variants**
Create and configure the additional query pipelines you need for non-control variants. Repeat these steps for each pipeline.
{/* // tag::create-pipelines[] */}
1. Navigate to Querying > **Query Pipelines**.
2. Click **Add**.
3. Enter a **Pipeline ID** (arbitrary name) for the pipeline, and then click **Save**.
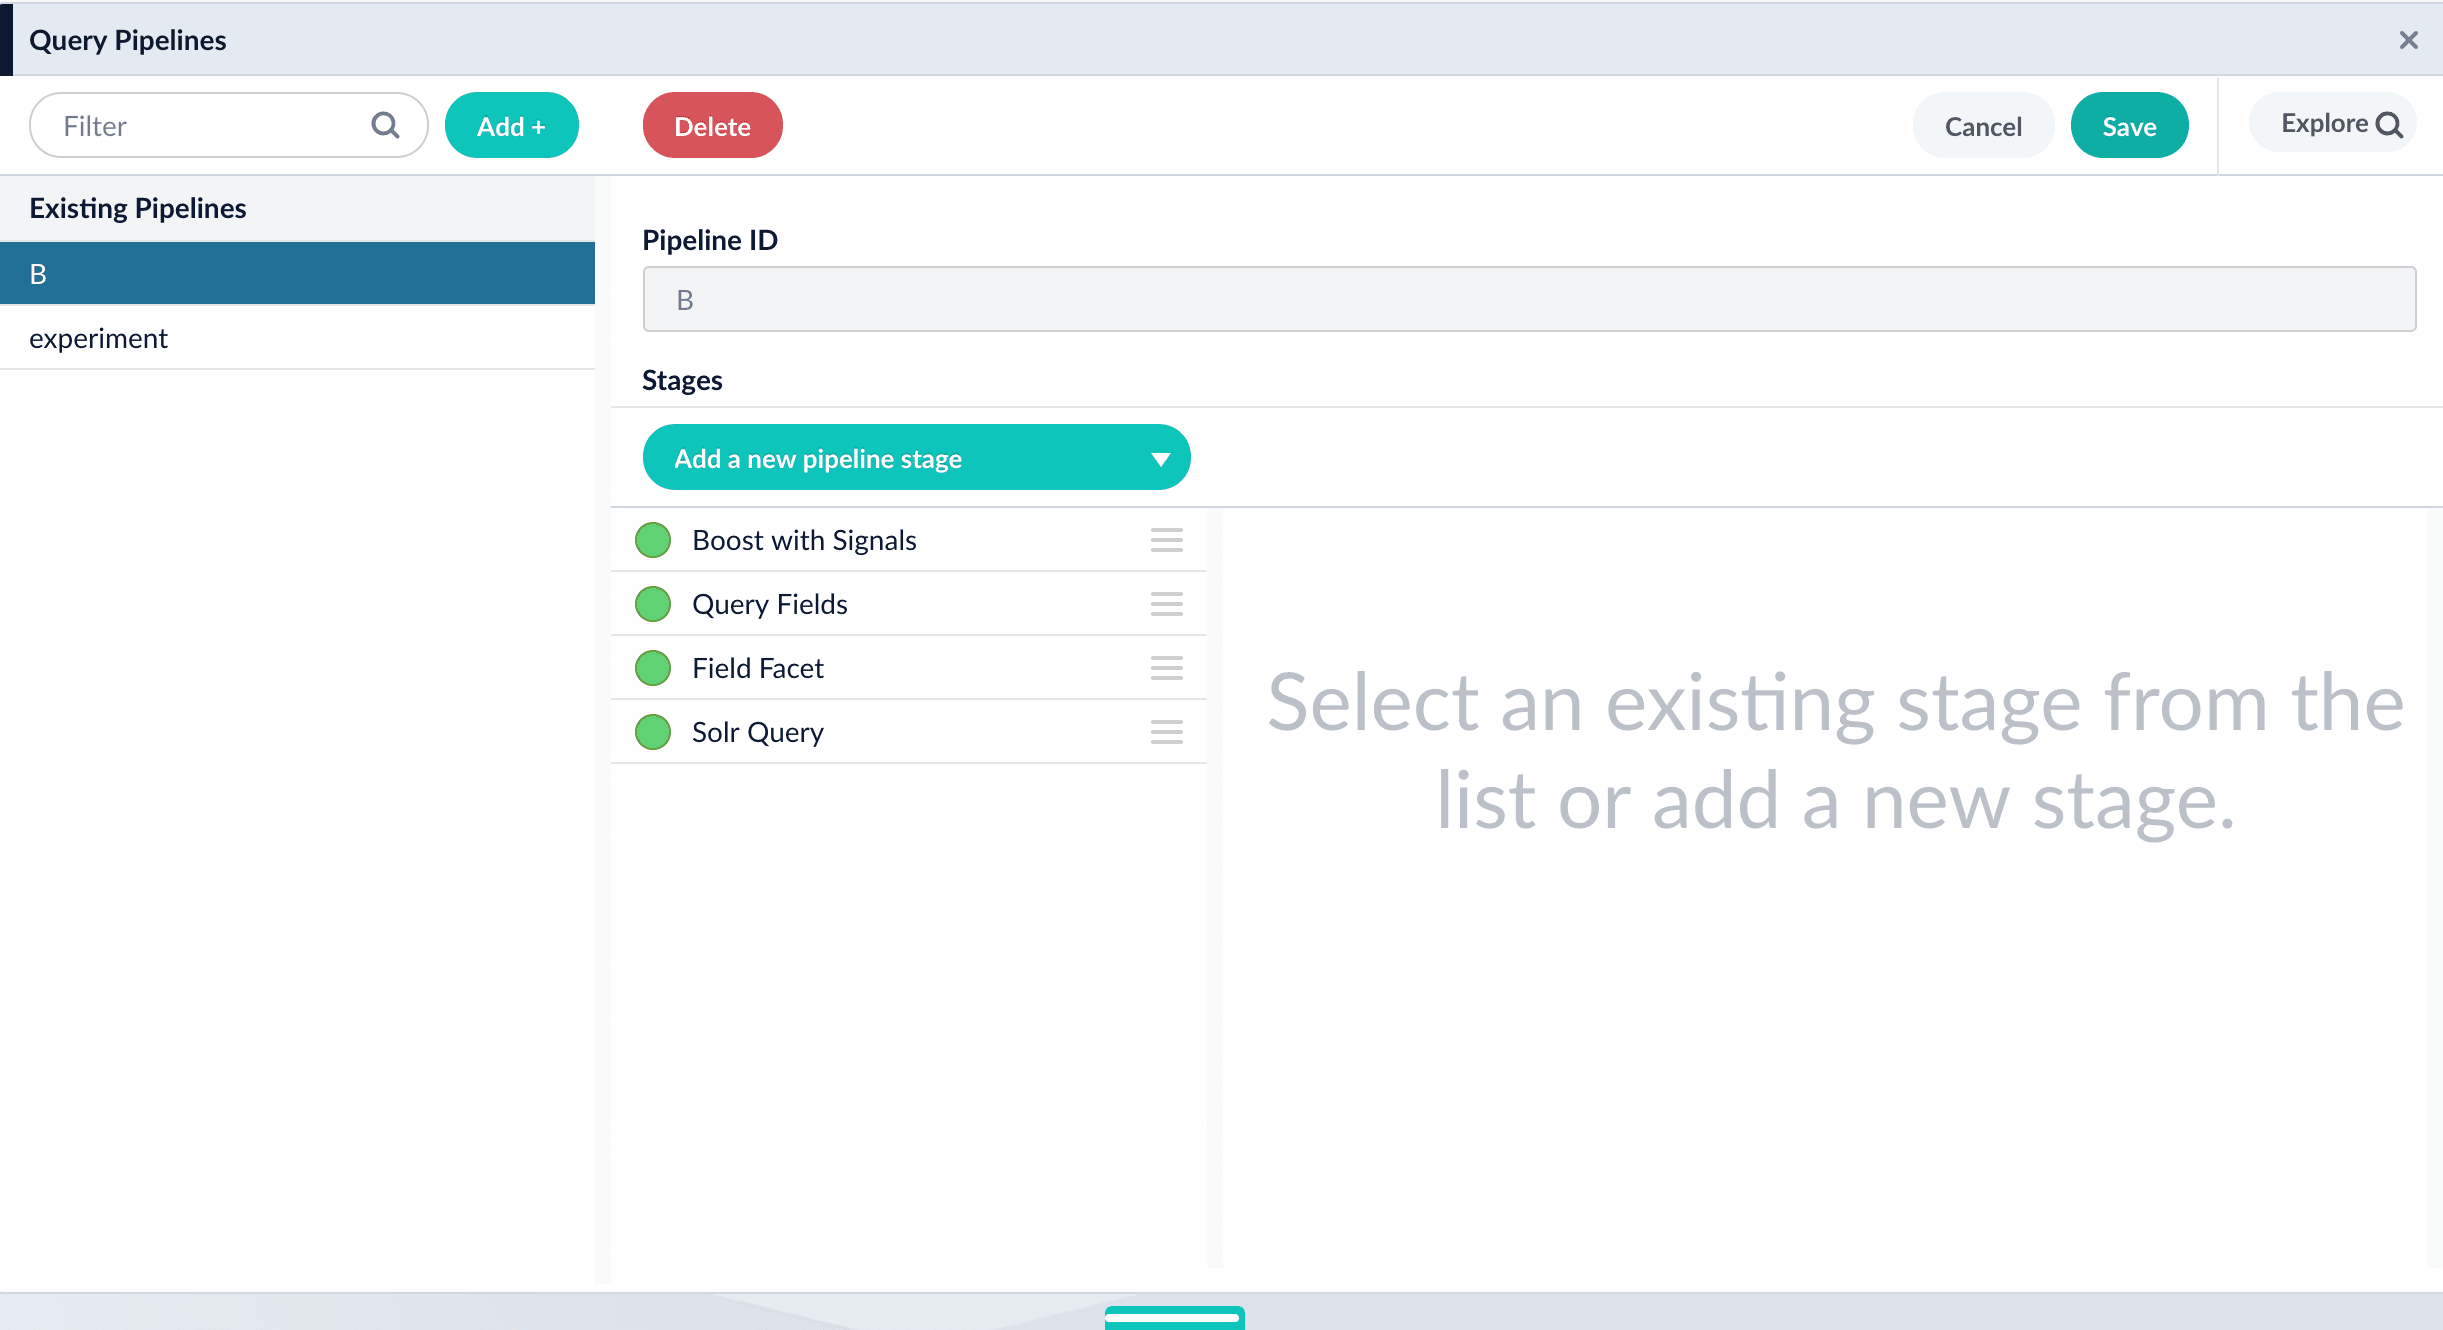 4\. Modify the pipeline as desired, for example, by adding, configuring, and reordering stages.
5\. Click **Save**.
{/* // end::create-pipelines[] */}
## Create the query profile and the experiment
In the Fusion UI, you can use either of these equivalent approaches to set up an experiment:
* **[Create the experiment in the Query Profiles UI](#option-a-create-the-experiment-in-the-query-profiles-ui).** Choose an existing query profile or create a new one. Then create the experiment in the **Querying** > **Query Profiles** UI.
* **[Create the experiment in the Experiments UI](#option-b-create-the-experiment-in-the-experiments-ui).** Create an experiment in the **Analytics** > **Experiments** UI, and then reference the experiment in the **Querying** > **Query Profiles** UI.
### Option A: Create the experiment in the Query Profiles UI
1. **Choose or create a query profile.** Choose an existing query profile (for example, the default query profile) or create a new query profile for the experiment.
**How to choose an existing query profile:**
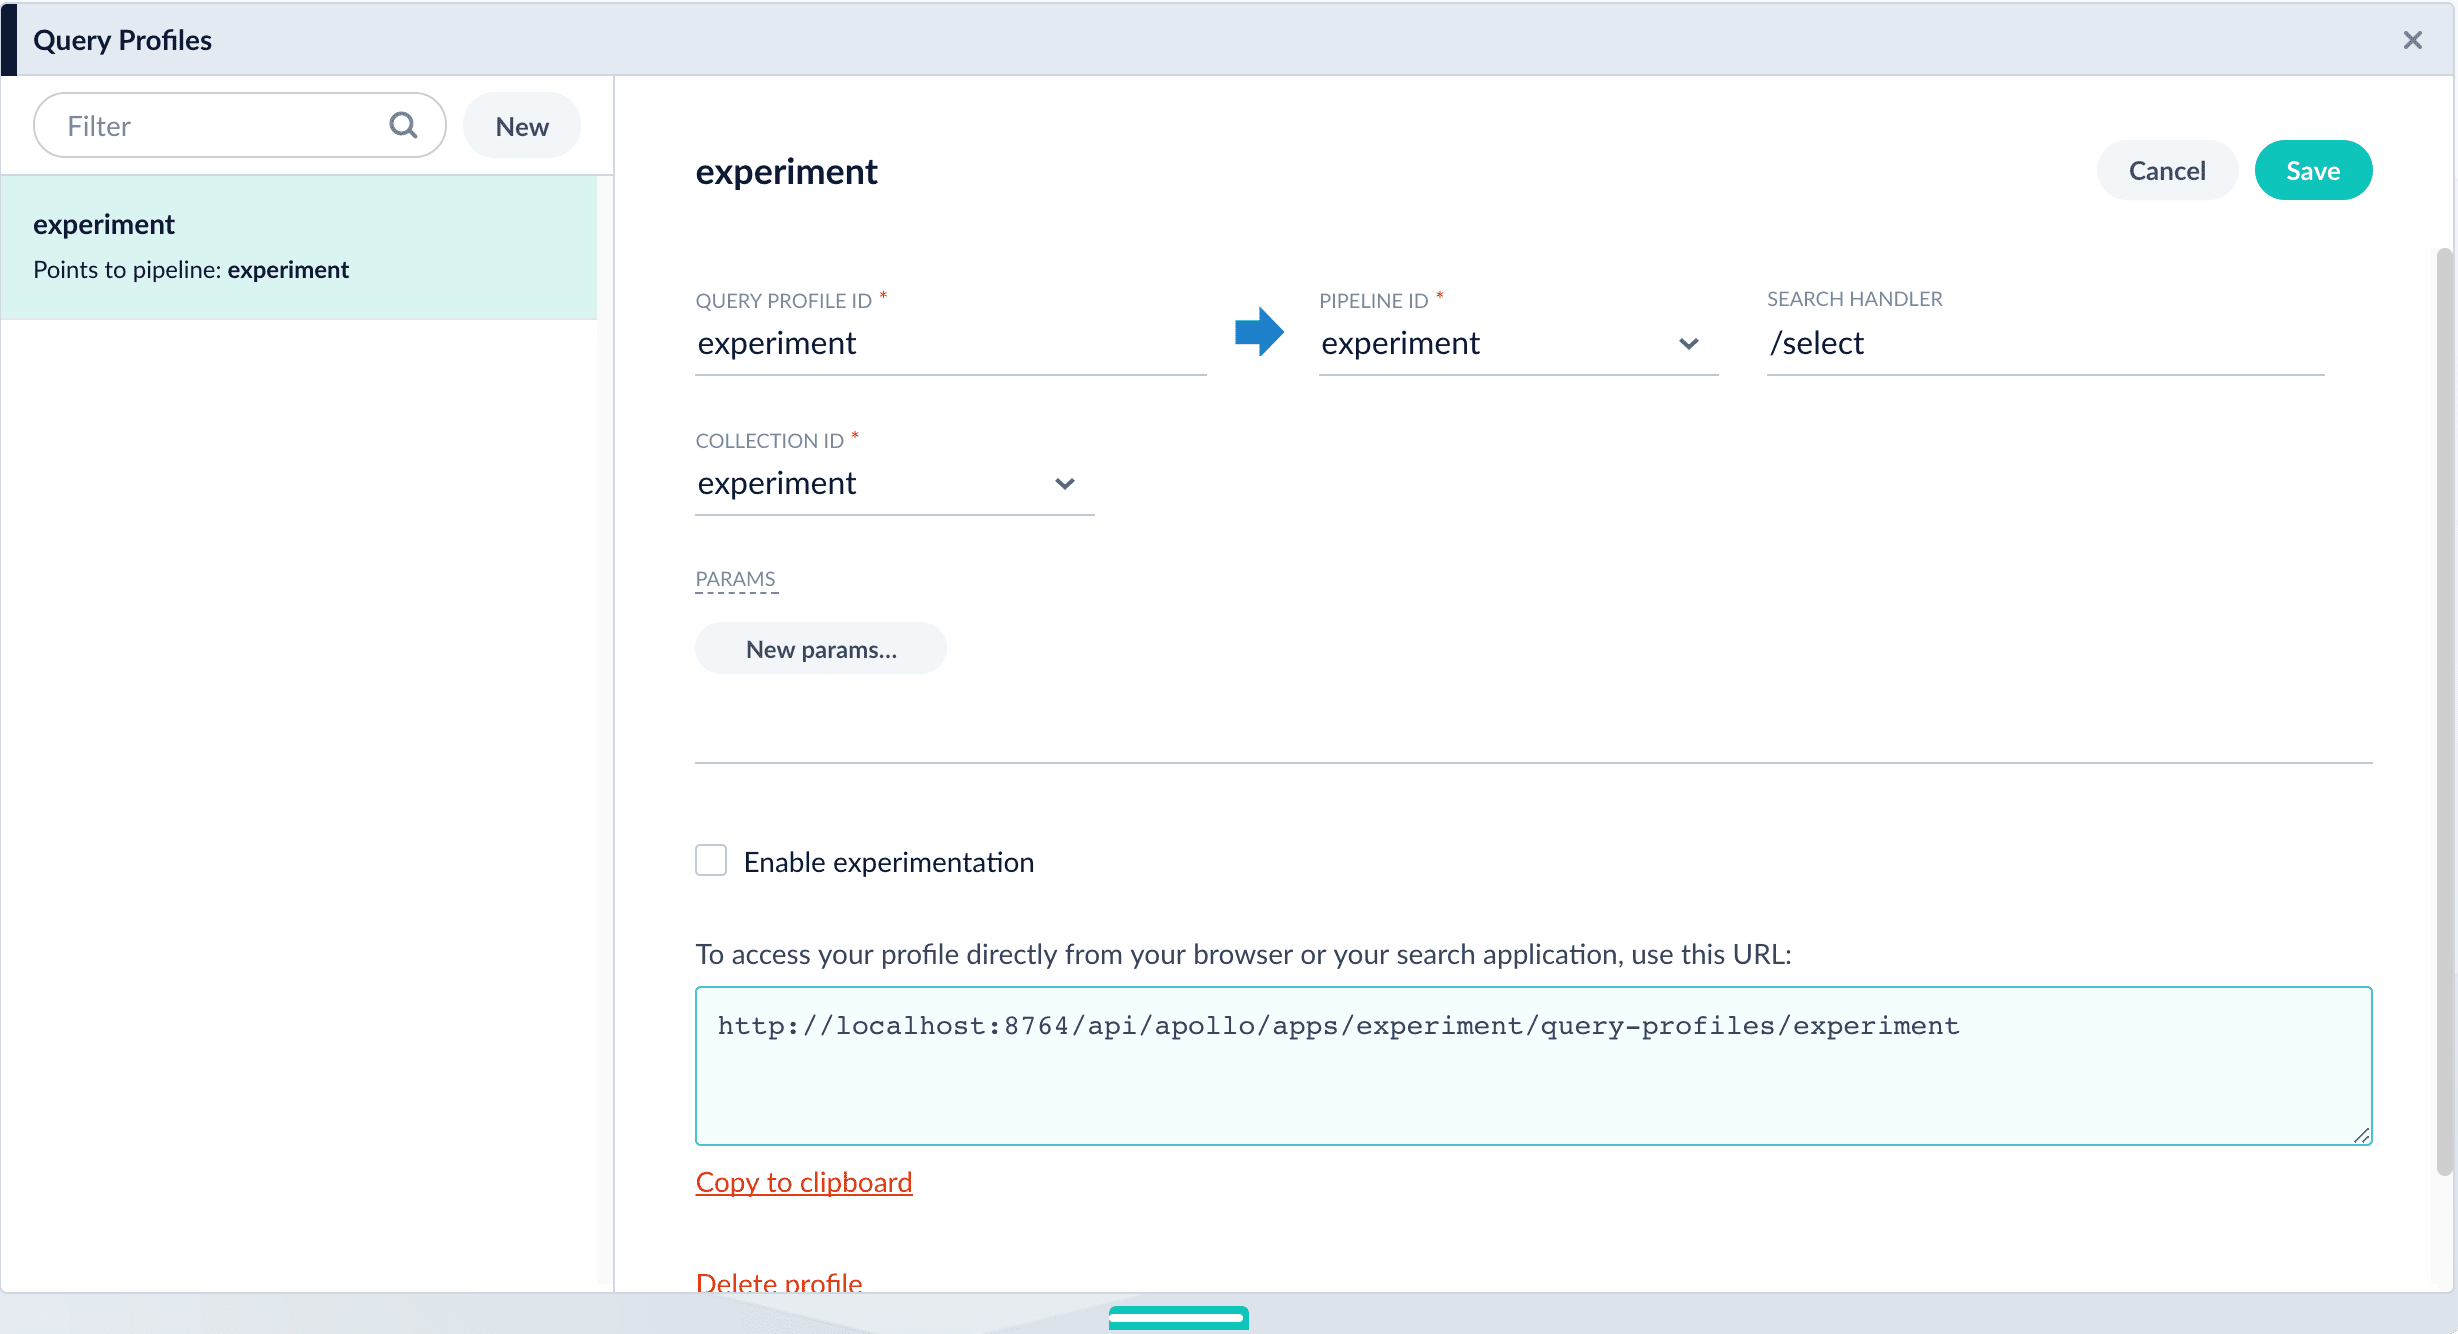
1. Navigate to Querying > **Query Profiles**.
2. In the left pane, click the query profile you want to use.
3. Verify that the pipeline, search handler, collection ID, and parameters are correct.
4. (Optional) Click **New params** and specify URL parameters to add to all queries for this query profile.
4\. Modify the pipeline as desired, for example, by adding, configuring, and reordering stages.
5\. Click **Save**.
{/* // end::create-pipelines[] */}
## Create the query profile and the experiment
In the Fusion UI, you can use either of these equivalent approaches to set up an experiment:
* **[Create the experiment in the Query Profiles UI](#option-a-create-the-experiment-in-the-query-profiles-ui).** Choose an existing query profile or create a new one. Then create the experiment in the **Querying** > **Query Profiles** UI.
* **[Create the experiment in the Experiments UI](#option-b-create-the-experiment-in-the-experiments-ui).** Create an experiment in the **Analytics** > **Experiments** UI, and then reference the experiment in the **Querying** > **Query Profiles** UI.
### Option A: Create the experiment in the Query Profiles UI
1. **Choose or create a query profile.** Choose an existing query profile (for example, the default query profile) or create a new query profile for the experiment.
**How to choose an existing query profile:**
1. Navigate to Querying > **Query Profiles**.
2. In the left pane, click the query profile you want to use.
3. Verify that the pipeline, search handler, collection ID, and parameters are correct.
4. (Optional) Click **New params** and specify URL parameters to add to all queries for this query profile.
 **How to create a new query profile:**
1. Navigate to Querying > **Query Profiles**.
2. Click **New**.
3. Enter a **Query Profile ID** (an arbitrary name for the query profile).
4. Choose a pipeline and a collection.
5. (Optional) Click **New params** and specify URL parameters to add to all queries for this query profile.
**How to create a new query profile:**
1. Navigate to Querying > **Query Profiles**.
2. Click **New**.
3. Enter a **Query Profile ID** (an arbitrary name for the query profile).
4. Choose a pipeline and a collection.
5. (Optional) Click **New params** and specify URL parameters to add to all queries for this query profile.
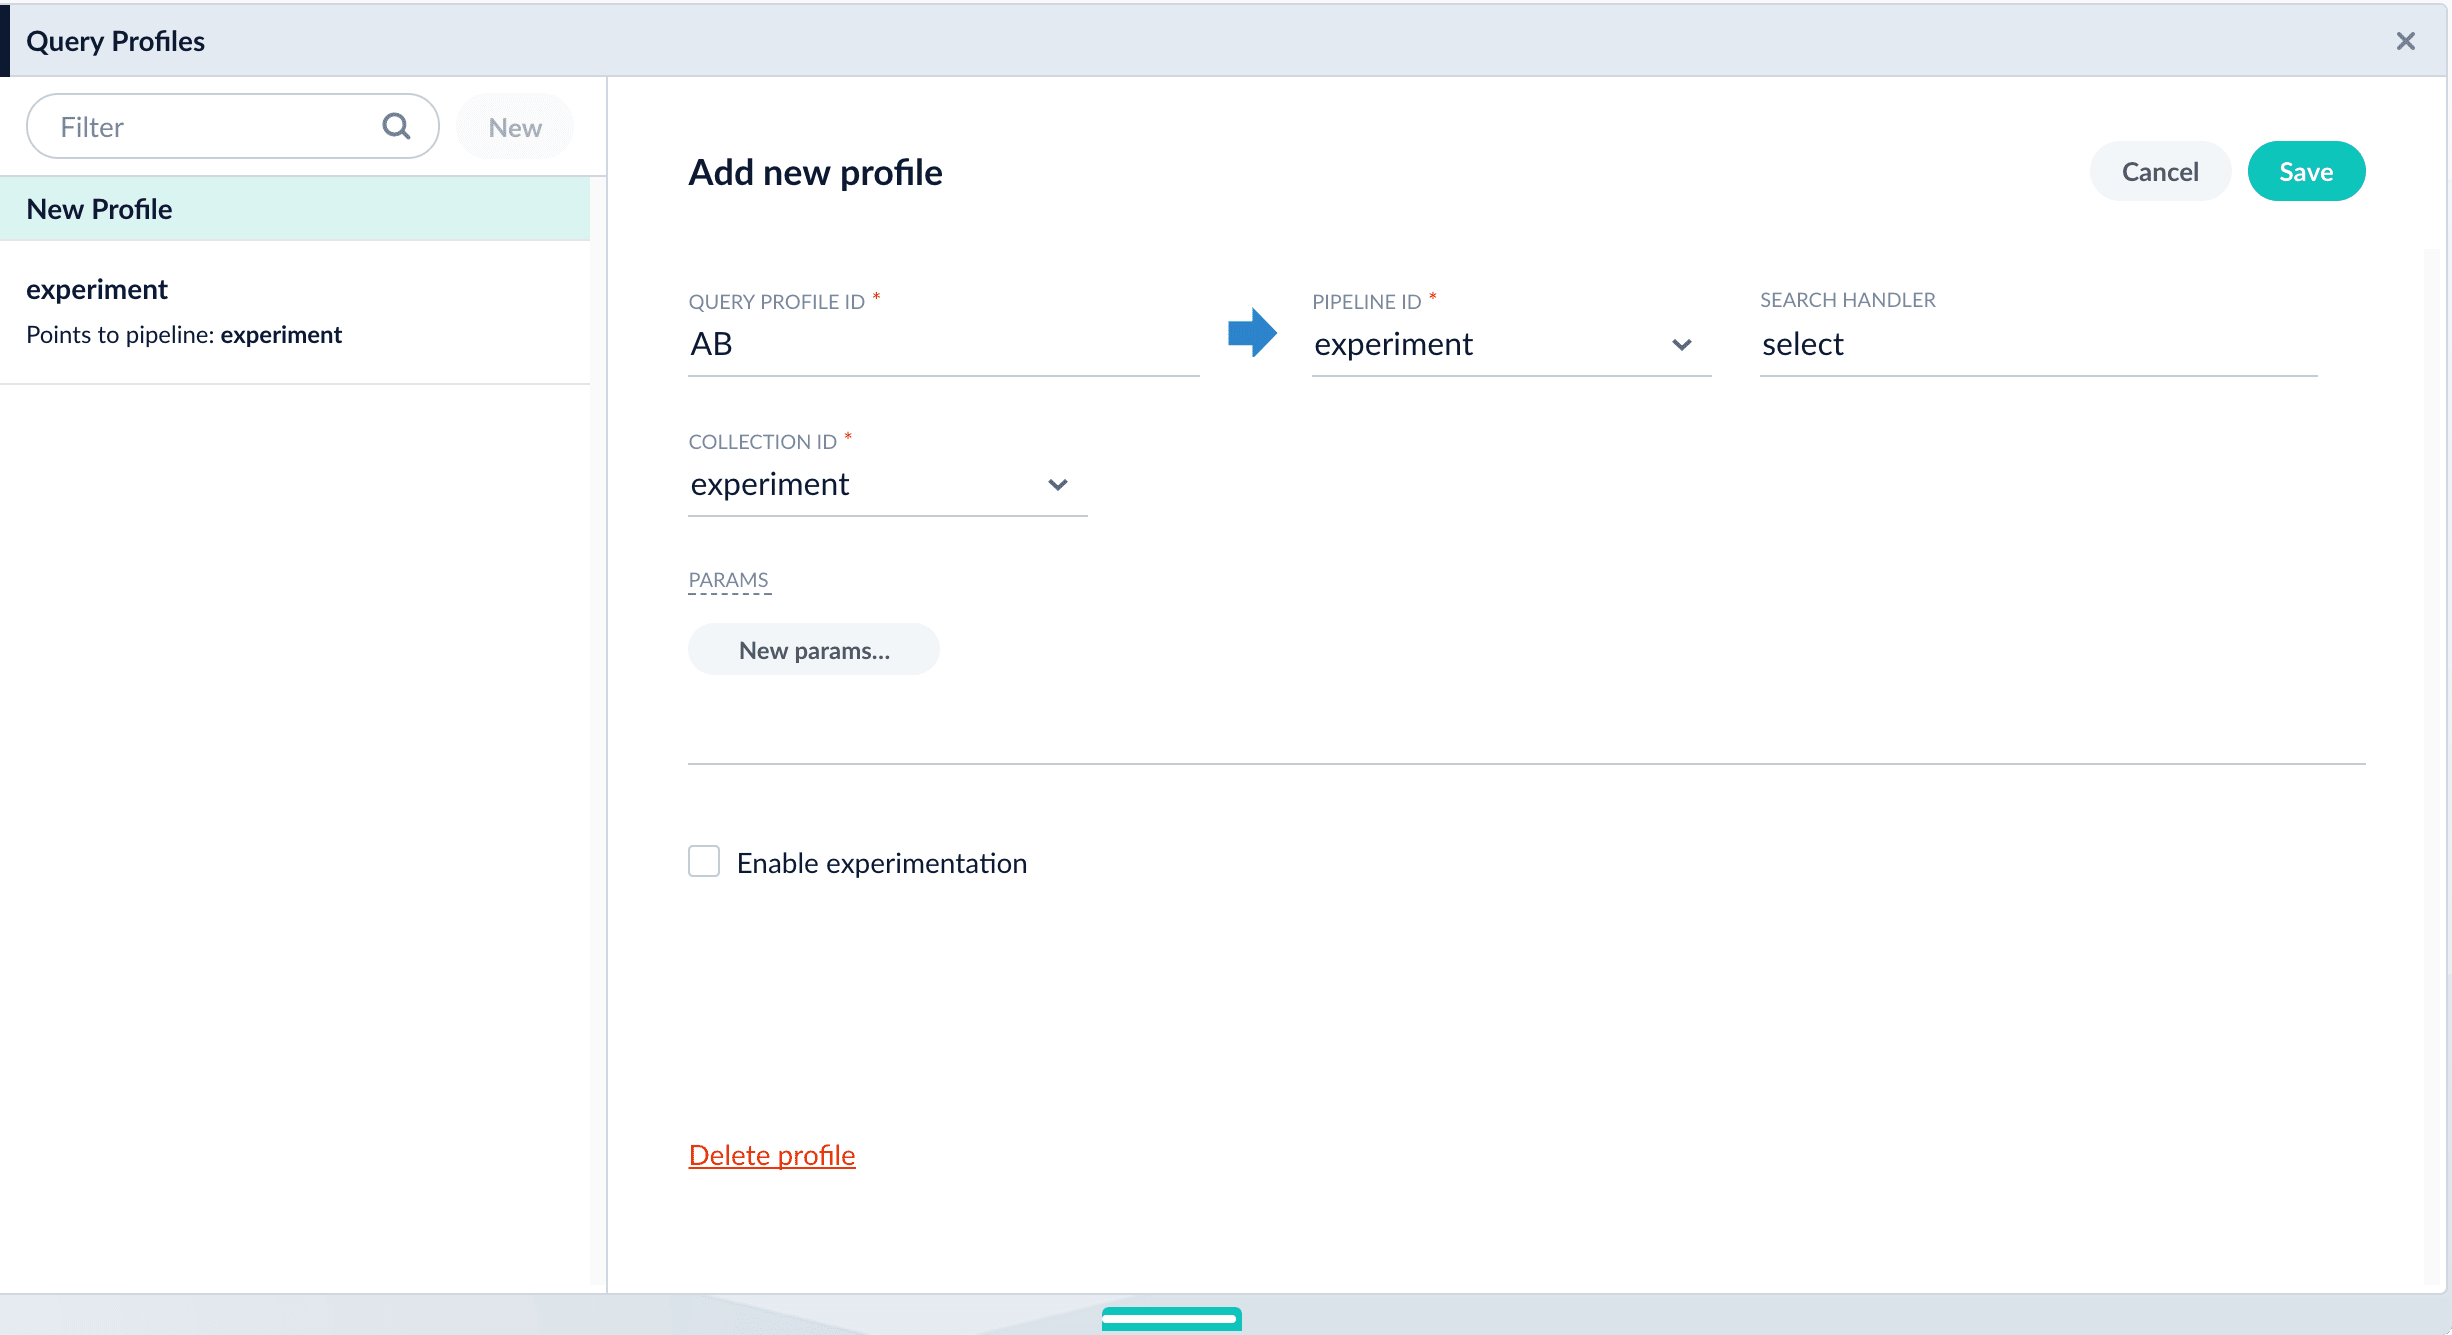 2. **Enable experimentation and specify experiment details in the query profile**:
1. Click the checkbox in front of **Enable experimentation**.
2. Specify the percent of traffic to include in the experiment.
3. Click the , and then click **Add Experiment**.
2. **Enable experimentation and specify experiment details in the query profile**:
1. Click the checkbox in front of **Enable experimentation**.
2. Specify the percent of traffic to include in the experiment.
3. Click the , and then click **Add Experiment**.
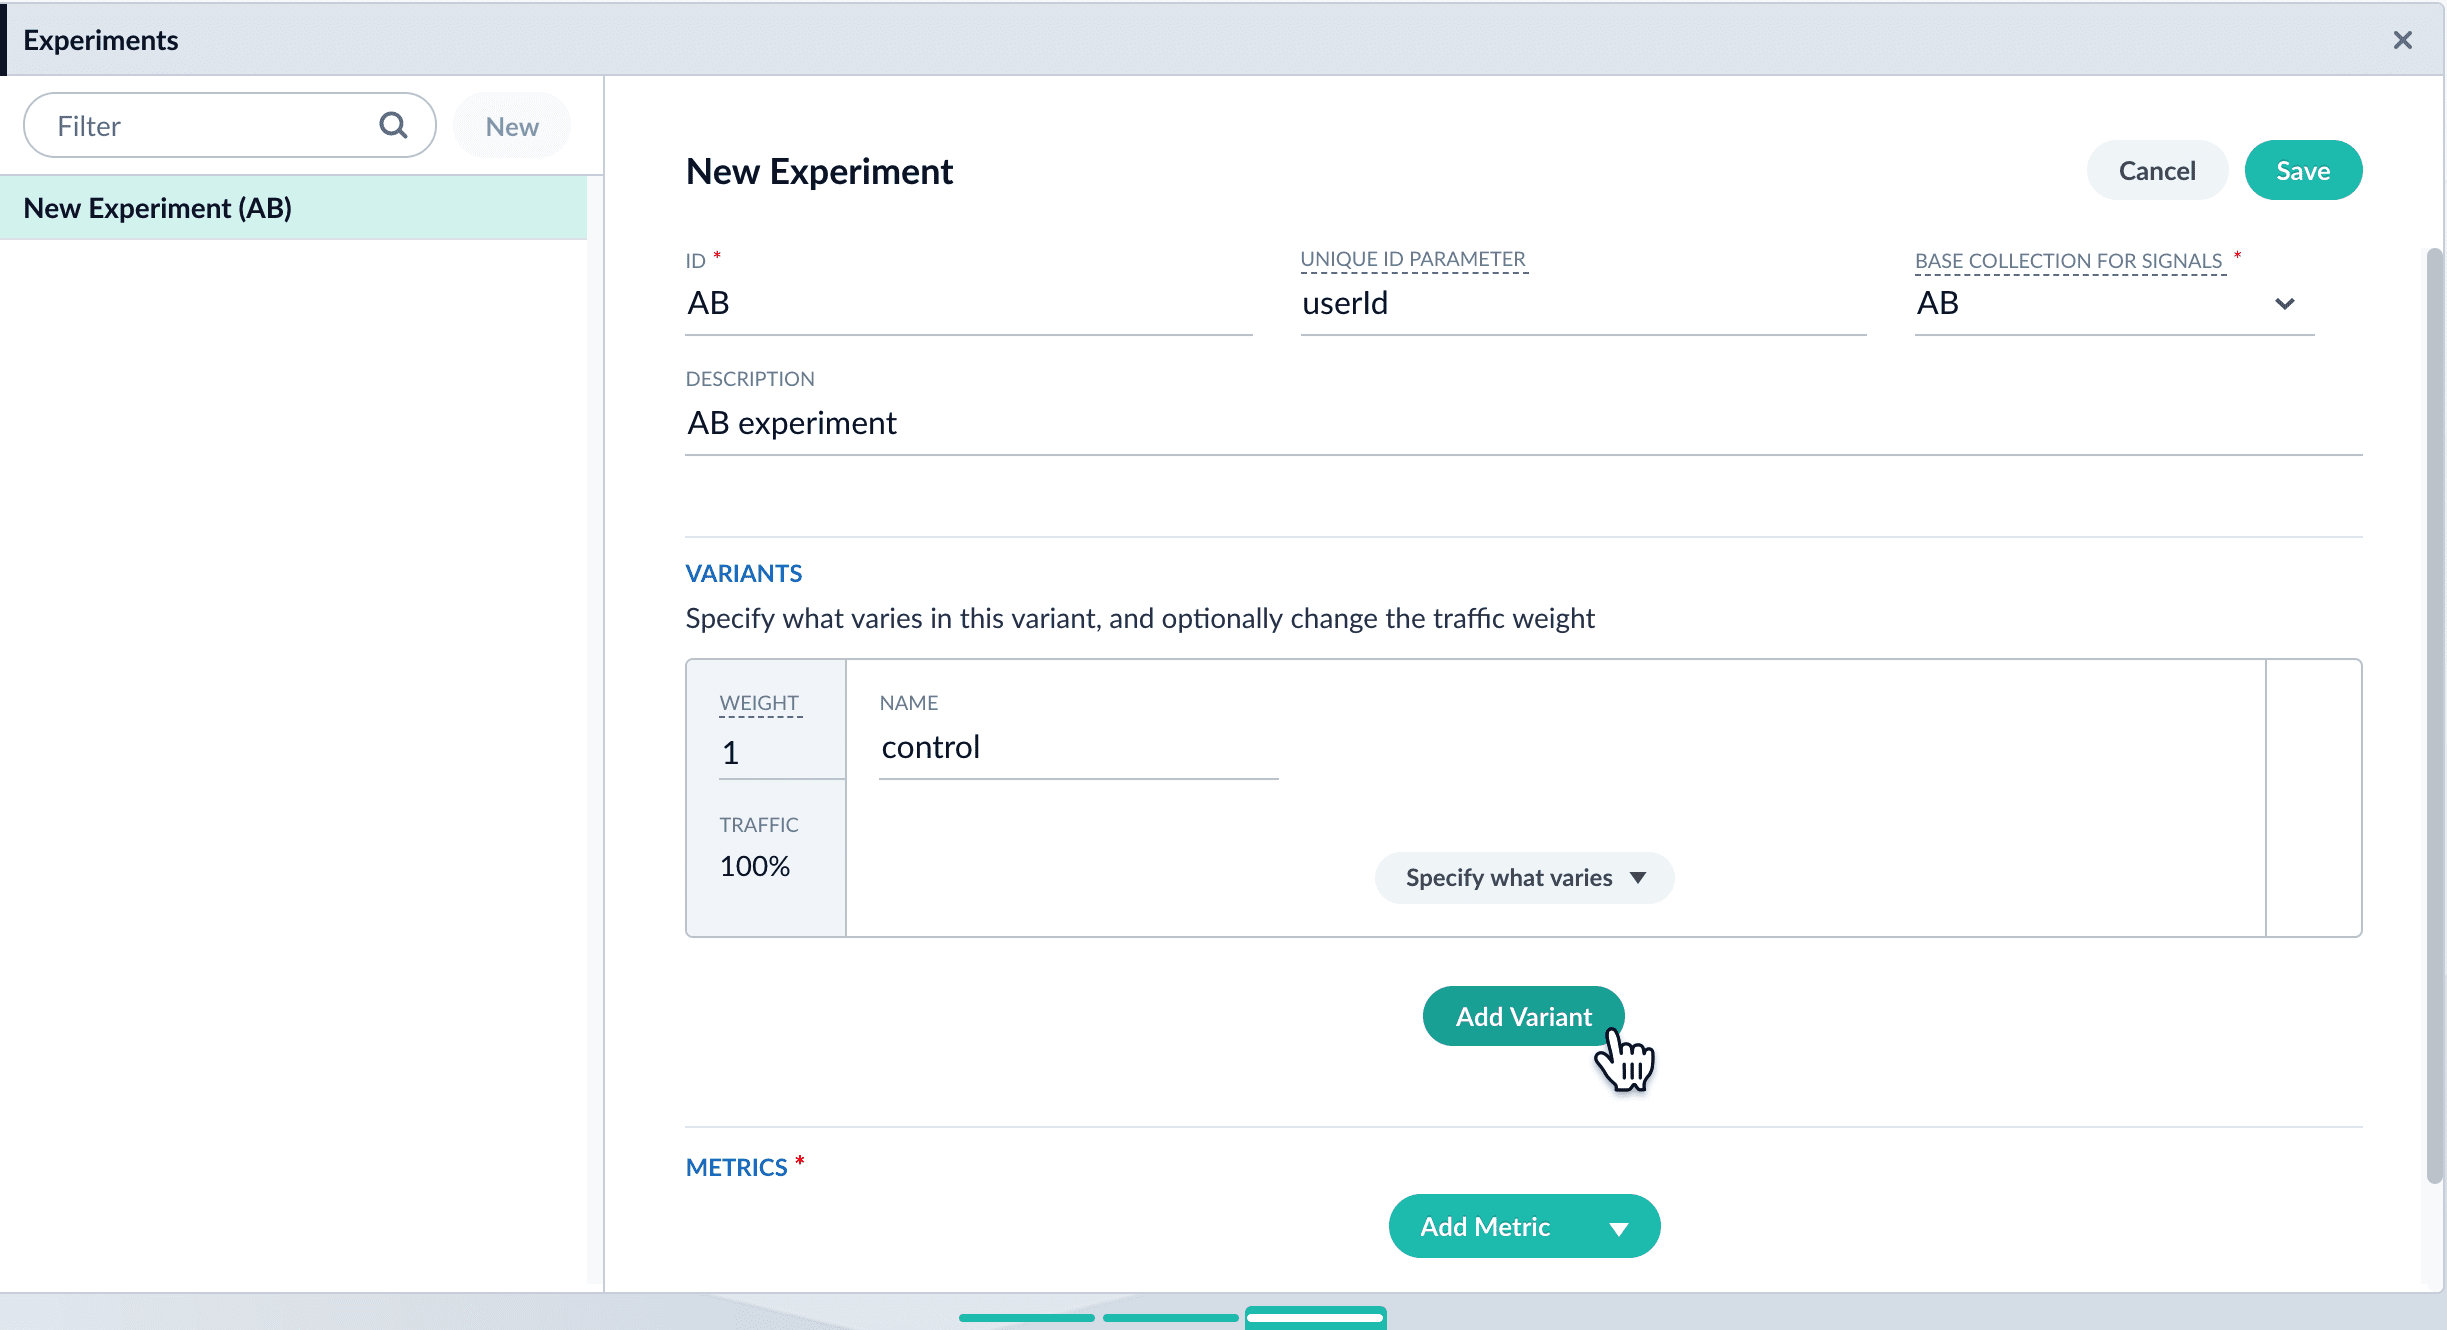
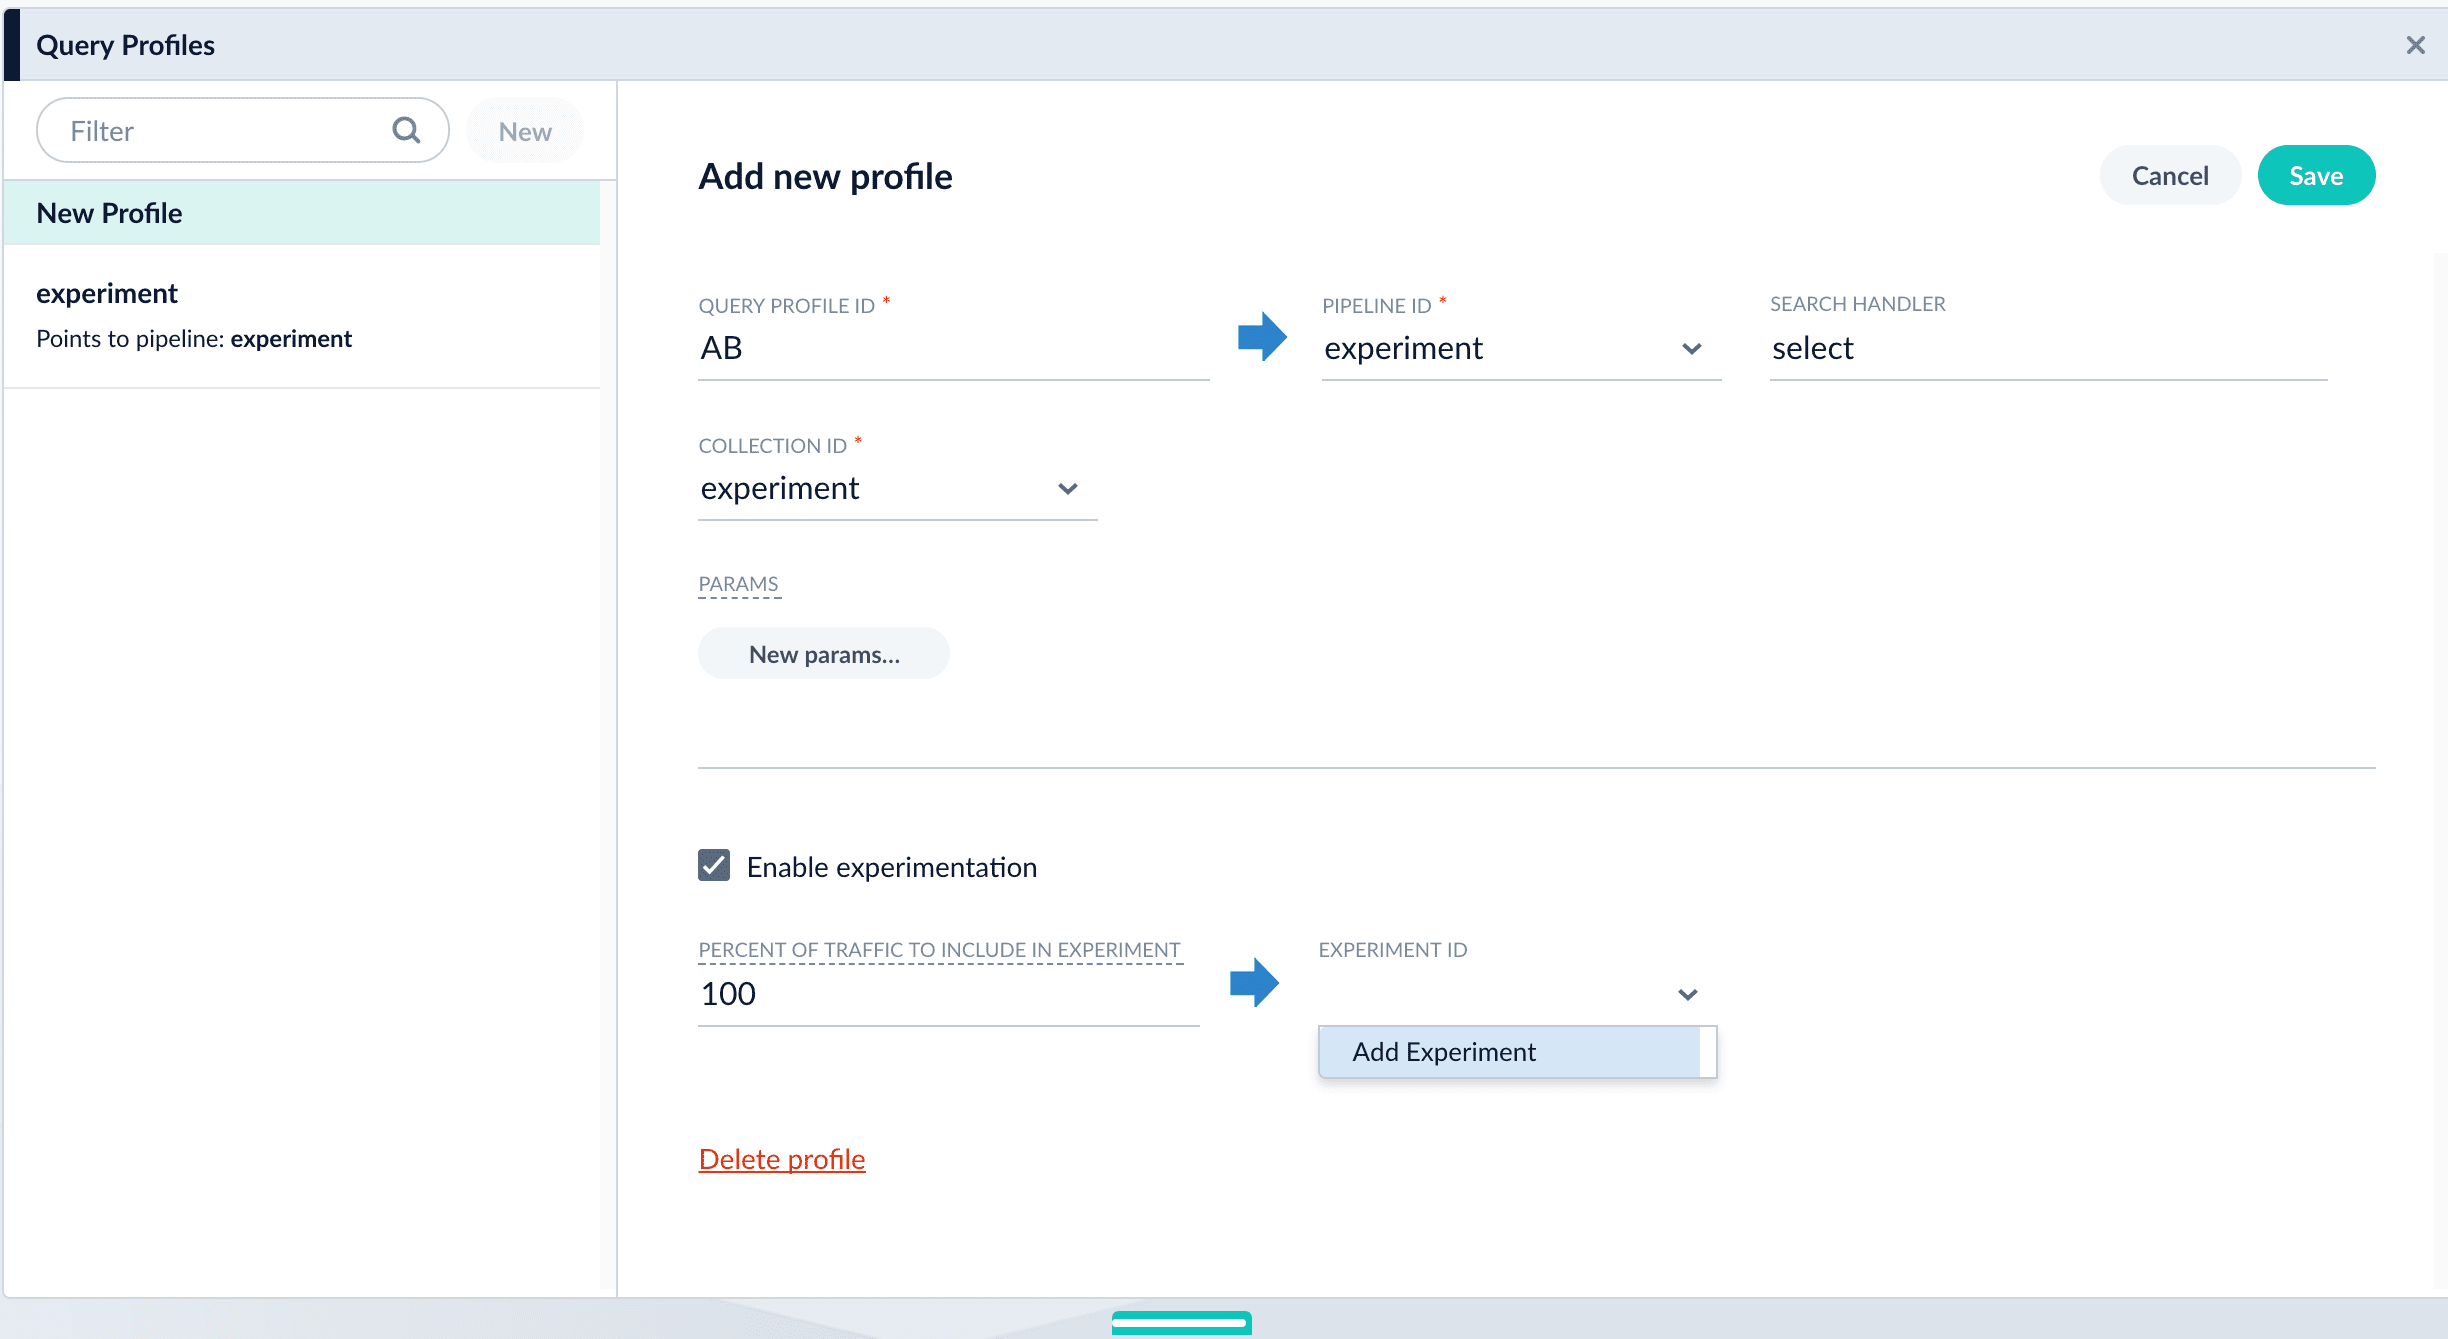 4. Enter an arbitrary **ID** (name) for the experiment.
5. Verify that the **unique ID parameter** is correct. It is the parameter that uniquely identifies each user. The default is `userId`. Correct the parameter if necessary, for example by specifying the session ID field instead.
6. Choose the base collection for signals. Signals resulting from requests that flow through the experiment are stored in the `_signals` collection associated with this collection.
7. (Optional) Enter a description for the experiment.
8. (Optional in Fusion 4.2+) To use a multi-armed bandit, select **Automatically Adjust Weights Between Variants**.
9. Add variants. Click **Add Variant** to add each non-control variant in your experiment.
4. Enter an arbitrary **ID** (name) for the experiment.
5. Verify that the **unique ID parameter** is correct. It is the parameter that uniquely identifies each user. The default is `userId`. Correct the parameter if necessary, for example by specifying the session ID field instead.
6. Choose the base collection for signals. Signals resulting from requests that flow through the experiment are stored in the `_signals` collection associated with this collection.
7. (Optional) Enter a description for the experiment.
8. (Optional in Fusion 4.2+) To use a multi-armed bandit, select **Automatically Adjust Weights Between Variants**.
9. Add variants. Click **Add Variant** to add each non-control variant in your experiment.
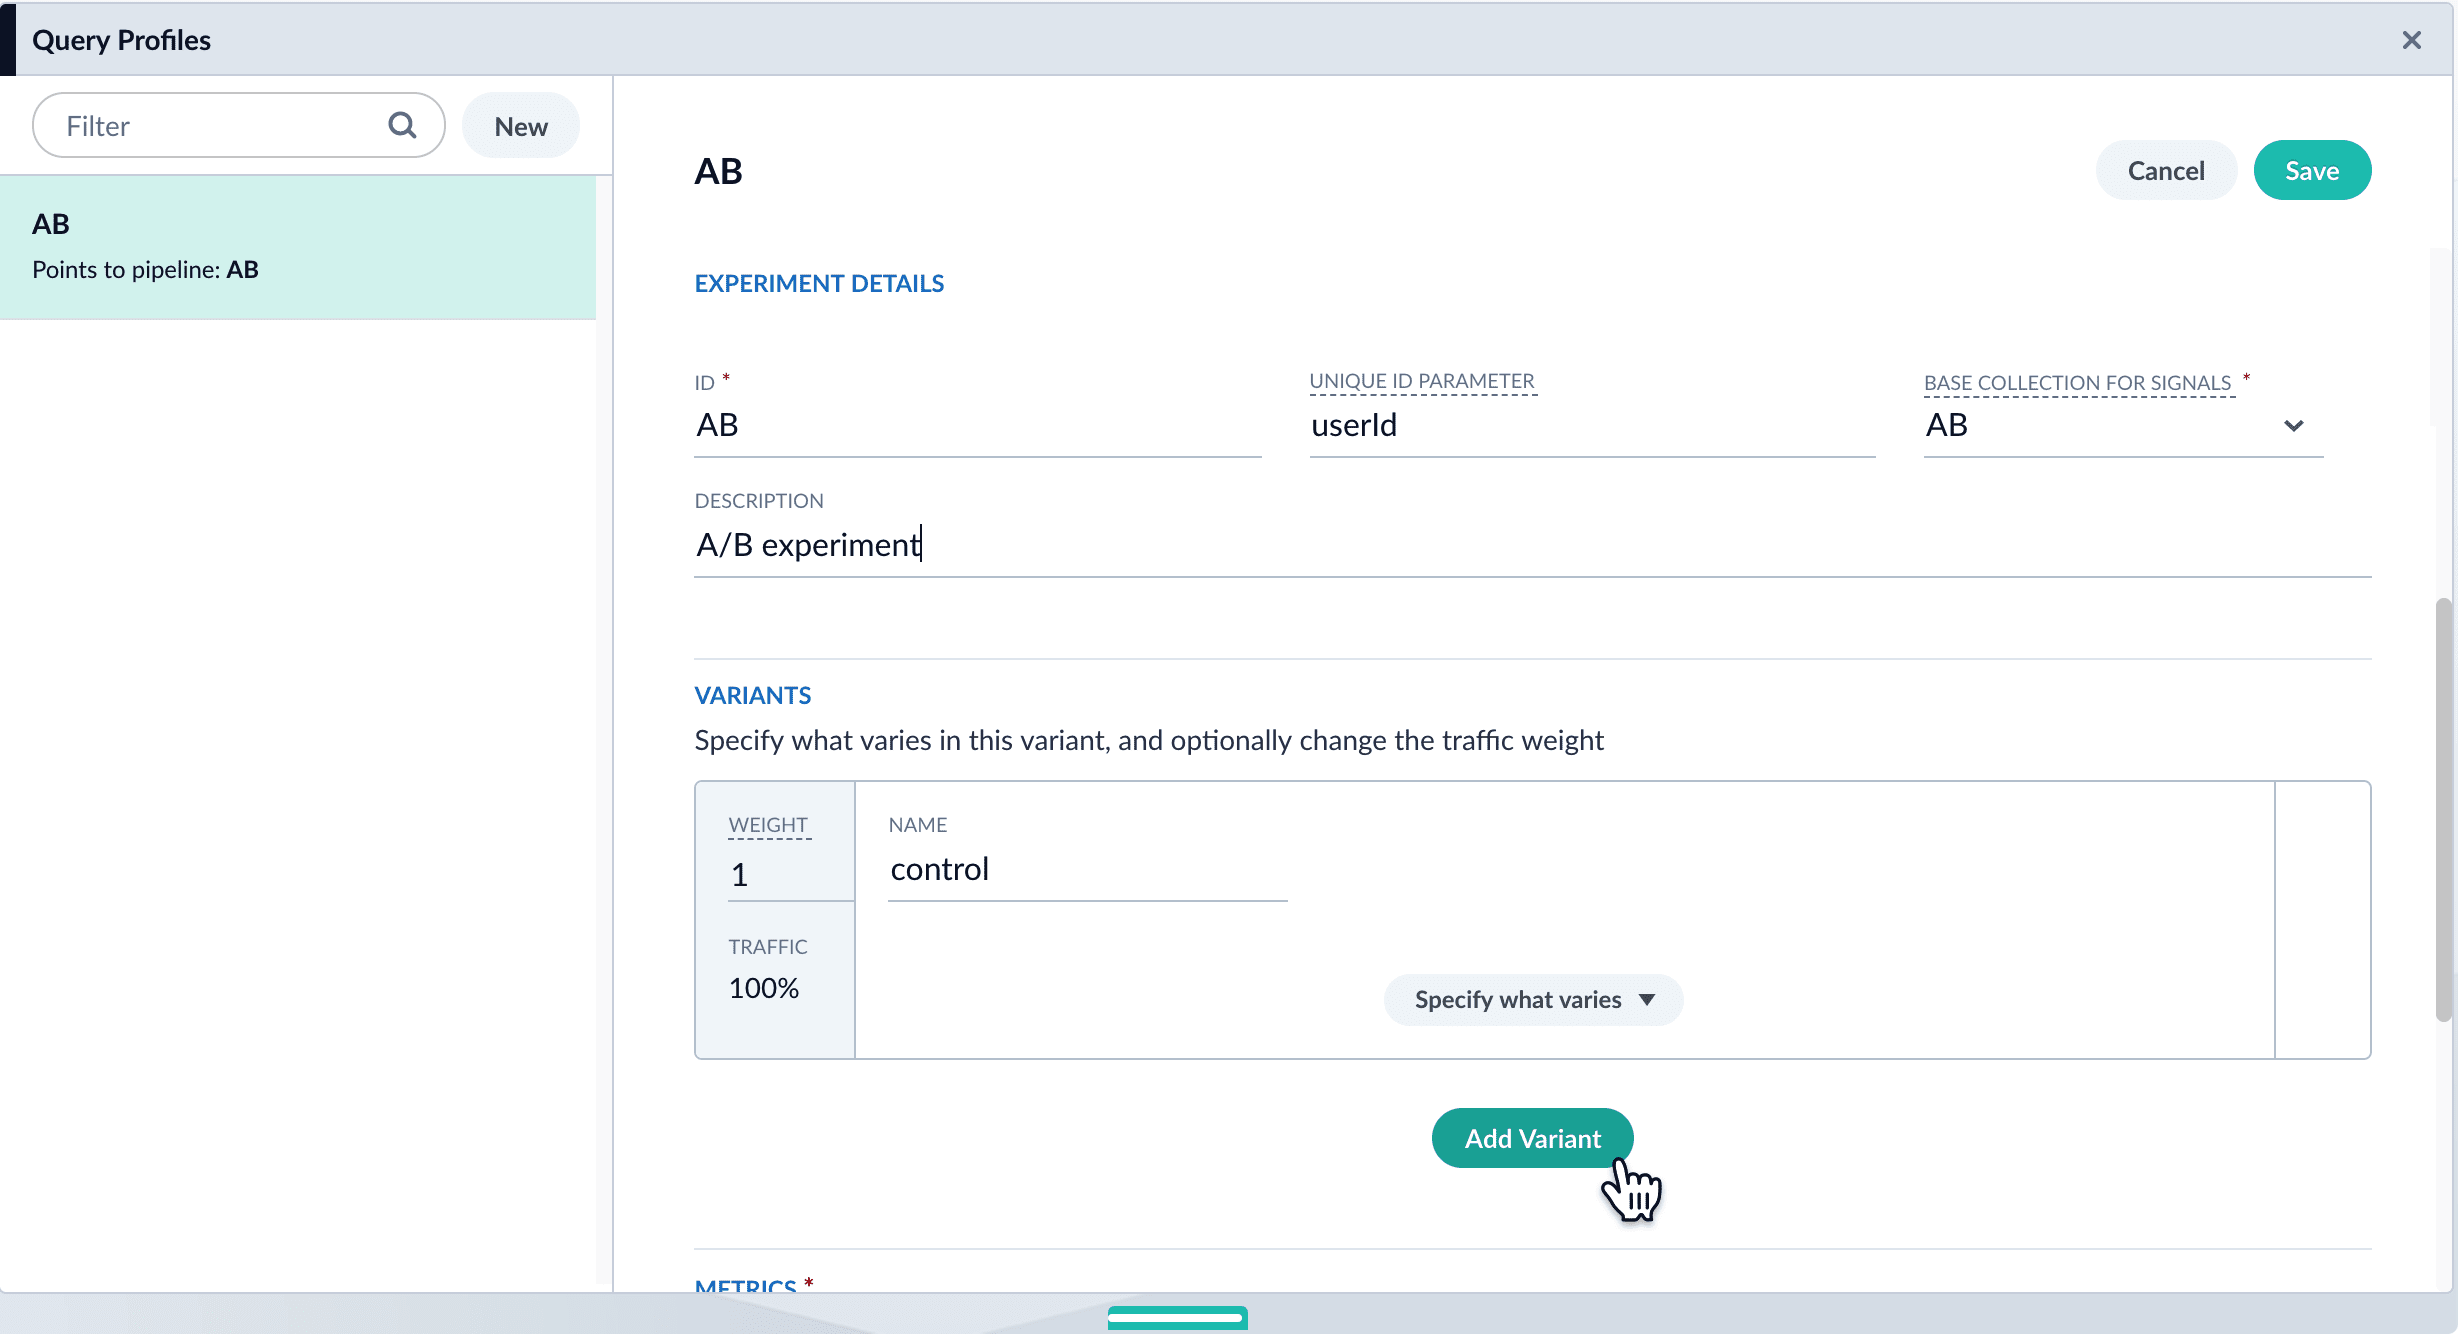 10. For each variant:
11. Enter an arbitrary name. For the first variant, which is the control, Fusion uses the name `control`. You can change that name if you wish.
12. Click **Specify what varies** and specify what varies. Items you select are visible in the variant UI and have a green check mark in the dropdown menu. You can vary the query pipeline, query parameters (URL parameters to add to the query), and/or the collection.
10. For each variant:
11. Enter an arbitrary name. For the first variant, which is the control, Fusion uses the name `control`. You can change that name if you wish.
12. Click **Specify what varies** and specify what varies. Items you select are visible in the variant UI and have a green check mark in the dropdown menu. You can vary the query pipeline, query parameters (URL parameters to add to the query), and/or the collection.
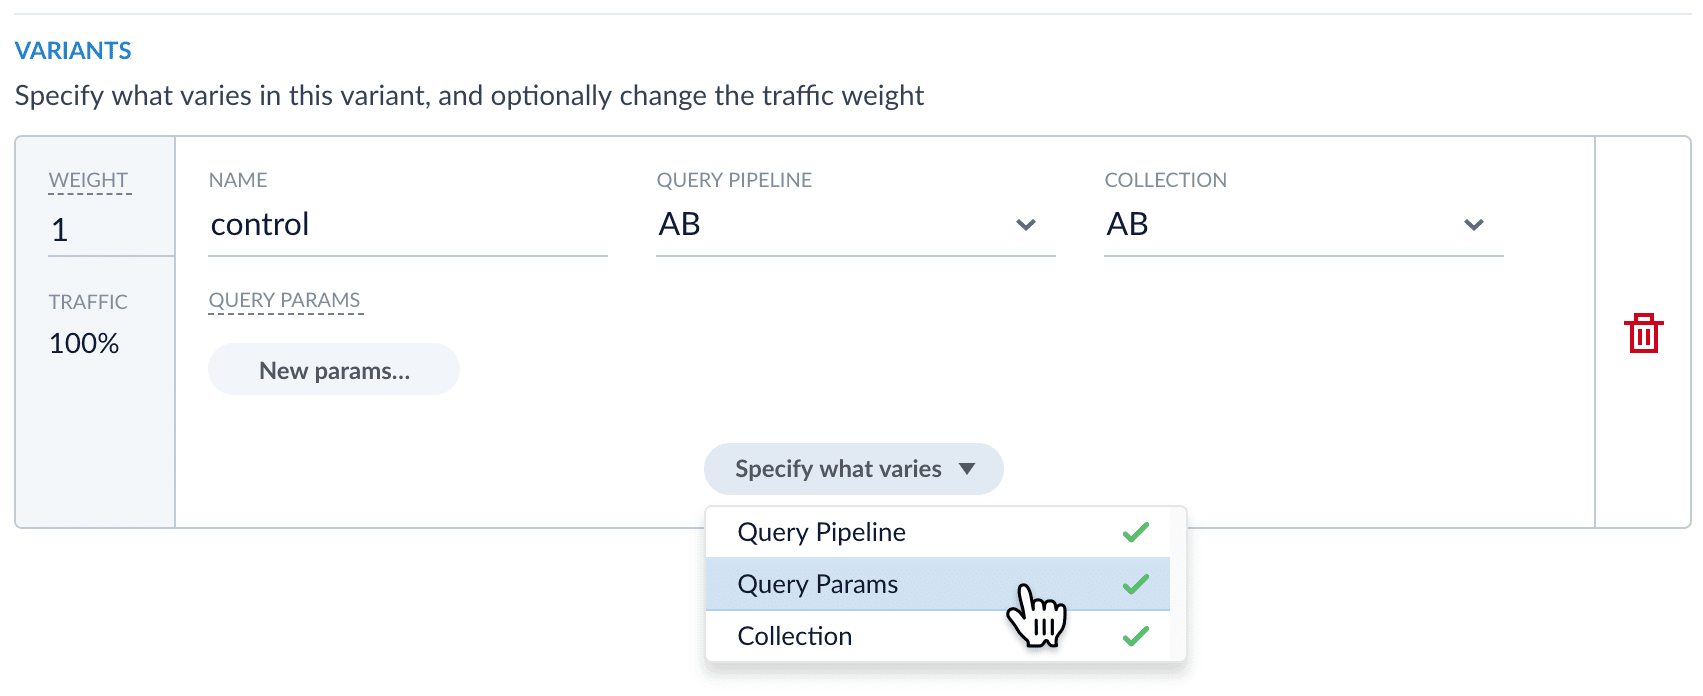 13. (*For query parameters*) Click **New params**. In the dialog box, specify the **Parameter Name**, **Parameter Value**, and **Update Policy** for each parameter (append, default, remove, or replace).
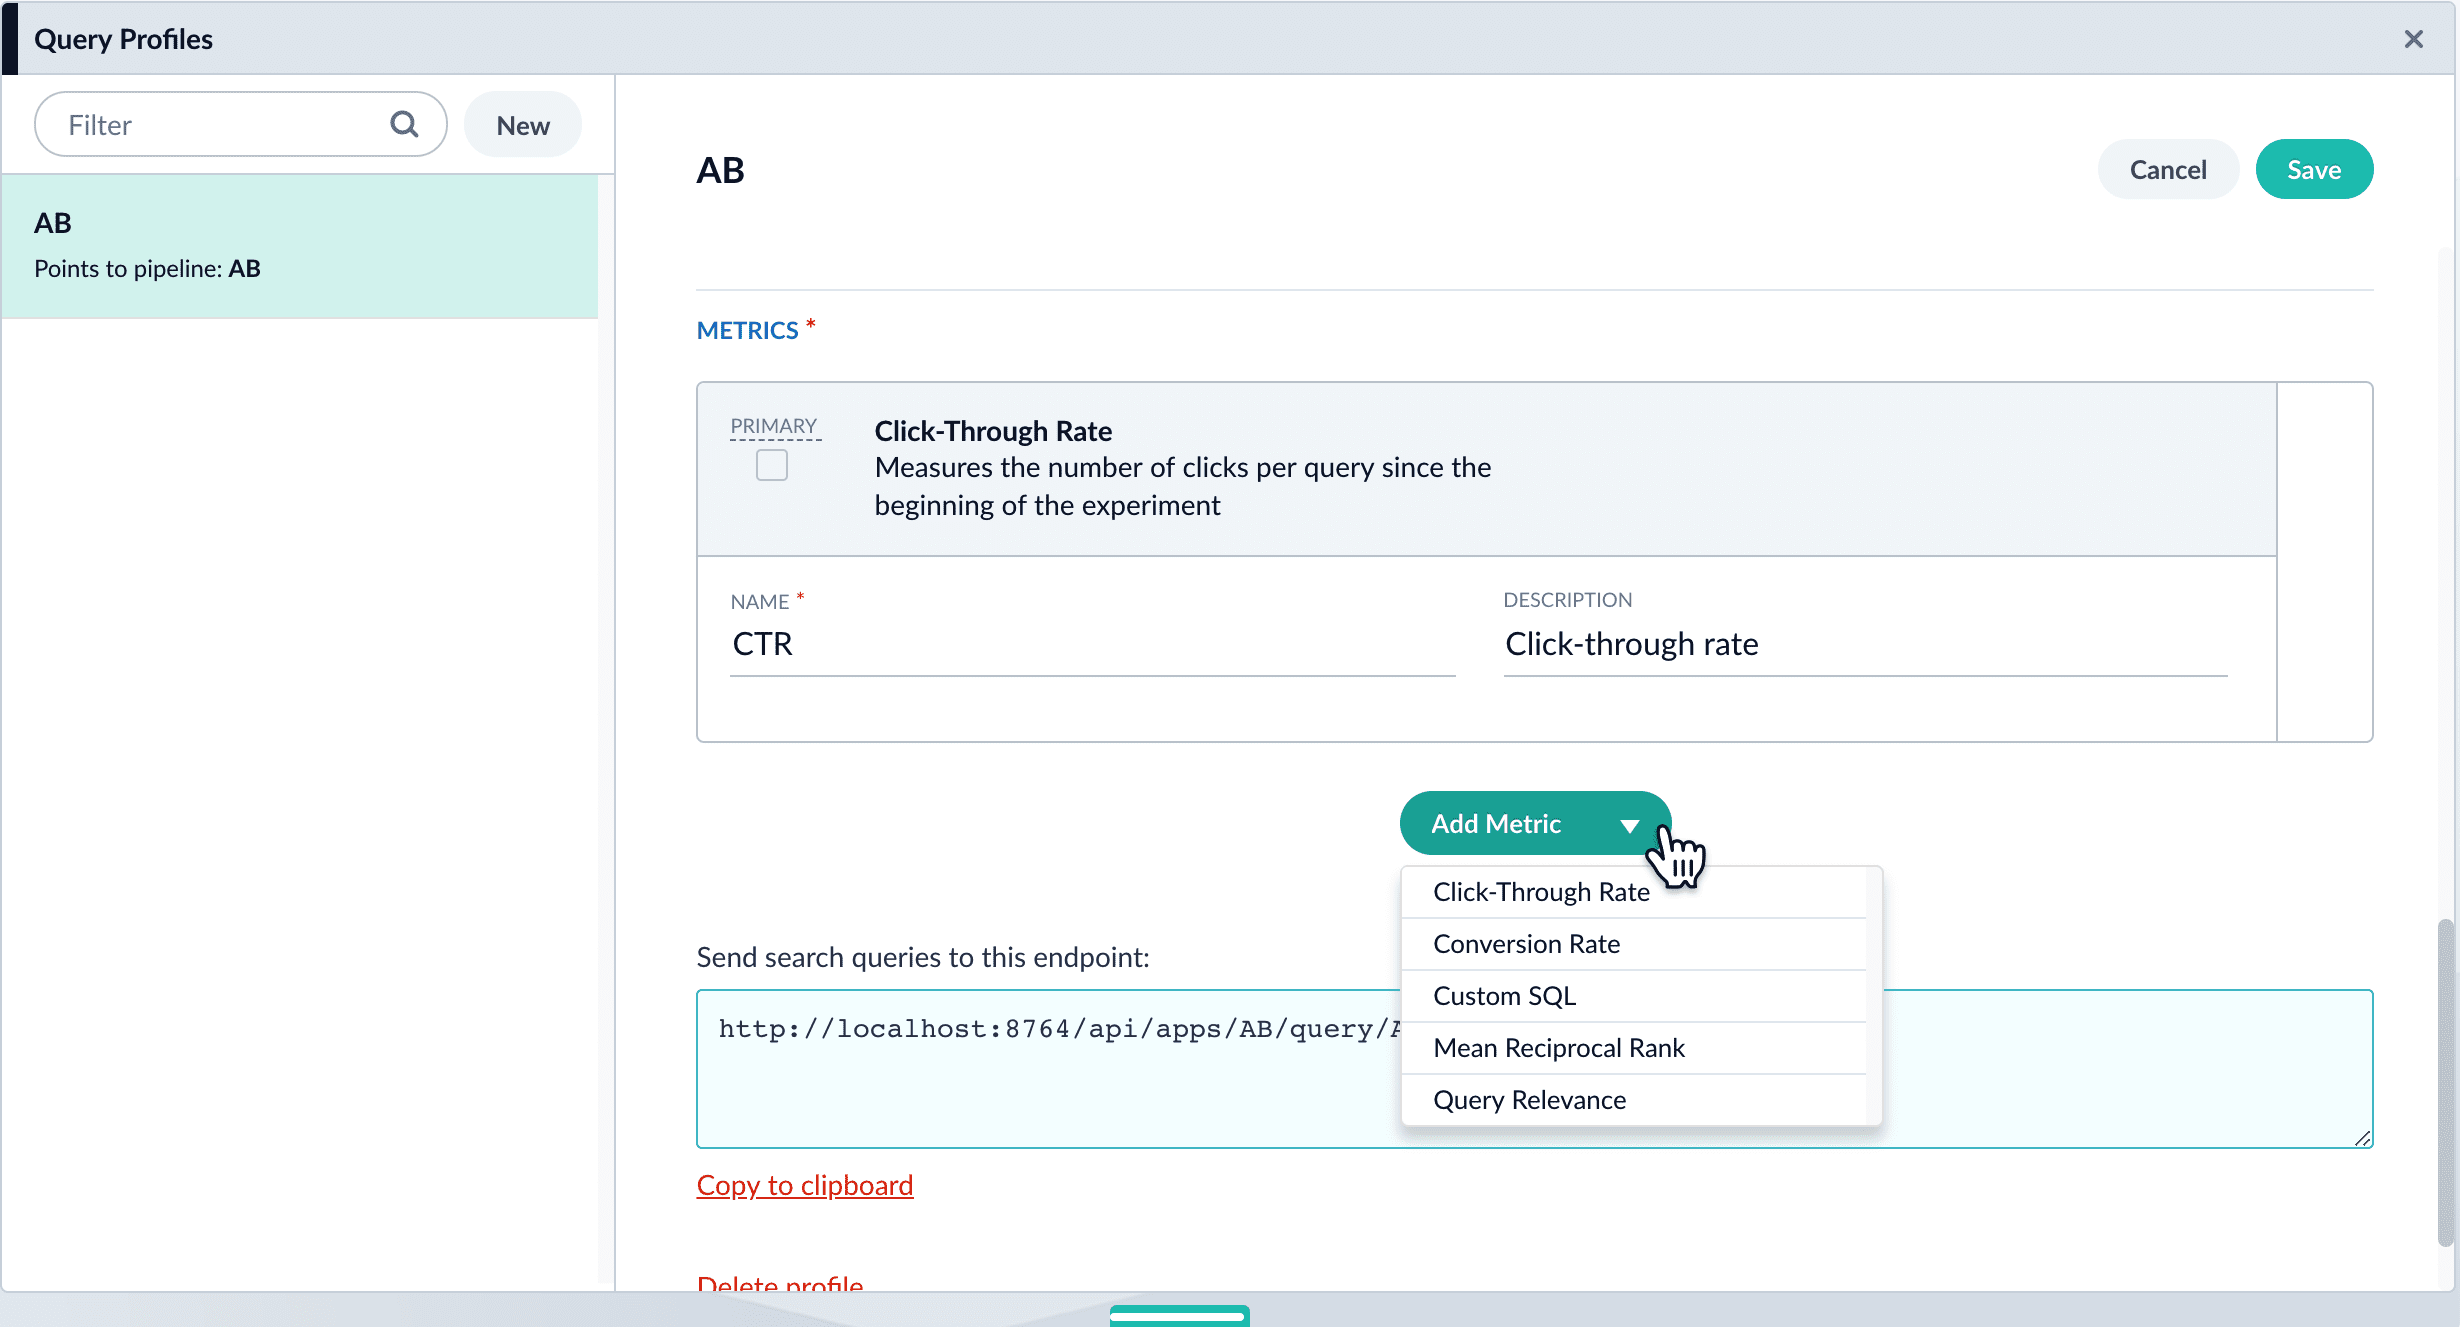
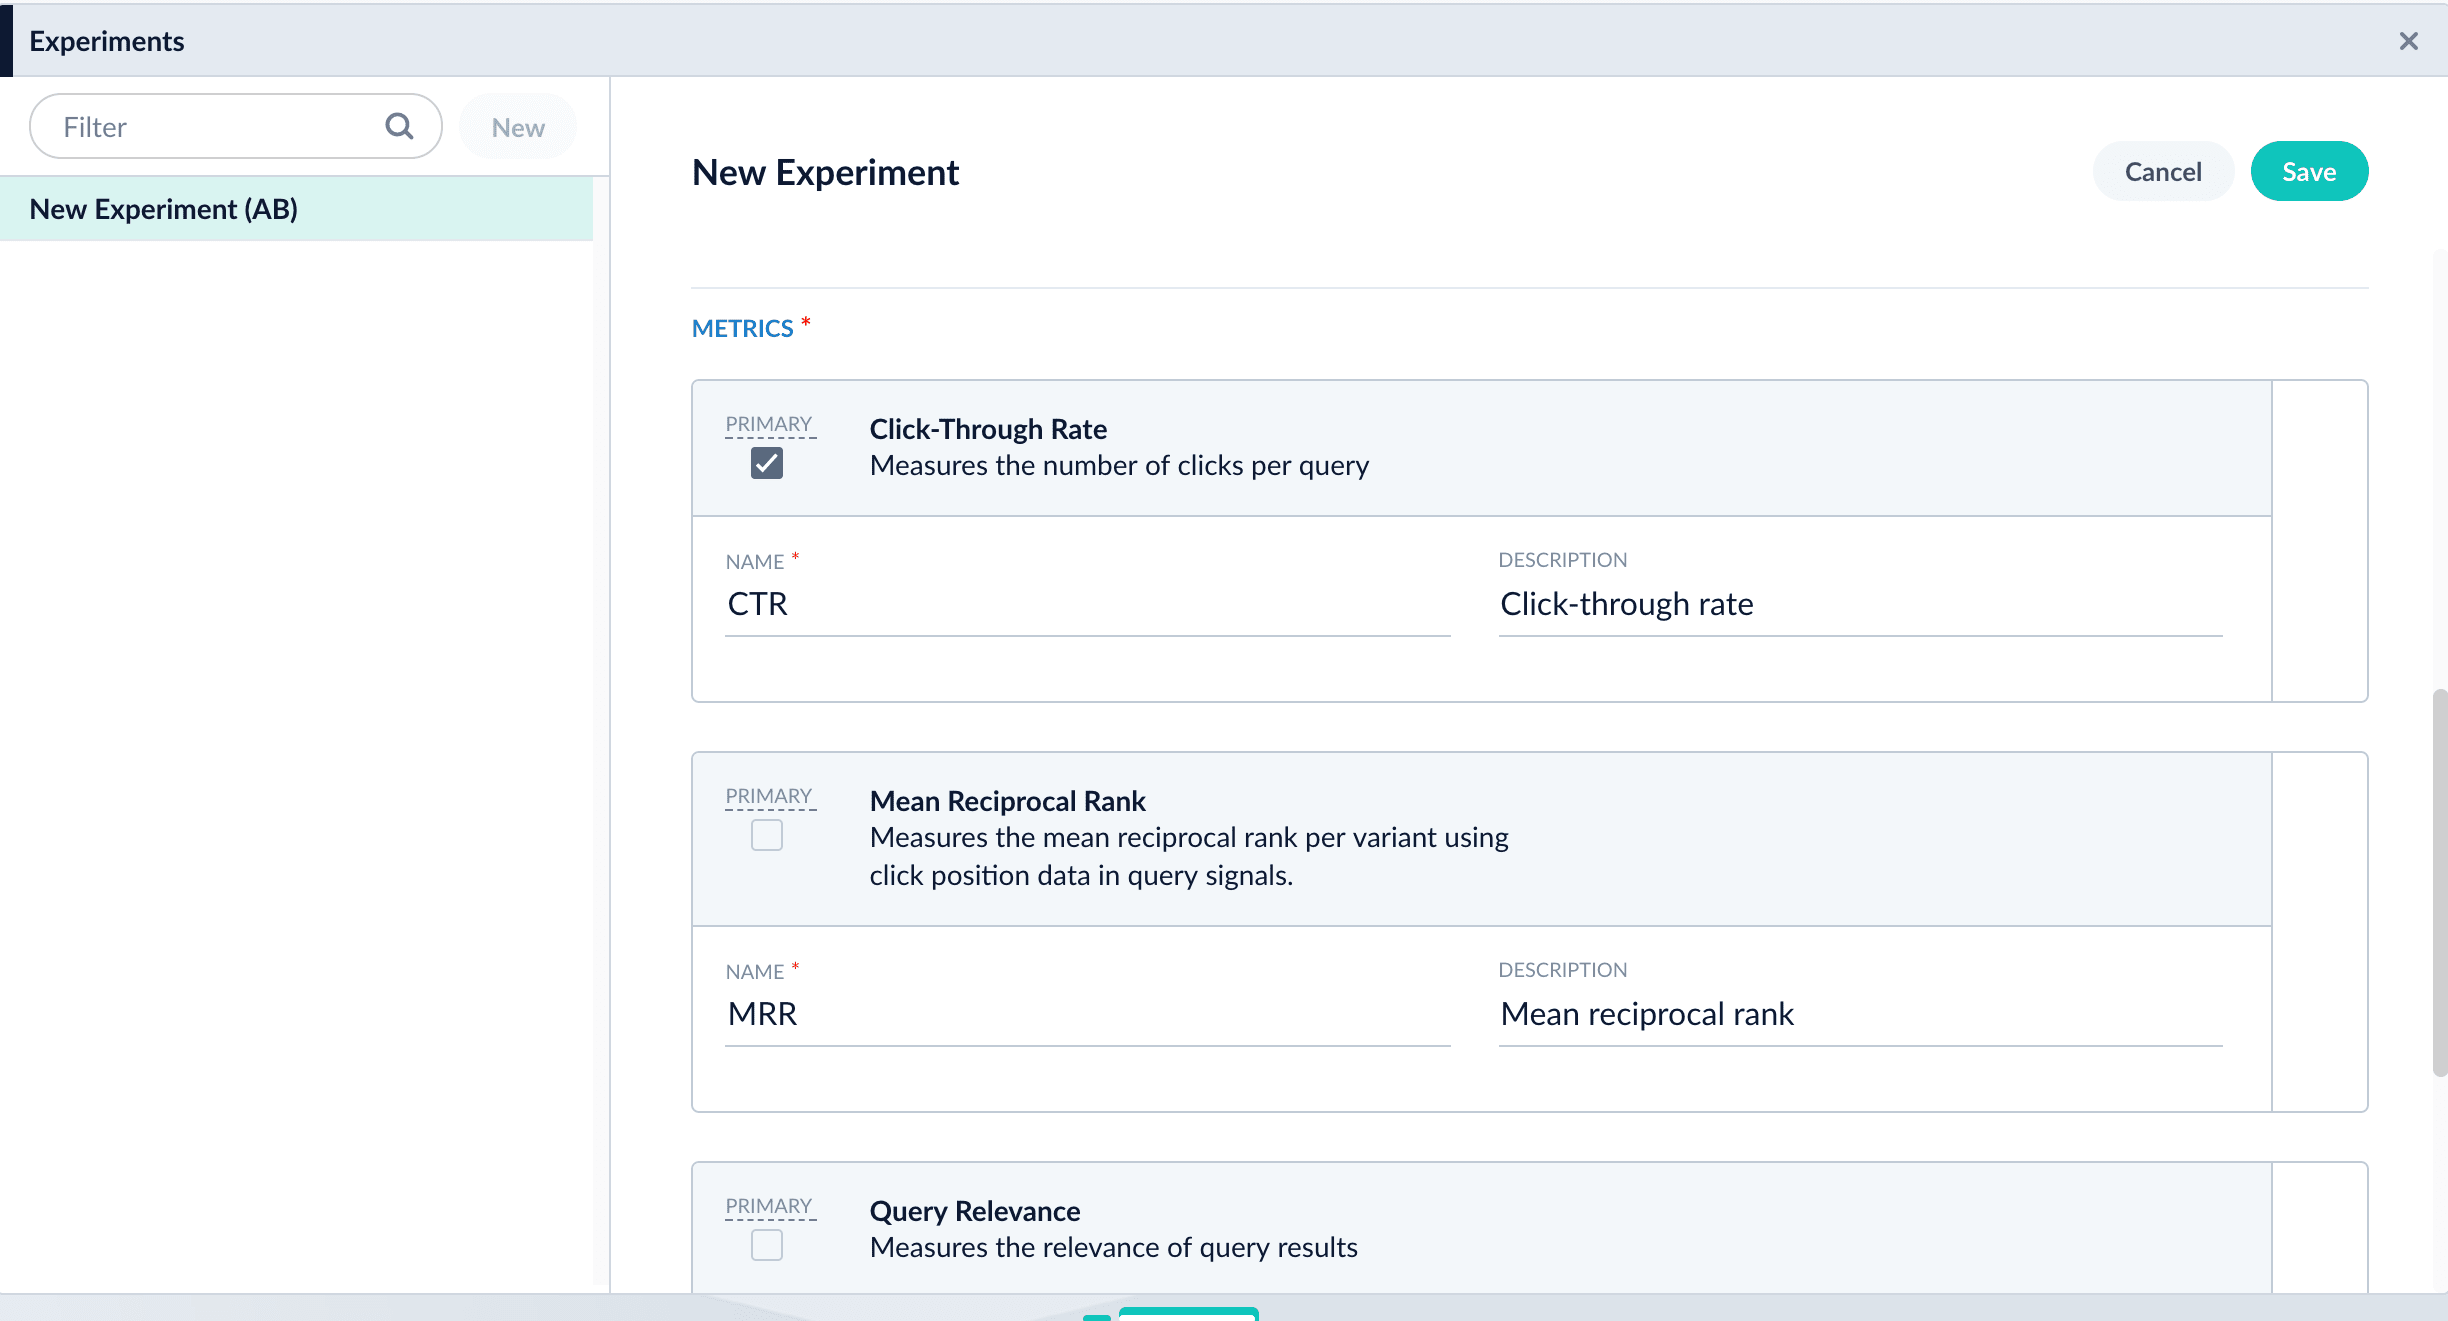
3. Add metrics. For each metric:
4. Click **Add Metric** and select the type of metric.
5. Fill in information for the metric.
13. (*For query parameters*) Click **New params**. In the dialog box, specify the **Parameter Name**, **Parameter Value**, and **Update Policy** for each parameter (append, default, remove, or replace).
3. Add metrics. For each metric:
4. Click **Add Metric** and select the type of metric.
5. Fill in information for the metric.
 6. Click **Save** to save the experiment.
### Option B: Create the experiment in the Experiments UI
You can create the experiment first and reference it from a query profile.
{/* // tag::create-experiment[] */}
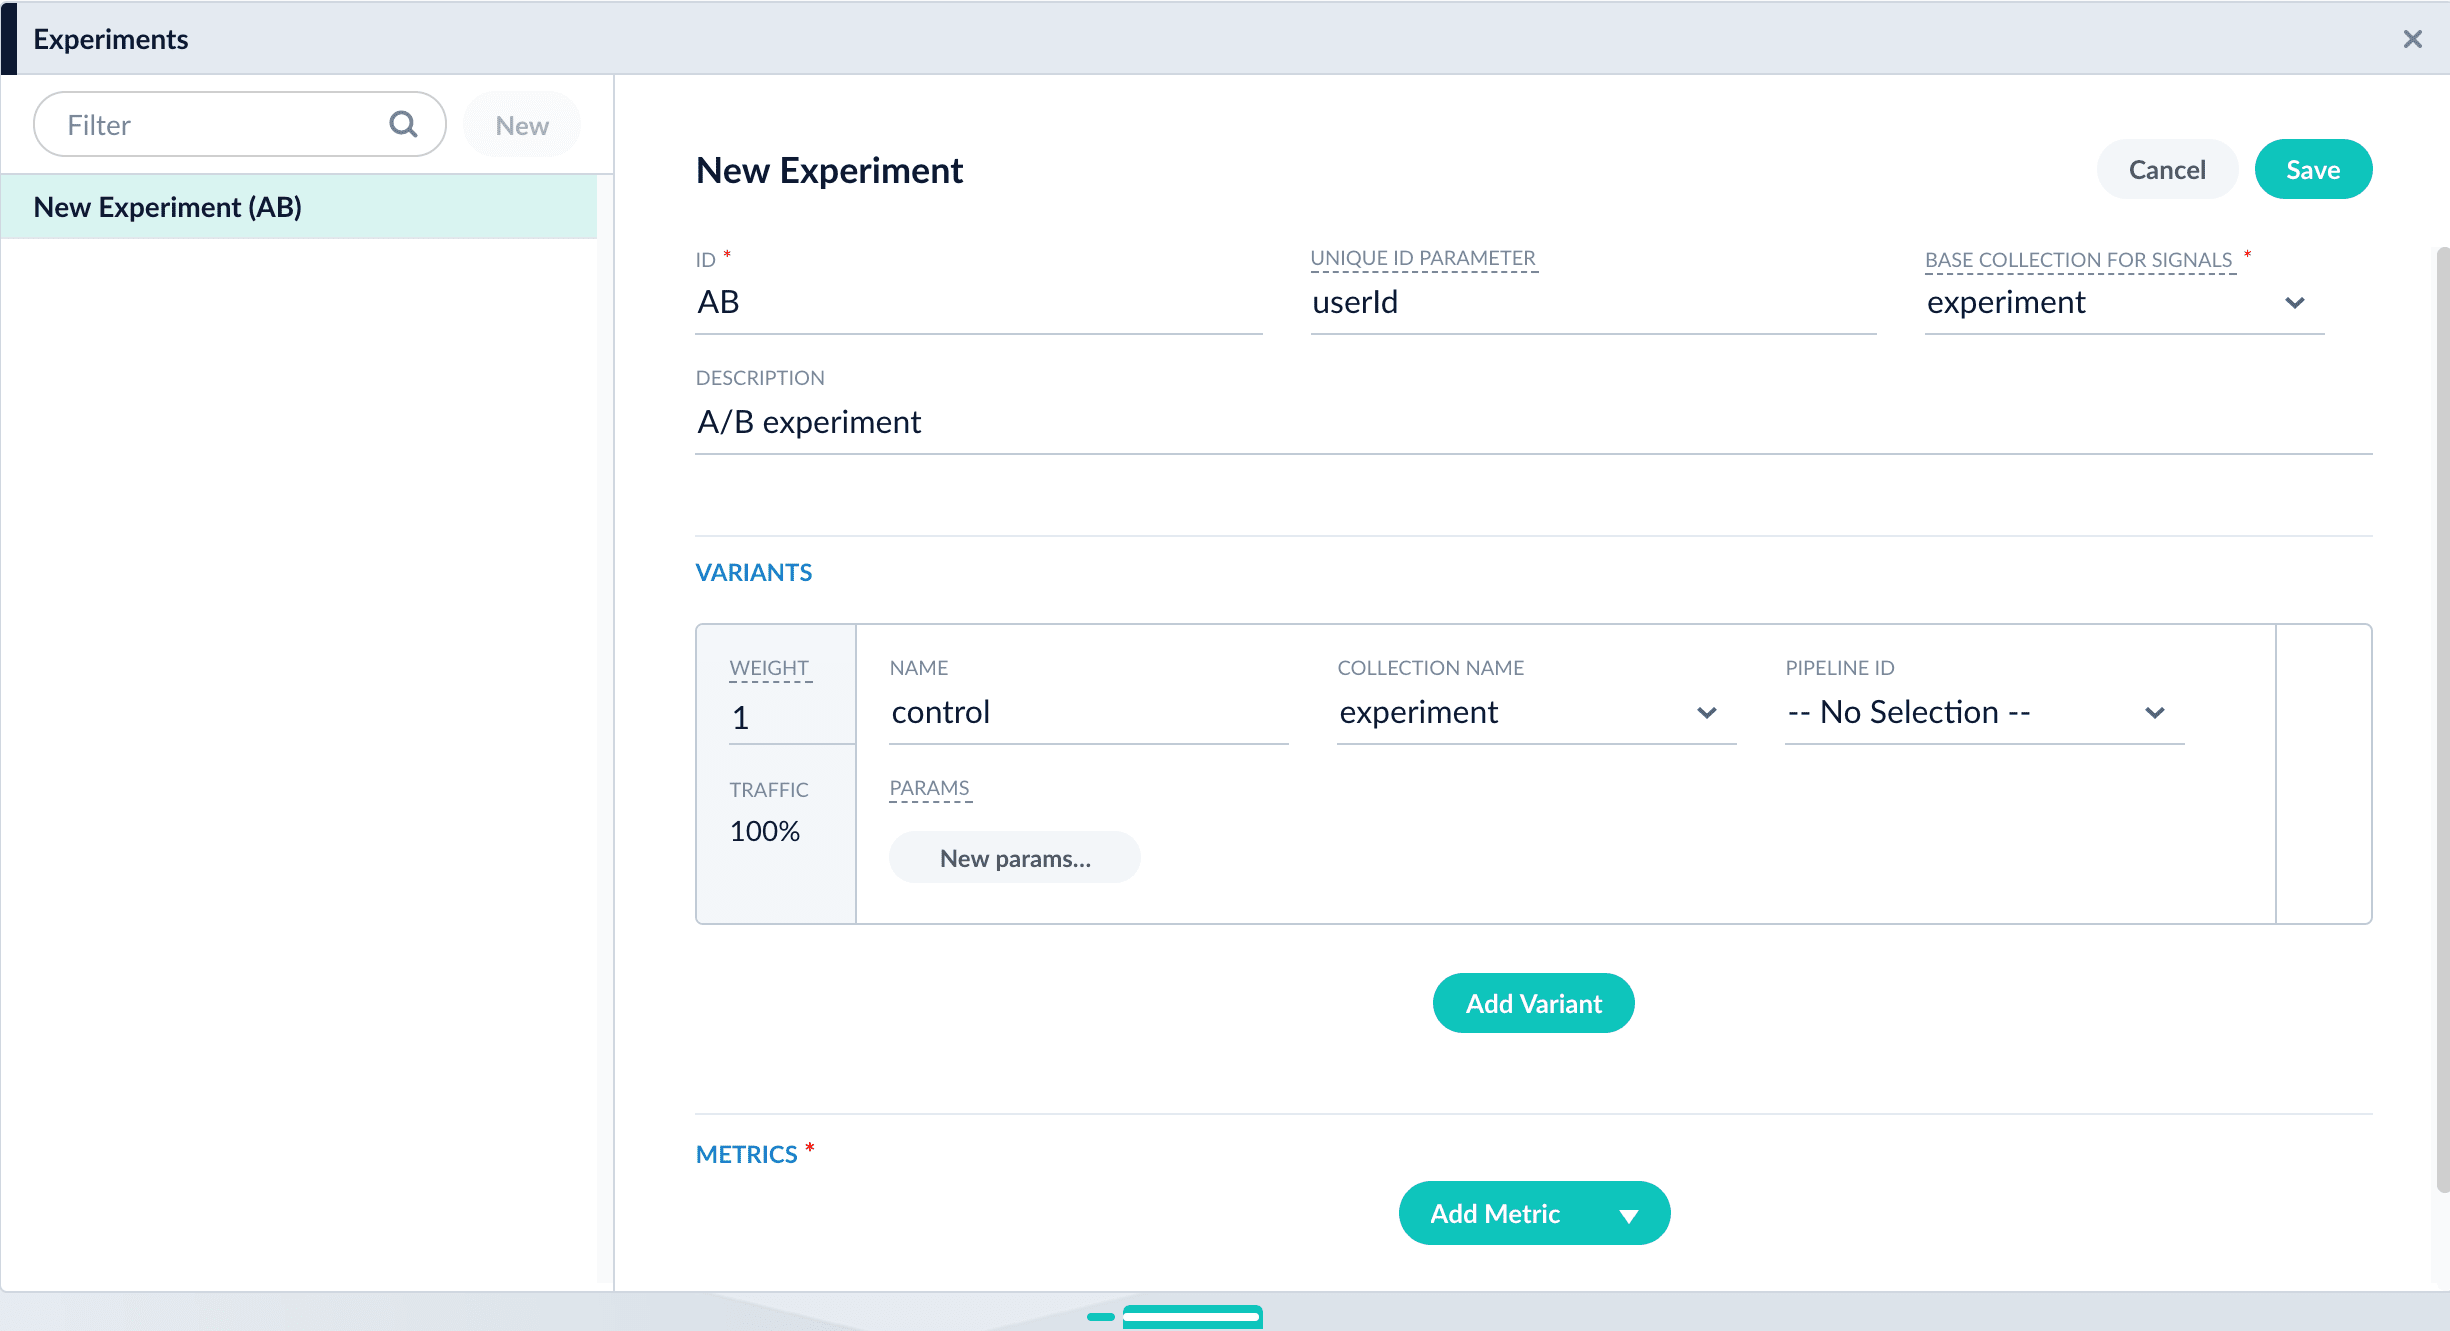
1. **Create an experiment.** The experiment defines variants and metrics, as well as the user ID parameter and the base collection for signals:
2. Navigate to Analytics > **Experiments**.
3. Click **New**.
4. Enter an arbitrary **ID** (name) for the experiment.
5. Verify that the **unique ID parameter** is correct. It is the parameter that uniquely identifies each user. The default is `userId`. Correct the parameter if necessary, for example by specifying the session ID field instead.
6. Choose the base collection for signals. Signals resulting from requests that flow through the experiment are stored in the `_signals` collection associated with this collection.
7. (Optional) Enter a description for the experiment.
6. Click **Save** to save the experiment.
### Option B: Create the experiment in the Experiments UI
You can create the experiment first and reference it from a query profile.
{/* // tag::create-experiment[] */}
1. **Create an experiment.** The experiment defines variants and metrics, as well as the user ID parameter and the base collection for signals:
2. Navigate to Analytics > **Experiments**.
3. Click **New**.
4. Enter an arbitrary **ID** (name) for the experiment.
5. Verify that the **unique ID parameter** is correct. It is the parameter that uniquely identifies each user. The default is `userId`. Correct the parameter if necessary, for example by specifying the session ID field instead.
6. Choose the base collection for signals. Signals resulting from requests that flow through the experiment are stored in the `_signals` collection associated with this collection.
7. (Optional) Enter a description for the experiment.
 8. (Optional in Fusion 4.2+) To use a multi-armed bandit, select **Automatically Adjust Weights Between Variants**.
9. Add variants. Click **Add Variant** to add each non-control variant in your experiment.
8. (Optional in Fusion 4.2+) To use a multi-armed bandit, select **Automatically Adjust Weights Between Variants**.
9. Add variants. Click **Add Variant** to add each non-control variant in your experiment.
 10. For each variant:
11. Enter an arbitrary name. For the first variant, which is the control, Fusion uses the name `control`. You can change that name if you wish.
12. Click **Specify what varies** and specify what varies. Items you select are visible in the variant UI and have a green check mark in the dropdown menu. You can vary the query pipeline, query parameters (URL parameters to add to the query), and/or the collection.
13. (*For query parameters*) Click **New params**. In the dialog box, specify the **Parameter Name**, **Parameter Value**, and **Update Policy** for each parameter (append, default, remove, or replace).
14. Add metrics. For each metric:
15. Click **Add Metric** and select the type of metric.
16. Fill in information for the metric.
10. For each variant:
11. Enter an arbitrary name. For the first variant, which is the control, Fusion uses the name `control`. You can change that name if you wish.
12. Click **Specify what varies** and specify what varies. Items you select are visible in the variant UI and have a green check mark in the dropdown menu. You can vary the query pipeline, query parameters (URL parameters to add to the query), and/or the collection.
13. (*For query parameters*) Click **New params**. In the dialog box, specify the **Parameter Name**, **Parameter Value**, and **Update Policy** for each parameter (append, default, remove, or replace).
14. Add metrics. For each metric:
15. Click **Add Metric** and select the type of metric.
16. Fill in information for the metric.
 17. Click **Save** to save the experiment.
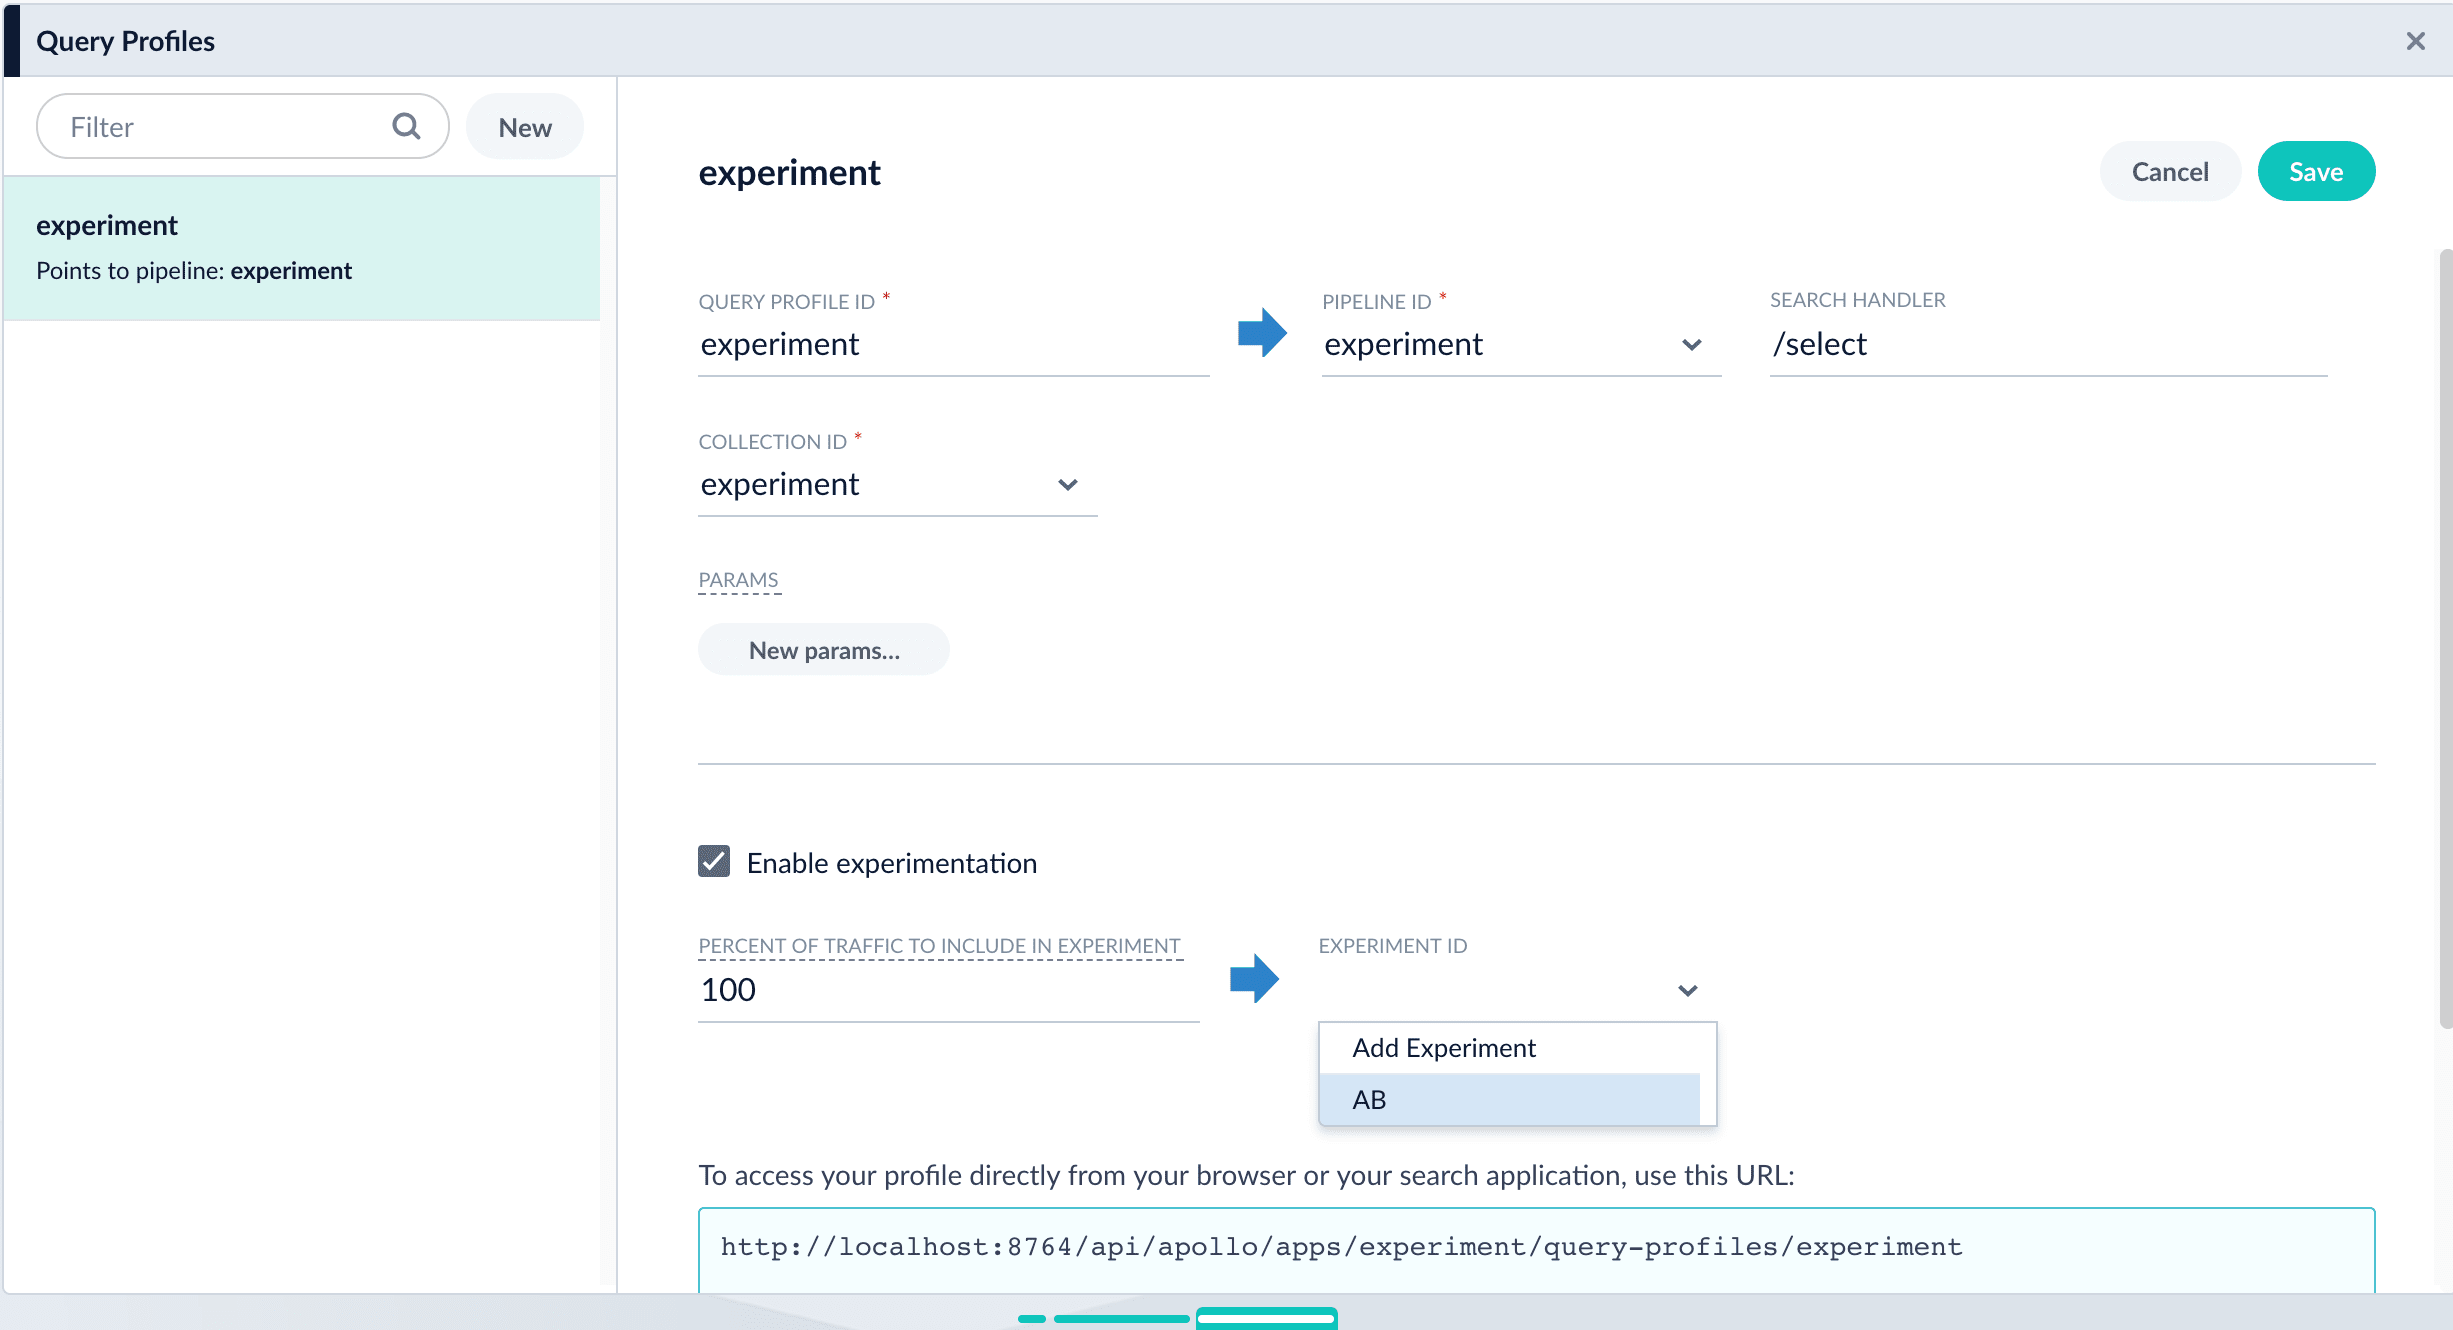
18. **Reference the experiment from the query profile.** Open the query profile you want to use for the experiment.
1. Navigate to Querying > **Query Profiles**.
2. Click the query profile you want to use for the experiment.
3. (Optional) If necessary, modify the query profile ID, default pipeline, and/or the search handler. These modifications are not related to experiments and are probably not required.
4. (Optional) Click **New params** and specify URL parameters to add to all queries for this query profile.
5. Click the checkbox in front of **Enable experimentation**.
6. Specify the percent of traffic to include in the experiment.
7. Click the , and then click the experiment name.
17. Click **Save** to save the experiment.
18. **Reference the experiment from the query profile.** Open the query profile you want to use for the experiment.
1. Navigate to Querying > **Query Profiles**.
2. Click the query profile you want to use for the experiment.
3. (Optional) If necessary, modify the query profile ID, default pipeline, and/or the search handler. These modifications are not related to experiments and are probably not required.
4. (Optional) Click **New params** and specify URL parameters to add to all queries for this query profile.
5. Click the checkbox in front of **Enable experimentation**.
6. Specify the percent of traffic to include in the experiment.
7. Click the , and then click the experiment name.
 8\. Click **Save** to save the query profile.
## Next step
You have set up the experiment. Alternatively, you will set it up using an Experiment stage. If you chose to use this article for setting up your experiment, you can skip the next article.
## Known issues
None.
8\. Click **Save** to save the query profile.
## Next step
You have set up the experiment. Alternatively, you will set it up using an Experiment stage. If you chose to use this article for setting up your experiment, you can skip the next article.
## Known issues
None.